background image

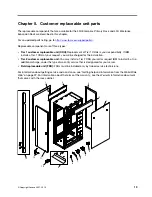
Chapter 5. Customer replaceable unit parts

The replaceable components that are available for the 42U Enterprise Primary Rack and 42U Enterprise 
Expansion Rack are described in this chapter.

For an updated parts listing, go to 

http://www.ibm.com/supportportal/

.

Replaceable components are of three types: 

• 

Tier 1 customer replaceable unit (CRU): 

Replacement of Tier 1 CRUs is your responsibility. If IBM 

installs a Tier 1 CRU at your request, you will be charged for the installation.

• 

Tier 2 customer replaceable unit: 

You may install a Tier 2 CRU yourself or request IBM to install it, at no 

additional charge, under the type of warranty service that is designated for your server.

• 

Field replaceable unit (FRU): 

FRUs must be installed only by trained service technicians.

For information about getting service and assistance, see “Getting help and information from the World Wide 
Web” on page 22. For information about the terms of the warranty , see the 

Warranty Information 

document 

that comes with the rack cabinet.

1

2

3

4

7

8

9

1

2

5

10

11

12

6

13

© Copyright Lenovo 2001, 2010

19

Содержание 9308-4EX

Страница 1: ...Lenovo 42U Enterprise Primary Rack and 42U Enterprise Expansion Rack Installation Guide ...

Страница 2: ... Guide documents on the Lenovo Documentation CD and the Important Notices document that comes with the product Second Edition August 2018 Copyright Lenovo 2001 2010 LIMITED AND RESTRICTED RIGHTS NOTICE If data or software is delivered pursuant to a General Services Administration GSA contract use reproduction or disclosure is subject to restrictions set forth in Contract No GS 35F 05925 ...

Страница 3: ...ng help and technical assistance 21 Before you call 21 Using the documentation 22 Getting help and information from the World Wide Web 22 How to send DSA data 22 Creating a personalized support web page 22 Software service and support 23 Hardware service and support 23 Taiwan product service 23 Appendix B Notices 25 Trademarks 26 Important notes 26 Particulate contamination 26 Telecommunication re...

Страница 4: ...duct installeert eerst de veiligheidsvoorschriften Ennen kuin asennat tämän tuotteen lue turvaohjeet kohdasta Safety Information Avant d installer ce produit lisez les consignes de sécurité Vor der Installation dieses Produkts die Sicherheitshinweise lesen Prima di installare questo prodotto leggere le Informazioni sulla Sicurezza Les sikkerhetsinformasjonen Safety Information før du installerer d...

Страница 5: ...labeled Statement 1 translations for that caution statement are in the Lenovo Rack Safety Information document under Statement 1 Be sure to read all caution and danger statements in this document before you perform the procedures Read any additional safety information that comes with the server or optional device before you install the device Statement 1 CAUTION To ensure safety all configurations...

Страница 6: ...optional devices starting from the bottom of the rack cabinet Always install the heaviest devices in the bottom of the rack cabinet Statement 3 DANGER Do not extend more than one sliding device at a time The maximum allowable weight for devices on slide rails is 80 kg 176 lb Do not install sliding devices that exceed this weight Statement 4 ...

Страница 7: ...when there is evidence of fire water or structural damage Disconnect the attached power cords telecommunications systems networks and modems before you open the device covers unless instructed otherwise in the installation and configuration procedures Connect and disconnect cables as described in the following table when installing moving or opening covers on this product or attached devices To Co...

Страница 8: ...2 kg 70 5 lb 55 kg 121 2 lb CAUTION Use safe practices when lifting Statement 6 CAUTION Do not place any object on top of a rack mounted device unless that rack mounted device is intended for use as a shelf Statement 8 ...

Страница 9: ...abinet by removing equipment starting at the top of the rack cabinet When possible restore the rack cabinet to the configuration of the rack cabinet as you received it If this configuration is not known you must do the following Remove all devices in the 32U position and above Ensure that the heaviest devices are installed in the bottom of the rack cabinet Ensure that there are no empty U levels b...

Страница 10: ...he configuration of the rack cabinet as you received it Pack the rack cabinet in the original packaging material or equivalent Also lower the leveling pads to raise the casters off of the pallet and bolt the rack cabinet to the pallet Statement 12 CAUTION See the instructions in the rack documentation before you install devices remove devices or relocate the rack Statement 13 CAUTION The weight of...

Страница 11: ......

Страница 12: ...building codes Place a fastener in each corner of the rack Each fastener must have a rated pull out force of at least 460 newtons United Kingdom Notice to Customers This apparatus is approved under approval number NS G 1234 J 100003 for indirect connection to public telecommunication systems in the United Kingdom ...

Страница 13: ...vailable you can download them from the Lenovo website The rack cabinet might have features that are not described in the documentation that comes with the rack and the documentation might be updated occasionally to include information about those features or technical updates might be available to provide additional information that is not included in the rack documentation Changes are made perio...

Страница 14: ...d or word string in the Search field and click Search The documents in which the word or word string appears are listed in order of the most occurrences Click a document to view it and press Crtl F to use the Acrobat search function or press Alt F to use the xpdf search function within the document Click Help for detailed information about using the Documentation Browser Notices and statements in ...

Страница 15: ...ment 1 CAUTION To ensure safety all configurations of the rack cabinet must be certified by a nationally recognized testing laboratory in order to verify compliance with country specific safety regulations This process ensures that the end product remains safe for the operator and service personnel under normal and forseeable misuse conditions Figure 1 Primary rack cabinet with side covers and exp...

Страница 16: ...ights 9308 4PX 42U enterprise primary rack 9308 4EX 42U enterprise expansion rack Empty 220 kg 485 lb 177 kg 390 lb Maximum load 950 kg 2094 lb 950 kg 2094 lb Maximum configuration 1170 kg 2579 lb 1127 kg 2485 lb Lowering the leveling feet and installing the stabilizer bracket See the unpacking instructions that come with the rack cabinet for information about how to unpack and locate the rack the...

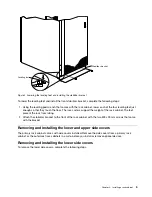
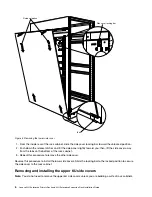
Страница 17: ...ht of the rack cabinet The feet prevent the rack from rolling 2 Attach the stabilizer bracket to the front of the rack cabinet with the two M8 x 25 mm screws that come with the bracket Removing and installing the lower and upper side covers The primary rack cabinet comes with side covers installed Remove the side covers from a primary rack cabinet or the outermost rack cabinets in a suite before y...

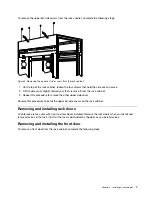
Страница 18: ...y from the tabs on the bottom of the rack cabinet 3 Repeat this procedure to remove the other side cover Reverse this procedure to install the lower side covers Slide the locking bar to the locked position to secure the side cover to the rack cabinet Removing and installing the upper 6U side covers Note You do not need to remove the upper 6U side covers unless you are building a suite of rack cabi...

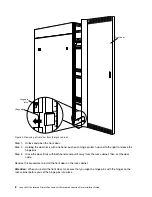
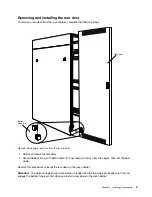
Страница 19: ...Repeat this procedure to remove the other upper side cover Reverse this procedure to install the upper 6U side covers on the rack cabinet Removing and installing rack doors All enterprise racks come with front and rear doors installed Remove the rack doors when you install and remove devices in the rack if part of the rack is obstructed by the door as you install devices Removing and installing th...

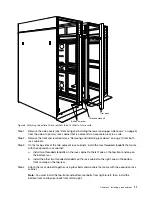
Страница 20: ...hinge pins Step 3 Grasp the door firmly with both hands and pull it away from the rack cabinet then set the door aside Reverse this procedure to install the front door on the rack cabinet Attention When you install the front door make sure that you align the hinge pins with the hinges on the rack cabinet before you set the hinge pins into place 8 Lenovo 42U Enterprise Primary Rack and 42U Enterpri...

Страница 21: ...the rear door 2 Grasp the door firmly with both hands lift it up and pull it away from the hinges then set the door aside Reverse this procedure to install the rear door on the rack cabinet Attention The bottom hinge pin on the rear door is longer than the top hinge pin Make sure that you engage the bottom hinge pin first when you install a rear door on the rack cabinet Chapter 2 Installing a rack...

Страница 22: ...On the front side of the rack cabinet install the two screws to hold the front support bar in place Step 2 On the rear side of the rack cabinet install the two screws to hold the rear support bar in place Step 3 Remove the screws that fix the upper 6U portion on the rack cabinet Then lift the upper 6U portion upward to remove it from the rack cabinet Reverse this procedure to install the upper 6U ...

Страница 23: ...es of the two adjacent rack cabinets install the four threaded standoffs that come with the expansion rack cabinet a Install two threaded standoffs on the rack cabinet to the left one on the top front and one on the bottom rear b Install the other two threaded standoffs on the rack cabinet to the right one on the bottom front and one on the top rear Step 4 Attach the rack cabinets together using f...

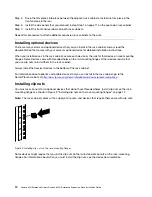
Страница 24: ...that you use clip nuts to install them in the rack cabinet Always install the heaviest devices in the bottom of the rack cabinet For information about optional compatible devices that you can install in the rack cabinet go to the ServerProven website at http www ibm com systems info x86servers serverproven compat us Installing clip nuts You must use clip nuts for all optional devices that do not h...

Страница 25: ... of or behind other devices that will prevent service access to those devices Do not bend a fiber optic cable beyond its limited specifications Label all cables so that they are clearly distinguishable from each other When installing devices mounted on slide rails such as servers Run the cables neatly along equipment cable management arms and secure the cables to the arms using provided cable stra...

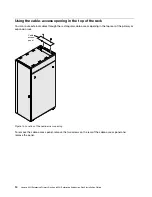
Страница 26: ...ening in the top rear of the primary or expansion rack Cable access panel Figure 10 Location of the cable access opening To remove the cable access panel remove the two screws on the rear of the cable access panel and remove the panel 14 Lenovo 42U Enterprise Primary Rack and 42U Enterprise Expansion Rack Installation Guide ...

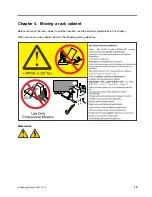
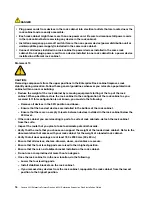
Страница 27: ...ack cabinet Before you move the rack cabinet to another location read the important guidelines in this chapter When you move a rack cabinet observe the following safety guidelines Statement 8 Copyright Lenovo 2001 2010 15 ...

Страница 28: ...nfiguration is not known you must do the following Remove all devices in the 32U position and above Ensure that the heaviest devices are installed in the bottom of the rack cabinet Ensure that there are no empty U levels between devices installed in the rack cabinet below the 32U level If the rack cabinet you are relocating is part of a suite of rack cabinets detach the rack cabinet from the suite...

Страница 29: ...he weight of the rack see Table 2 Lenovo 42U Enterprise Primary Rack and Lenovo 42U Enterprise Expansion Rack weights on page 4 A general guideline is to assume a weight of 23 kg 50 lb per rack U space 3 Use the following weight limit guidelines If the rack cabinet is empty at least two people are required to move the rack If the rack cabinet weight is between 142 and 227 kg between 313 and 500 lb...

Страница 30: ...18 Lenovo 42U Enterprise Primary Rack and 42U Enterprise Expansion Rack Installation Guide ...

Страница 31: ...st you will be charged for the installation Tier 2 customer replaceable unit You may install a Tier 2 CRU yourself or request IBM to install it at no additional charge under the type of warranty service that is designated for your server Field replaceable unit FRU FRUs must be installed only by trained service technicians For information about getting service and assistance see Getting help and in...

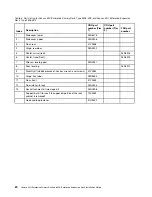
Страница 32: ...Caster swivel rear 05N4916 6 Caster fixed front 05N4915 7 Wrench leveling pad 05N4927 8 Foot leveling 05N4914 9 Stability kit stabilizer bracket hex key wrench and screws 41V0584 10 Hinge front door 09N9695 11 Door front 41Y0559 12 Door latch with lock 05N4903 13 Rack attachment kit marriage kit 05N4908 Support bar kit for use if the upper 6U portion of the rack cabinet is removed 12K0489 Hook and...

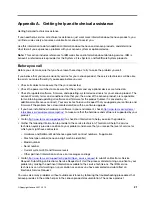
Страница 33: ...tract Your service technician will request that you upgrade your software and firmware if the problem has a documented solution within a software upgrade If you have installed new hardware or software in your environment check http www ibm com systems info x86servers serverproven compat us to make sure that the hardware and software is supported by your product Go to http www ibm com supportportal...

Страница 34: ...s available at http www ibm com supportportal The most current version of the product documentation is available in the following product specific Information Centers Flex System products http pic dhe ibm com infocenter flexsys information index jsp System x products http www ibm com systems x NeXtScale System products http pic dhe ibm com infocenter nxtscale documentation index jsp How to send DS...

Страница 35: ...vice through your Lenovo reseller or from IBM To locate a reseller authorized by Lenovo to provide warranty service go to http www ibm com partnerworld and click Business Partner Locator For IBM support telephone numbers see http www ibm com planetwide In the U S and Canada call 1 800 IBM SERV 1 800 426 7378 In the U S and Canada hardware service and support is available 24 hours a day 7 days a we...

Страница 36: ...24 Lenovo 42U Enterprise Primary Rack and 42U Enterprise Expansion Rack Installation Guide ...

Страница 37: ...publication Lenovo may make improvements and or changes in the product s and or the program s described in this publication at any time without notice The products described in this document are not intended for use in implantation or other life support applications where malfunction may result in injury or death to persons The information contained in this document does not affect or change Lenov...

Страница 38: ...cell can incur Therefore a solid state device has a maximum number of write cycles that it can be subjected to expressed as total bytes written TBW A device that has exceeded this limit might fail to respond to system generated commands or might be incapable of being written to Lenovo is not responsible for replacement of a device that has exceeded its maximum guaranteed number of program erase cy...

Страница 39: ...1985 Environmental conditions for process measurement and control systems Airborne contaminants Instrument Society of America Research Triangle Park North Carolina U S A Telecommunication regulatory statement This product may not be certified in your country for connection by any means whatsoever to interfaces of public telecommunications networks Further certification may be required by law prior...

Страница 40: ...or commercial and industrial environments to provide reasonable protection against interference with licensed communication equipment Lenovo Einsteinova 21 851 01 Bratislava Slovakia Germany Class A statement Deutschsprachiger EU Hinweis Hinweis für Geräte der Klasse A EU Richtlinie zur Elektromagnetischen Verträglichkeit Deutschsprachiger EU Hinweis Hinweis für Geräte der Klasse A EU Richtlinie z...

Страница 41: ...ntstört sind nur mit besonderer Genehmigung des Bundesministers für Post und Telekommunikation oder des Bundesamtes für Post und Telekommunikation betrieben werden Die Genehmigung wird erteilt wenn keine elektromagnetischen Störungen zu erwarten sind Auszug aus dem EMVG Paragraph 3 Abs 4 Dieses Genehmigungsverfahren ist nach Paragraph 9 EMVG in Verbindung mit der entsprechenden Kostenverordnung Am...

Страница 42: ... attention to it This is for any areas other than home Russia Electromagnetic Interference EMI Class A statement People s Republic of China Class A electronic emission statement Taiwan Class A compliance statement 30 Lenovo 42U Enterprise Primary Rack and 42U Enterprise Expansion Rack Installation Guide ...

Страница 43: ...tement 28 F FCC Class A notice 27 feet lowering 4 front door removing and installing 7 front stabilizer bracket installing 4 FRU part numbers 19 G gaseous contamination 26 Germany Class A statement 28 H help from the World Wide Web 22 from World Wide Web 22 sending diagnostic data 22 help sources of 21 I important notes 26 important notices 2 information center 22 installing clip nuts 12 front doo...

Страница 44: ...tware 23 service and support before you call 21 side cover removing and installing lower 5 upper 6 size and weight specifications of rack 3 software service and support telephone numbers 23 stabilizer bracket installing 4 statements and notices 2 suite of racks attaching 10 support web page custom 22 T Taiwan Class A electronic emission statement 30 Taiwan product service 23 telecommunication regu...

Страница 45: ......

Страница 46: ...Part Number 00WA355 Printed in China 1P P N 00WA355 1P00WA355 ...

Отзывы: