


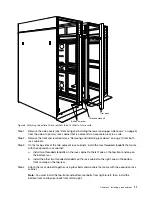


Removing and installing the upper 6U portion
Remove the upper 6U portion when the enterprise rack is too high to pass through the door. Reinstall the
upper 6U portion after the rack cabinet passes through the door. Before removing the upper 6U portion,
install the support bar kit that comes with the rack cabinet. The support bars help align the upper 6U portion
with the rack cabinet during the reinstallation.
To remove the upper 6U portion from the rack cabinet, complete the following steps:
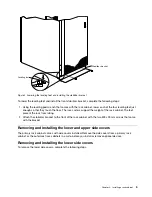
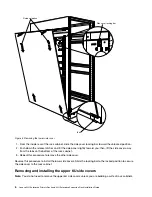
Figure 7. Removing and installing the upper 6U portion
Step 1. On the front side of the rack cabinet, install the two screws to hold the front support bar in place.
Step 2. On the rear side of the rack cabinet, install the two screws to hold the rear support bar in place.
Step 3. Remove the screws that fix the upper 6U portion on the rack cabinet. Then, lift the upper 6U portion
upward to remove it from the rack cabinet.
Reverse this procedure to install the upper 6U portion on the rack cabinet.
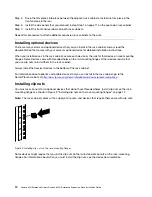
Attaching rack cabinets in a suite
Expansion rack cabinets come with all the hardware that is required for you to attach rack cabinets together
and form a suite. To attach rack cabinets together in a suite, complete the following steps.
10
Lenovo 42U Enterprise Primary Rack and 42U Enterprise Expansion Rack Installation Guide
Содержание 9308-4EX
Страница 1: ...Lenovo 42U Enterprise Primary Rack and 42U Enterprise Expansion Rack Installation Guide ...
Страница 11: ......
Страница 30: ...18 Lenovo 42U Enterprise Primary Rack and 42U Enterprise Expansion Rack Installation Guide ...
Страница 36: ...24 Lenovo 42U Enterprise Primary Rack and 42U Enterprise Expansion Rack Installation Guide ...
Страница 45: ......
Страница 46: ...Part Number 00WA355 Printed in China 1P P N 00WA355 1P00WA355 ...


