background image

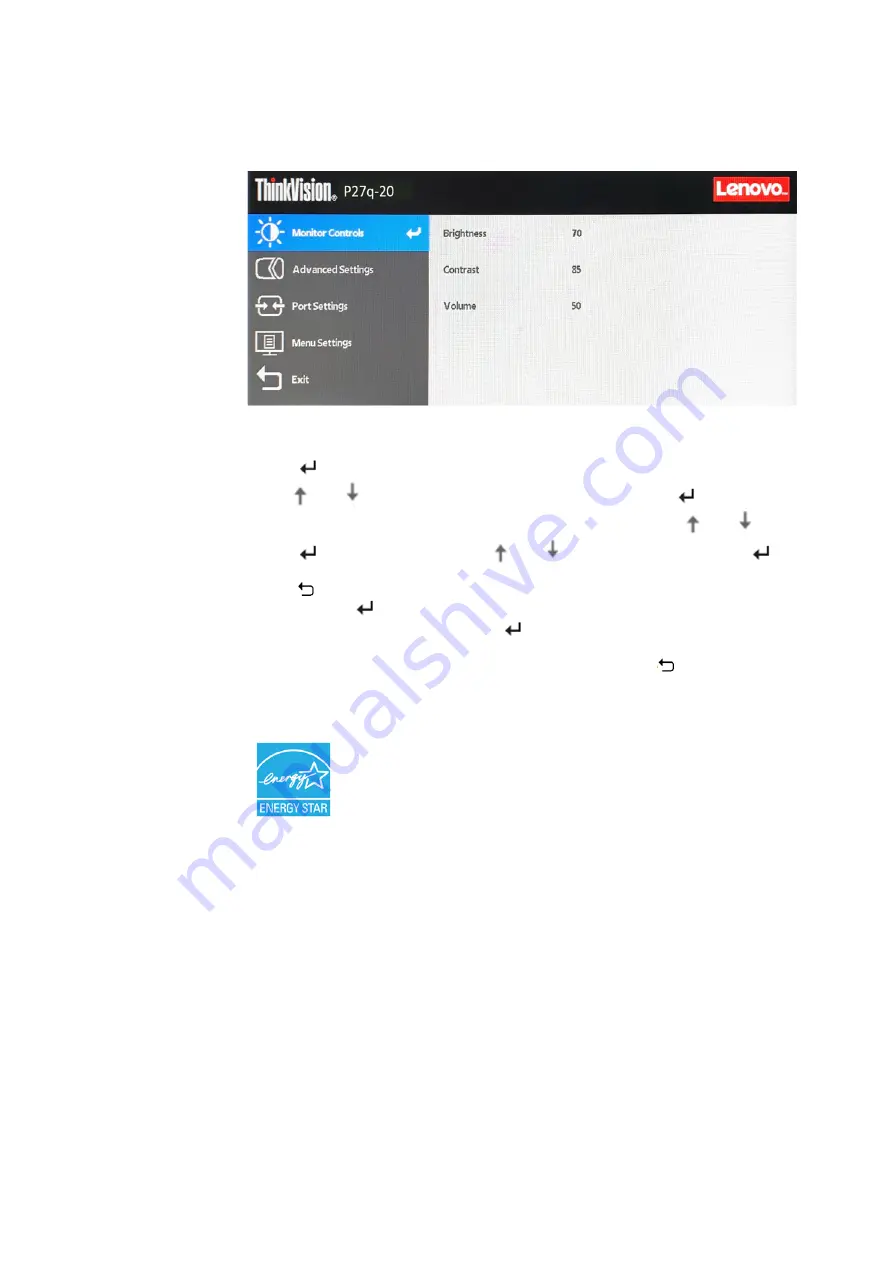
Using the On-Screen Display (OSD) controls 

The settings adjustable with the user controls are viewed through the On-Screen Display (OSD), 
as shown below. 

To use the controls: 
1.  Press 

to open the main OSD menu. 

2.  Use 

or 

to move among the icons. Select an icon and press 

to access that 

function. If there is a sub-menu, you can move between options using 

or 

, then 

press 

 to select that function. Use 

or 

 to make adjustments.  Press 

to 

save. 

3.  Press 

to move backwards through the sub-menus and exit from the OSD. 

4.


Press and hold 

for 10 seconds to lock the OSD. This will prevent accidental 

adjustments to the OSD. Press and hold 

for 10 seconds to unlock the OSD and allow 

adjustments to the OSD. 

5.


Enables DDC/CI by default. Use OSD Exit Key, press and hold the 

buttons for 10 seconds 

to disable/enable DDC/CI function. The words " DDC/CI Disable/DDC/CI/Enable" shows 
on the screen. 

6.


The ENERGY STAR option resets all user settings to default values so that the monitor can 
meet the requirements of Energy Star. 

Energy Star is an energy saving program for consumer electronics led by the U.S. 
government. It was launched in 1992 by EPA and DOE to reduce energy consumption and 
greenhouse gas emissions. Energy Star logo is a symbol of energy conservation and 
environmental protection. It improves the concept of energy efficiency of consumers and 
manufacturers, and effectively guides the market. 
The regulation of Energy Star improves energy efficiency and reduces air pollution by 
using more energy-efficient equipment in homes, offices and factories. One way to achieve 
this goal is to use management to reduce energy consumption when products are not in 
use. 
The default settings for monitors conform to Energy Star certification. Any changes by 
users for more features and functionalities may increase power consumption, which will 
exceed the limitation of Energy Star’s standard. If the user changes the options related to 
energy efficiency when using, such as brightness, color mode, etc., select All Reset Factory 
or choose the Energy Star option, the power consumption will be restored to the energy 
efficiency with Energy Star standard. 
For more information, please refer to (www.energystar.gov/products). All products of 
Energy Star will be posted online and can be accessed directly by governments, public 
institutions and consumers. 

2-7 P27q-20 Flat Panel Monitor User’s Guide 

Содержание 61EA-GAR6-WW

Страница 1: ...P27q 20 Flat Panel Monitor User s Guide Machine Type 61EA ...

Страница 2: ...overnmental entities as commercial items as defined by 47 C F R 2 101 with limited and restricted rights to use reproduction and disclosure LIMITED AND RESTRICTED RIGHTS NOTICE IF products data computer software or services are delivered pursuant a General Services Administration GSA contract use reproduction or disclosure is subject to restrictions set forth in Contract No GS 35F 05925 Copyright ...

Страница 3: ...Display OSD controls 2 7 Selectingasupporteddisplaymode 2 10 Imagerotation 2 10 Understandingpowermanagement 2 11 Caringforyourmonitor 2 11 Detachingthemonitorstand 2 12 WallMounting Optional 2 12 Chapter3 Referenceinformation 3 1 Monitorspecifications 3 1 Troubleshooting 3 3 Manuallyinstallingthemonitordriver 3 5 Serviceinformation 3 7 AppendixA ServiceandSupport A 1 Registeringyouroption A 1 Onl...

Страница 4: ...ety information General Safety guidelines For tips to help you use your computer safety go to http www lenovo com safety Before installing this product read the Safety Information Copyright Lenovo 2019 iii ...

Страница 5: ... for each device Install your monitor near a power outlet that you can easily reach Disconnect the monitor by grasping the plug firmly and pulling it from the outlet Never disconnect the monitor by pulling the cord Do not allow anything to rest on the power cord Do not walk on the cord While using VESA mount application the AC Inlet must face to down side D Maintenance Guidelines To enhance the pe...

Страница 6: ...screen area is glass and can be damaged by rough handling or excessive pressure 1 Place your monitor with the screen face down on a soft flat surface 2 Put the stand and base to the monitor Note To attach a VESA mount please see Detaching the monitor stand on page 2 12 Depending on many factors such as the processing capability of peripheral devices file attributes and other factors related to sys...

Страница 7: ...ypes of adjustments Tilt Please see the illustration below for an example of the tilt range Swivel With the built in pedestal you can tilt and swivel the monitor for the most comfortable viewing angle Height Adjustment After pressing the top of the monitor you can adjust the height of the monitor 1 2 P27q 20 Flat Panel Monitor User s Guide ...

Страница 8: ...e monitor stops at 90 User controls Your monitor has controls at the right side which are used to adjust the display For information on how to use these controls please see Adjusting your monitor image on page 2 6 Cable lock slot Your monitor is equipped with a cable lock slot located on the rear of your monitor Please follow the instructions that came with the cable lock to attach it Chapter 1 Ge...

Страница 9: ...monitor Lenovo recommends that customers who require using the Display Port input on their monitor purchase the Lenovo Display Port to Display Port cable 0A36537 For more information go to the following www lenovo com support monitor accessories 3 Connect one end of the HDMI cable to the HDMI connector on the back of the computer and the other end to the HDMI connector on the monitor Lenovo recomm...

Страница 10: ...fer audio source from DP HDMI or USB Note The audio output in DP and HDMI modes 6 Connect one end of the USB cable to the USB downstream terminal of the monitor and connect the other end of the USB cable to an appropriate USB port on your device Note The USB downstream port does not provide power while the monitor is switched off If there are any tag you can consult the comments on page 1 1 Chapte...

Страница 11: ...he computer 10 To install the monitor driver you must download it from Lenovo website http support lenovo com docs P27q_20 and follow the instructions on page 3 5 Registering your option Thank you for purchasing this Lenovo product Please take a few moments to register your product and provide us with information that will help Lenovo to better serve you in the future Your feedback is valuable to ...

Страница 12: ...ing distance that is most comfortable for you Monitor height Position the monitor so your head and neck are in a comfortable and neutral vertical or upright position If your monitor does not have height adjustments you might have to place books or other sturdy objects under the base of the monitor to achieve the desired height A general guideline is to position the monitor such that the top of the...

Страница 13: ... on screen harder to see Generally lighting level should not exceed 750 lux and levels ranging from 300 to 500 lux are most appropriate for computer desk work Recommended lighting arrangement includes positioning work stations away from direct sunlight or using overhead lighting with baffles or louvers that reduces glare Working Habits Long exposures to computer screens may cause eye strain Sympto...

Страница 14: ...sition Placing the monitor too far or too close may lead to eye strain Far viewing distance causes users to lean forward to see small texts which strain the eyes and torso Close viewing distance on the other hand strains the eye resulting from exerting more effort to focus and also causes the user to sit in awkward body posture i e tilting the head typing with outstretched arms etc Recommended vie...

Страница 15: ...er Monitor flickers refer to repeated changes in monitor light intensity It is caused by several factors including but not limited to voltage fluctuations Reducing flicker minimizes eye strain and headaches ThinkVision monitors allow users to use high frequency display modes that can effectively reduce flicker Low Blue Light Concerns on blue light affecting eye health have risen over the years Blu...

Страница 16: ...ility information Lenovo is committed to providing greater access to information and technology to people with disabilities With assistive technologies users can access information in the way most appropriate to their disability Some of these technologies are already provided in your operating system others can be purchased through vendors or accessed at https lenovo ssbbartgroup com lenovo reques...

Страница 17: ... On Screen Display OSD is not displayed Table 2 1 Direct access controls Icon Control Description DDC CI Press and hold for 10 seconds to enable or disable the DDC CI function Input change Switches the video input source Brightness Direct access to Brightness adjustment Main menu Open OSD main menu Press and hold for 10 seconds will lock menu un lock menu Adjusting and Using your monitor 2 6 ...

Страница 18: ...nment It was launched in 1992 by EPA and DOE to reduce energy consumption and greenhouse gas emissions Energy Star logo is a symbol of energy conservation and environmental protection It improves the concept of energy efficiency of consumers and manufacturers and effectively guides the market The regulation of Energy Star improves energy efficiency and reduces air pollution by using more energy ef...

Страница 19: ...ts intensity of red green and blue sRGB BT 709 DCI P3 Neutral Reddish Bluish Custom Red Increases or decreases the saturation of red in the image Green Increases or decreases the saturation of green in the image Blue Increases or decreases the saturation of blue in the image Scenario Modes Panel Native Image Creation Digital Cinema Video Creation Low Blue Light Aspect Ratio Selects type of scaled ...

Страница 20: ... time a button is pressed Menu Horizontal Changes the horizontal position of the OSD Menu Vertical Changes the vertical position of the OSD Transparency choose the transparency of OSD Factory Reset Resets monitor to the original factory settings Yes No The ENERGY STAR Logo means resets all user settings to default values so that the monitor can meet the requirements of Energy Star Exit Exit OSD me...

Страница 21: ... 60Hz 1024x768 60Hz 1280x720 60Hz 1280x800 60Hz 1280x1024 60Hz 1440x900 60Hz reduced 60Hz 1600x900 reduced 60Hz 1680x1050 60Hz 1920x1080 60Hz 2560x1440 60Hz Image rotation Before rotating the monitor you should set up your computer to rotate the image Rotating the image may require special rotation software or you may find that your computer is preloaded with video graphic drivers that allows imag...

Страница 22: ...lects laboratory performance Your product may perform differently depending on the software components and peripherals you ordered and shall have no obligation to update such information Accordingly the customer should not rely upon this information in making decisions about electrical tolerances or otherwise No warranty as to accuracy or completeness is expressed or implied Caring for your monito...

Страница 23: ...wn on a non abrasive surface on stable flat table 2 Remove the stand 3 Attach the mounting bracket from the wall mounting kit to the monitor 4 Mount the monitor on the wall by following the instructions that come with the base mounting kit NOTE For use only with UL and GS Listed Wall Mount Bracket with minimum weight load bearing capacity of 6 00 kg In order to fulfil TCO Certification for this wa...

Страница 24: ...wer input Supply voltage 100 240 VAC 60 50 Hz current 1 5A Power consumption Max Consumption 57W Note Power consumption figures are for the monitor and the power supply Typical Consumption 22W Standby Suspend 0 5W combined Off 0 3W Video input DP Input signal DP Horizontal addressability 2560 pixels max Vertical addressability 1440 lines max Clock frequency 300 MHz Video input HDMI Input signal HD...

Страница 25: ...Humidity Operating 8 to 80 Storage 5 to 95 Shipping 5 to 95 3 2 P27q 20 Flat Panel Monitor User s Guide ...

Страница 26: ...orted display mode for your computer If these options do not work contact the Customer Support Centre The image quality The video signal Be sure the signal cable is firmly Connecting and turning is unacceptable cable is not connected with the monitor or system completely plugged into the system and monitor on your monitor on page 1 4 The image quality is unacceptable The color settings may be inco...

Страница 27: ... contrast are at the lowest setting menu One or more of the This is a characteristic If there are more than five Appendix A Service pixels appear of the LCD pixels missing contact the and Support on page discoloured technology and is not an LCD defect Customer Support Centre A 1 Fuzzy lines in text Your system Display Adjust the resolution settings Adjusting your monitor or a blurry image Properti...

Страница 28: ...he computer 13 Click the Have Disk button By clicking the Browse button browse and point to the following path X Monitor Drivers Windows 7 Where X indicates the folder in which the downloaded driver is located such as a desktop 14 Select the P27q 20 inf file and click the Open button Click the OK button 15 Select Lenovo P27q 20 and click Next 16 After the installation is complete delete all downlo...

Страница 29: ...on browse and point to the following path X Monitor Drivers Windows 10 where X indicates the folder in which the downloaded driver is located such as a desktop 14 Select the P27q 20 inf file and click the Open button Click the OK button 15 In the new window select Lenovo P27q 20 and click Next 16 After the installation is complete delete all downloaded files and close all windows 17 Restart the sy...

Страница 30: ... solve your problem please contact the Customer Support Centre For more information on contacting the Customer Support Centre please see Appendix A Service and Support on page A 1 Service parts The following parts are for use by Lenovo service or Lenovo authorized dealers to support the customer warranty Parts are for service use only The table below shows information for model 61EA GAR6 WW Table ...

Страница 31: ...e option has been withdrawn from marketing Additional support offerings including step by step installation assistance are available for a nominal fee To assist the technical support representative have available as much of the following information as possible Option name Option number Proof of purchase Computer manufacturer model serial number and manual Exact wording of the error message if any...

Страница 32: ...gary 36 13 825 716 English Hungarian India Primary 1800 419 4666 Tata Secondary 1800 3000 8465 Reliance Email commercialts lenovo com English and Hindi Indonesia 1 803 442 425 62 213 002 1090 Standard Charges Apply English Bahasa Indonesia Ireland Warranty service and support 01 881 1444 English Israel Givat Shmuel Service and Center 972 3 531 3900 Hebrew English Italy Warranty service and support...

Страница 33: ...a Malaysia Slovakia ThinkStation and ThinkServer 421 2 4954 5555 Slovenia 386 1 2005 60 Slovenian Spain 34 917 147 833 Spanish Sri Lanka 9477 7357 123 Sumathi Information systems English Sweden Warranty service and support 077 117 1040 Swedish Switzerland Warranty service and support 0800 55 54 54 German French Italian Taiwan 0800 000 702 Mandarin Thailand 001 800 4415 734 662 787 3067 Standard Ch...

Страница 34: ...ns of the publication Lenovo may make improvements and or changes in the product s and or the program s described in this publication at any time without notice The products described in this document are not intended for use in implantation or other life support applications where malfunction may result in injury or death to persons The information contained in this document does not affect or ch...

Страница 35: ...n of Effective Utilization of Resources Lenovo Japan provides through its PC Collecting and Recycling Services for the collecting reuse and recycling of disused computers and monitors For details visit the Lenovo Web site at www ibm com jp pc service recycle pcrecycle Pursuant to the Law for Promotion of Effective Utilization of Resources the collecting and recycling of home used computers and mon...

Страница 36: ... compliance The Lenovo product meets the requirements of the Republic of Turkey Directive on the Restriction of the Use of Certain Hazardous Substances in Electrical and Electronic Equipment EEE Lenovo and the Lenovo logo are trademarks of Lenovo in the United States other countries or both Ukraine RoHS India RoHS RoHS compliant as per E Waste Management Handling Rules 2011 Power cords and power a...

Отзывы: