background image

To Connect:

To Disconnect:

1.  Turn everything OFF.
2.  First, attach all cables to devices.
3.  Attach signal cables to connectors.
4.  Attach power cords to outlet.
5.  Turn device ON.

1.  Turn everything OFF.
2.  First, remove power cords from outlet.
3.  Remove signal cables from connectors.
4.  Remove all cables from devices.

Before you remove the M.2 backplane: 

1.  Read the following section(s) to ensure that you work safely. 

•  “Installation Guidelines” on page 30

2.  Turn off the corresponding DWC tray that you are going to perform the task on.

3.  Remove the tray (see “Remove a DWC tray from the enclosure” on page 32).

4.  Remove the tray cover (see “Remove the tray cover” on page 34).

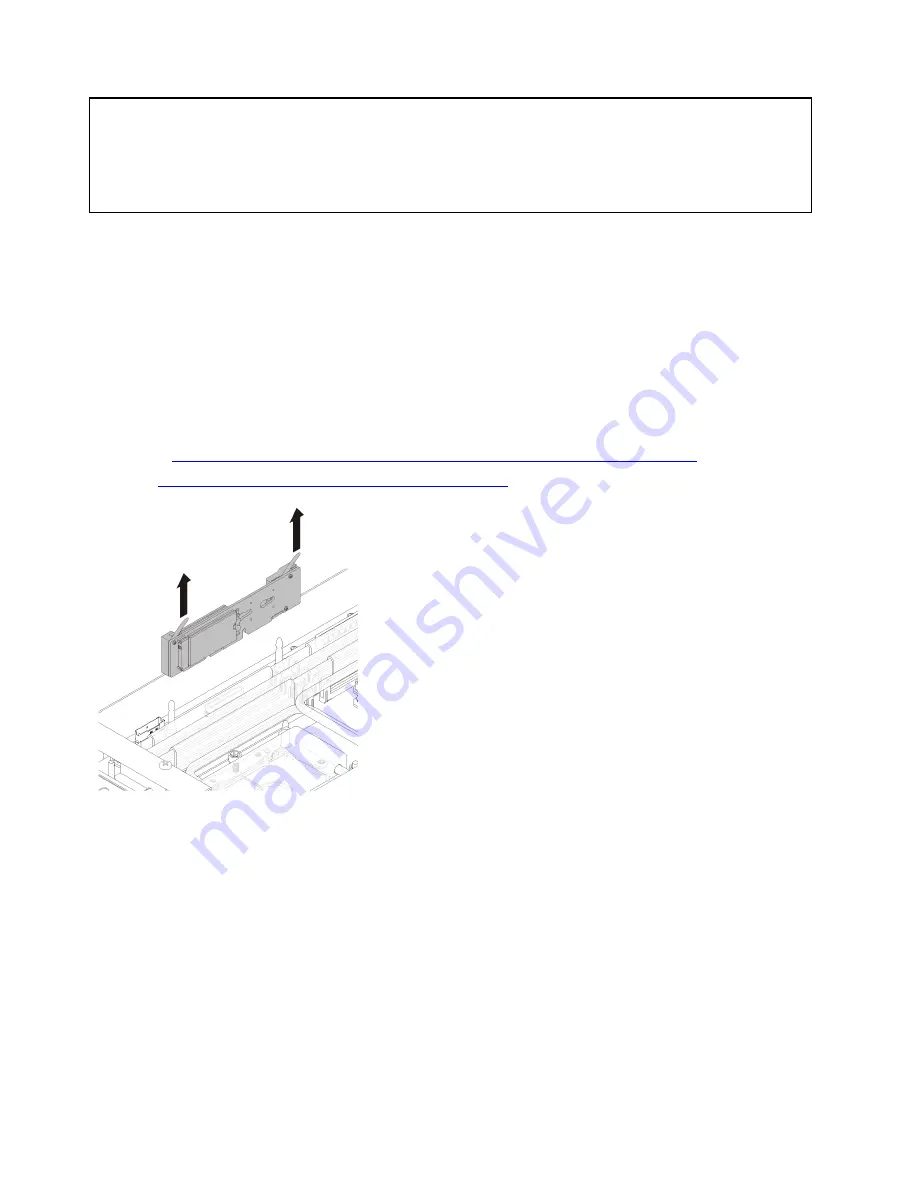
Complete the following steps to remove the M.2 backplane.

Watch the procedure

. A video of the installation process is available: 

•  Youtube: 

https://www.youtube.com/playlist?list=PLYV5R7hVcs-BHNs9o9uS9u93aeU5BCI8I

•  Youku: 

http://list.youku.com/albumlist/show/id_51372950.html

Figure 25. M.2 backplane removal

Step 1.  Remove the M.2 backplane from the system board by pulling up on both ends of the backplane at 

the same time.

If you are instructed to return the component or optional device, follow all packaging instructions, and use 
any packaging materials for shipping that are supplied to you.

Remove an adapter

Use this information to remove an adapter.

Before you remove an adapter: 

1.  Read the following section(s) to ensure that you work safely. 

40

ThinkSystem SD650 Dual Node DWC Tray and NeXtScale n1200 DWC Enclosure Setup Guide

Содержание 5468

Страница 1: ...ThinkSystem SD650 Dual Node DWC Tray and NeXtScale n1200 DWC Enclosure Setup Guide Machine Type 7X58 and 5468 ...

Страница 2: ...t PDU or Uninterruptible Power Supply UPS supplying a maximum 20 A branch circuit protection The overall system rack connection to mains power is to be a Pluggable Type B connector In addition be sure that you are familiar with the terms and conditions of the Lenovo warranty for your solution which can be found at http datacentersupport lenovo com warrantylookup Third Edition October 2018 Copyrigh...

Страница 3: ...IMM 34 Remove a drive 37 Remove the M 2 backplane 39 Remove an adapter 40 Remove an Internal Faceplate Transition IFT adapter 42 Memory module installation 44 Install an M 2 drive into the M 2 backplane 51 Install the M 2 backplane 54 Install a drive 55 Install an adapter 57 Install an Internal Faceplate Transition IFT adapter 59 Install the tray cover 61 Install a DWC tray in the enclosure 63 Ins...

Страница 4: ...ii ThinkSystem SD650 Dual Node DWC Tray and NeXtScale n1200 DWC Enclosure Setup Guide ...

Страница 5: ...e contents When you receive your solution verify that the shipment contains everything that you expected to receive The solution package includes the following items Note Some of the items listed are available on select models only DWC tray Enclosure Rail installation kit optional Detailed instructions for installing the rail installation kit are provided in the package with the rail installation ...

Страница 6: ...s data on two pairs of DIMMs within two channels simultaneously If a failure occurs the memory controller switches from the primary pair of memory DIMMs to the backup pair of DIMMs Large system memory capacity The solution supports synchronous dynamic random access memory SDRAM registered dual inline memory modules DIMMs with error correcting code ECC For more information about the specific types ...

Страница 7: ...ower capabilities The solution supports a maximum of six 1300 watt 1500 watt or 2000 watt hot swap power supplies Note You cannot mix 1300 watt 1500 watt and 2000 watt power supplies in the solution ThinkSystem RAID support The ThinkSystem RAID provides software RAID supports for RAID levels 0 and 1 while integrated on board hardware RAID supports for RAID levels 1 Specifications The following inf...

Страница 8: ...water flow rate 6 0 liters per minute per enclosure assuming 1 0 lpm per compute tray with 6 trays per enclosure 1 tray consists of 2 compute nodes For processors below 205 W 6 0 liters per minute per enclosure assuming 1 0 lpm per compute tray with 6 trays per enclosure 1 tray consists of 2 compute nodes Maximum pressure 4 4 bars Note The water required to initially fill the system side cooling l...

Страница 9: ...ltitude exceeds 900 m 2953 ft the maximum ambient temperature value decreases by 1 C 1 8 F with every 300 m 984 ft of altitude increase Solution off 5 45 C 41 113 F Shipping storage 40 60 C 40 140 F Maximum altitude 3048 m 10 000 ft Relative Humidity non condensing Operating ASHRAE Class A2 8 80 maximum dew point 21 C 70 F Shipment storage 8 90 Particulate contamination Airborne particulates and r...

Страница 10: ...rocessor Intel Xeon Gold 6148F Processor Intel Xeon Platinum 8160F Processor Intel Xeon Platinum 8176F Processor Memory Slots 12 DIMM slots per node 1 tray consists of 2 nodes Minimum 8 GB single DDR4 DIMM per processor Maximum 768 GB 384 GB 12 x 32GB RDIMM 768 GB 12 x 64GB LRDIMM Type PC4 21300 dual rank 2666 MT s error correcting code ECC double data rate 4 DDR4 registered DIMM RDIMM or load red...

Страница 11: ... for Lenovo XClarity Controller access One 1GbE Ethernet connector dedicated for Lenovo XClarity Controller access Minimum configuration for debugging One n1200 Enclosure One SD650 Dual Node DWC Tray contains two computer nodes One processor on location 1 on specific node One CFF v2 power supply any type One DIMM any type on specific node One disk any type If OS is needed for debugging Upgrade exi...

Страница 12: ...mware or Omni Path firmware require the use of vendor tools 3 Firmware updates are limited to Lenovo XClarity Provisioning Manager Lenovo XClarity Controller firmware and UEFI updates only Firmware updates for optional devices such as adapters are not supported 4 The server UEFI settings for option ROM must be set to Auto or UEFI to update firmware using Lenovo XClarity Administrator or Lenovo XCl...

Страница 13: ...rator to apply and activate firmware updates for all devices in that endpoint from a repository of firmware updates that you manage Operating System deployment You can use Lenovo XClarity Administrator to manage a repository of operating system images and to deploy operating system images to up to 28 managed servers concurrently Service and support Lenovo XClarity Administrator can be set up to co...

Страница 14: ...ent such as a data center power failure For more information about downloading installation and usage see https datacentersupport lenovo com solutions lnvo lxem Lenovo XClarity Provisioning Manager Lenovo XClarity Provisioning Manager is embedded software that provides a graphic user interface GUI for configuring the system with support for 10 languages It simplifies the process of configuring Bas...

Страница 15: ...erform diagnostics for hard disk drives and memory You can also collect service data that can be saved to a USB device and sent to Lenovo Support Note The service data collected by Lenovo XClarity Provisioning Manager does not include the operating system logs To collect the operating system logs and the hardware service data use Lenovo XClarity Essentials OneCLI Documentation for Lenovo XClarity ...

Страница 16: ...s the third generation of the Integrated Management Module IMM service processor that consolidates the service processor functionality super I O video controller and remote presence capabilities into a single chip on the server system board There are two ways to access the management processor Web based interface To access the web based interface point your browser to the IP address for the manage...

Страница 17: ...Cryptographic Module TCM adapter for enhanced security to keep user data safe and to erase confidential data completely from a hard disk drive Lenovo Business Vantage provides the following functions Data Safe Encrypt files to ensure data safety by using the TCM adapter Sure Erase Erase confidential data from a hard disk This tool follows the industry standard method to do the erasing and allows t...

Страница 18: ...14 ThinkSystem SD650 Dual Node DWC Tray and NeXtScale n1200 DWC Enclosure Setup Guide ...

Страница 19: ... model number and serial number are on the enclosure label that can be found on the front of the enclosure as shown in the following illustration Figure 2 Enclosure label on the front of the enclosure Table 4 Enclosure label on the front of the enclosure 1 Enclosure label The tray machine type model number and serial number are on the tray label that can be found on the front of the tray as shown ...

Страница 20: ...olution support Figure 4 Service Label and QR code Network access tag The Lenovo XClarity Controller network access information for both nodes can be found on the pull out information tag located at the front of the tray You can use the information on the pull out tag to access the XCC MAC address and LLA for each node The left node information is on the left side and the right node information is...

Страница 21: ...olution Enclosure Note The illustrations in this document might differ slightly from your hardware The enclosure supports up to six trays The following illustration shows six trays installed in the enclosure Figure 6 Enclosure Tray The following illustrations show the controls LEDs and connectors on the front of each tray Chapter 2 Solution components 17 ...

Страница 22: ...RJ45 port with share NIC feature to access Lenovo XClarity Controller 4 USB 3 0 connector 9 KVM breakout cable connector 5 System error LED 10 Tray label Rear view The following illustration shows the components on the rear of the enclosure Figure 8 Rear view Table 7 Rear view 1 Power supply 3 Drip sensor assembly 2 Fan and Power Control 4 Manifold 18 ThinkSystem SD650 Dual Node DWC Tray and NeXtS...

Страница 23: ... is lit yellow it indicates that a system error has occurred Check the FPC event log for additional information 6 Ethernet port activity RJ 45 LED When this LED is flashing green it indicates that there is activity through the remote management and console Ethernet port over the management network 7 Dedicated Ethernet port for FPC management access Use this connector to access FPC management 8 Eth...

Страница 24: ...of 100 127 V ac in a enclosure that is powered by 200 240 V ac power supplies the 100 127 V power supply will not power on The same restriction applies to a enclosure that is powered by 100 127 V ac power supplies If you install a 200 240 V ac power supply in a enclosure that is powered by 100 127 V ac power supplies the 200 240 V ac power supply will not power on The following illustration shows ...

Страница 25: ...ling to release them before removing the cables will damage the cable sockets on the system board which are fragile Any damage to the cable sockets might require replacing the system board Some options such as IFT processors might require additional internal cabling See the documentation that is provided for the option to determine any additional cabling requirements and instructions 2 5 inch driv...

Страница 26: ...tacentersupport lenovo com and navigate to the support page for your solution 2 Click Service Parts 3 Enter the serial number to view a listing of parts for your solution Note Depending on the model your solution might look slightly different from the illustration Enclosure components Figure 14 Enclosure components The parts listed in the following table are identified as one of the following 22 T...

Страница 27: ...umable and structural parts components such as a cover or bezel is your responsibility If Lenovo acquires or installs a structural component at your request you will be charged for the service Table 9 Parts listing Index Description Tier 1 CRU Tier 2 CRU FRU Consuma ble and Structural part For more information about ordering the parts shown in Figure 14 Enclosure components on page 22 1 Go to http...

Страница 28: ... DWC tray components Figure 15 DWC tray components 24 ThinkSystem SD650 Dual Node DWC Tray and NeXtScale n1200 DWC Enclosure Setup Guide ...

Страница 29: ...er loop 3 Quick connects 4 Quick connect plug covers 5 Air baffle 6 Power distribution board 7 Trusted Cryptographic Module TCM 8 System board 9 M 2 drive 42 mm and 80 mm 10 M 2 backplane 11 DIMM cover 12 DIMM 13 Processor 14 Processor clip 15 Fabric processor 16 Fabric processor clip 17 Drive cage 18 2 5 inch drive 15mm 19 2 5 inch drive 7mm 20 PCIe riser card assembly 21 CX5 EDR adapter 22 Retai...

Страница 30: ...Figure 15 DWC tray components on page 24 1 Go to http datacentersupport lenovo com and navigate to the support page for your solution 2 Click Service Parts 3 Enter the serial number to view a listing of parts for your solution 29 DWC tray 30 Water loop carrier 31 Rear cross brace 26 ThinkSystem SD650 Dual Node DWC Tray and NeXtScale n1200 DWC Enclosure Setup Guide ...

Страница 31: ... Standards Association CSA For units intended to be operated at 115 volts Use a UL listed and CSA certified cord set consisting of a minimum 18 AWG Type SVT or SJT three conductor cord a maximum of 15 feet in length and a parallel blade grounding type attachment plug rated 15 amperes 125 volts For units intended to be operated at 230 volts U S use Use a UL listed and CSA certified cord set consist...

Страница 32: ...28 ThinkSystem SD650 Dual Node DWC Tray and NeXtScale n1200 DWC Enclosure Setup Guide ...

Страница 33: ...ect the Ethernet cables and power cords to the solution See Rear view on page 18 to locate the connectors See Cable the enclosure on page 64 for cabling best practices d Power on the solution See Power on nodes on page 64 Note You can access the management processor interface to configure the system without powering on the solution Whenever the solution is connected to power the management process...

Страница 34: ...re you update the code It is good practice to make sure that the solution is working correctly before you install an optional component Keep the working area clean and place removed components on a flat and smooth surface that does not shake or tilt Do not attempt to lift an object that might be too heavy for you If you have to lift a heavy object read the following precautions carefully Make sure...

Страница 35: ...n of open space around the front and rear of the solution Do not place any object in front of the fans For proper cooling and airflow refit the solution cover before you turn the power on Do not operate the solution for more than 30 minutes with the solution cover removed for it might damage solution components Cabling instructions that come with optional components must be followed A removed hot ...

Страница 36: ...ry Keep the device from others reach to prevent possible damages Install solution hardware options This section includes instructions for performing initial installation of optional hardware Each component installation procedure references any tasks that need to be performed to gain access to the component being replaced Installation procedures are presented in the optimum sequence to minimize wor...

Страница 37: ...list youku com albumlist show id_51372950 html Step 1 Rotate the release latches as shown in the illustration The DWC tray moves out of the tray bay approximately 0 6 cm 0 25 inch Figure 16 DWC tray removal Attention To maintain proper system cooling do not operate the NeXtScale n1200 DWC Enclosure Type 5468 without a DWC tray or tray bay filler installed in each tray bay When you remove the DWC t...

Страница 38: ...ver Watch the procedure A video of the installation process is available Youtube https www youtube com playlist list PLYV5R7hVcs BHNs9o9uS9u93aeU5BCI8I Youku http list youku com albumlist show id_51372950 html Step 1 Press on the release latch and the push point at the same time and slide the cover toward the rear of the DWC tray Figure 17 Tray cover removal Step 2 Lift the cover off the DWC tray ...

Страница 39: ... or installing memory modules Electrostatic discharge gloves can also be used Never hold two or more memory modules together so that they touch Do not stack memory modules directly on top of each other during storage Never touch the gold memory module connector contacts or allow these contacts to touch the outside of the memory module connector housing Handle memory modules with care never bend tw...

Страница 40: ...outward on each end of the DIMM connector Figure 20 DIMM removal Attention To avoid breaking the retaining clips or damaging the DIMM connectors open and close the clips gently Step 3 Carefully remove the DIMM 36 ThinkSystem SD650 Dual Node DWC Tray and NeXtScale n1200 DWC Enclosure Setup Guide ...

Страница 41: ... corresponding DWC tray that you are going to perform the task on 3 Remove the tray see Remove a DWC tray from the enclosure on page 32 4 Remove the tray cover see Remove the tray cover on page 34 Complete the following steps to remove a drive Watch the procedure A video of the installation process is available Youtube https www youtube com playlist list PLYV5R7hVcs BHNs9o9uS9u93aeU5BCI8I Youku ht...

Страница 42: ...the drive then slide the drive out of the drive cage Figure 23 Drive removal Note For individuals with large fingers it may be useful to remove the blank bezel filler to provide more access to drives 38 ThinkSystem SD650 Dual Node DWC Tray and NeXtScale n1200 DWC Enclosure Setup Guide ...

Страница 43: ... an electrical storm Connect all power cords to a properly wired and grounded electrical outlet Connect to properly wired outlets any equipment that will be attached to this product When possible use one hand only to connect or disconnect signal cables Never turn on any equipment when there is evidence of fire water or structural damage Disconnect the attached power cords telecommunications system...

Страница 44: ...over on page 34 Complete the following steps to remove the M 2 backplane Watch the procedure A video of the installation process is available Youtube https www youtube com playlist list PLYV5R7hVcs BHNs9o9uS9u93aeU5BCI8I Youku http list youku com albumlist show id_51372950 html Figure 25 M 2 backplane removal Step 1 Remove the M 2 backplane from the system board by pulling up on both ends of the b...

Страница 45: ...to remove an adapter Watch the procedure A video of the installation process is available Youtube https www youtube com playlist list PLYV5R7hVcs BHNs9o9uS9u93aeU5BCI8I Youku http list youku com albumlist show id_51372950 html Step 1 Remove two silver Torx T10 screws then remove the retaining clamp Figure 26 Screws and retaining clamp removal Step 2 Carefully grasp the PCIe riser cage assembly by ...

Страница 46: ... use any packaging materials for shipping that are supplied to you Remove an Internal Faceplate Transition IFT adapter Use this information to remove an IFT adapter Before you remove an IFT adapter 1 Read the following section s to ensure that you work safely Installation Guidelines on page 30 2 Turn off the corresponding DWC tray that you are going to perform the task on 42 ThinkSystem SD650 Dual...

Страница 47: ... list PLYV5R7hVcs BHNs9o9uS9u93aeU5BCI8I Youku http list youku com albumlist show id_51372950 html Step 1 Rotate the IFT connector release spring up and away from the cable side of the connector then disconnect the IFT connector Figure 29 Disconnecting the IFT connector Step 2 Disconnect the other connector from the system board Step 3 Carefully grasp the PCIe riser cage assembly by its edges and ...

Страница 48: ...ng instructions and use any packaging materials for shipping that are supplied to you Memory module installation The following notes describe the types of DIMMs that the node supports and other information that you must consider when you install DIMMs Confirm that the node supports the DIMM that you are installing see http www lenovo com us en serverproven 44 ThinkSystem SD650 Dual Node DWC Tray a...

Страница 49: ...IMMs that are installed in DIMM connectors 2 and 4 You can use compatible DIMMs from various manufacturers in the same pair The specifications of a DDR4 DIMM are on a label on the DIMM in the following format gggGBpheRxff PC4 wwwwaa mccd bb where gggGB is the total capacity in gigabytes for primary bus ECC not counted 4GB 8GB 16GB etc no space between digits and units pheR is the number of package...

Страница 50: ...ion of the DIMM connectors on the system board Installation order Memory modules must be installed in a specific order based on the memory configuration that you implement on your node The following memory configurations are available Memory mirroring population sequence on page 47 Memory rank sparing population sequence on page 47 Independent memory mode population sequence on page 46 For informa...

Страница 51: ...tomatically 2 processors installed Number of DIMM installed Installation sequence connectors 2 4 12 4 4 5 12 13 6 1 4 5 9 12 13 8 1 4 5 8 9 12 13 16 10 1 2 4 5 8 9 10 12 13 16 12 1 2 4 5 7 8 9 10 12 13 15 16 Install a DIMM Use this information to install a DIMM Before you install a DIMM 1 Read the following section s to ensure that you work safely Installation Guidelines on page 30 Attention Memor...

Страница 52: ... following illustration shows the location of the DIMM connectors on the system board Figure 34 The location of the DIMM connectors on the system board Complete the following steps to install a DIMM Watch the procedure A video of the installation process is available Youtube https www youtube com playlist list PLYV5R7hVcs BHNs9o9uS9u93aeU5BCI8I Youku http list youku com albumlist show id_51372950 ...

Страница 53: ... memory mode See Installation order on page 46 for the required installation order Step 1 Remove the DIMM cover Figure 35 DIMM cover removal Step 2 Carefully use the DIMM tool to press down the retaining clips on each end of the DIMM connector Note DIMM tool is recommended due to space limitations caused by location of water loop tubes through the memory section Chapter 3 Solution hardware setup 4...

Страница 54: ...rface on the outside of the node Then remove the DIMM from the package Step 4 Carefully insert the DIMM into the connector by aligning the edges of the DIMM with the slots at the ends of the DIMM connector Step 5 Firmly press the DIMM straight down into the connector by applying pressure on both ends of the DIMM simultaneously The retaining clips snap into the locked position when the DIMM is firm...

Страница 55: ...ou install a DIMM complete the following steps 1 Reinstall the tray cover see Install the tray cover on page 61 2 Reinstall the tray see Install a DWC tray in the enclosure on page 63 3 Check the power LED on each node to make sure it changes from fast blink to slow blink to indicate both nodes are ready to be powered on Install an M 2 drive into the M 2 backplane Use this information to install a...

Страница 56: ...To Connect To Disconnect 1 Turn everything OFF 2 First attach all cables to devices 3 Attach signal cables to connectors 4 Attach power cords to outlet 5 Turn device ON 1 Turn everything OFF 2 First remove power cords from outlet 3 Remove signal cables from connectors 4 Remove all cables from devices Before you install an M 2 drive into the M 2 backplane 1 Read the following section s to ensure th...

Страница 57: ...otate it until the notch catches on the lip of the retainer then slide the retainer forward toward the connector to secure the M 2 drive in the M 2 backplane Figure 39 M 2 drive installation Attention When sliding the retainer forward make sure the two nubs on the retainer enter the small holes on the M 2 backplane Once they enter the holes you will hear a soft click sound Figure 40 M 2 drive inst...

Страница 58: ...rds telecommunications systems networks and modems before you open the device covers unless instructed otherwise in the installation and configuration procedures Connect and disconnect cables as described in the following table when installing moving or opening covers on this product or attached devices To Connect To Disconnect 1 Turn everything OFF 2 First attach all cables to devices 3 Attach si...

Страница 59: ...e on page 63 3 Check the power LED on each node to make sure it changes from fast blink to slow blink to indicate both nodes are ready to be powered on Install a drive Use this information to install a drive Before you install a drive 1 Read the following section s to ensure that you work safely Installation Guidelines on page 30 Complete the following steps to install a drive Watch the procedure ...

Страница 60: ...ve installation Step 3 Pull the blue retention latch and rotate the drive cage down Carefully push down on the top of drive cage to make sure it is correctly seated Figure 44 Drive cage installation After you install a drive complete the following steps 56 ThinkSystem SD650 Dual Node DWC Tray and NeXtScale n1200 DWC Enclosure Setup Guide ...

Страница 61: ...teps to remove an adapter Watch the procedure A video of the installation process is available Youtube https www youtube com playlist list PLYV5R7hVcs BHNs9o9uS9u93aeU5BCI8I Youku http list youku com albumlist show id_51372950 html Step 1 Align the adapter with the PCIe slot on the riser cage Then carefully press the adapter straight into the slot until it is securely seated Figure 45 Adapter inst...

Страница 62: ...d retaining clamp installation After you install an adapter complete the following steps 1 Reinstall the tray cover see Install the tray cover on page 61 2 Reinstall the tray see Install a DWC tray in the enclosure on page 63 3 Check the power LED on each node to make sure it changes from fast blink to slow blink to indicate both nodes are ready to be powered on 58 ThinkSystem SD650 Dual Node DWC ...

Страница 63: ...Youtube https www youtube com playlist list PLYV5R7hVcs BHNs9o9uS9u93aeU5BCI8I Youku http list youku com albumlist show id_51372950 html Step 1 Connect the IFT cable a Rotate the IFT connector release spring up and away from the cable side of the connector b Connect the IFT connector c Rotate the IFT connector release spring toward the cable side of the connector then press it down until it engage...

Страница 64: ...he adapter straight into the slot until it is securely seated Figure 50 Adapter installation Step 4 Connect the connector then align the PCI riser cage assembly with slots and press the PCI riser cage assembly firmly into the node 60 ThinkSystem SD650 Dual Node DWC Tray and NeXtScale n1200 DWC Enclosure Setup Guide ...

Страница 65: ...install the tray cover see Install the tray cover on page 61 2 Reinstall the tray see Install a DWC tray in the enclosure on page 63 3 Check the power LED on each node to make sure it changes from fast blink to slow blink to indicate both nodes are ready to be powered on Install the tray cover Use this information to install the tray cover Before you install the tray cover 1 Read the following sec...

Страница 66: ... Slide the cover toward the front of the tray Important Before you slide the cover forward make sure that all the tabs on the front rear and side of the cover engage the enclosure correctly If all the tabs do not engage the enclosure correctly it will be very difficult to remove the cover later Step 3 Make sure that the cover correctly engages all the insert tabs on the tray Figure 54 Tray cover i...

Страница 67: ...g steps to install a DWC tray in the enclosure Watch the procedure A video of the installation process is available Youtube https www youtube com playlist list PLYV5R7hVcs BHNs9o9uS9u93aeU5BCI8I Youku http list youku com albumlist show id_51372950 html Figure 55 DWC tray installation Step 1 Select the tray bay Attention To maintain proper system cooling do not operate the NeXtScale n1200 DWC Enclo...

Страница 68: ...e changed the configuration of the DWC tray or if you are installing a different DWC tray from the one that you removed you must configure the DWC tray through the Setup utility and you might have to install the DWC tray operating system Install the enclosure in a rack To install the enclosure in a rack follow the instructions that are provided below To install the enclosure in a rack follow the i...

Страница 69: ...er source allowing the Lenovo XClarity Controller to respond to remote power on requests To remove all power from the nodes power status LED off remove the tray from the enclosure Note This removes power immediately from both nodes To place the solution in a standby state power status LED flashes once per second Note The Lenovo XClarity Controller can place the solution in a standby state as an au...

Страница 70: ...66 ThinkSystem SD650 Dual Node DWC Tray and NeXtScale n1200 DWC Enclosure Setup Guide ...

Страница 71: ...Controller micro USB connector on the front of the server For the location of the Lenovo XClarity Controller USB connector see Front view on page 17 To connect using the Lenovo XClarity Administrator Mobile app 1 Connect the USB cable of your mobile device to the Lenovo XClarity Administrator USB connector on the front panel 2 On your mobile device enable USB tethering 3 On your mobile device laun...

Страница 72: ...pdate and then directing the update to the target subsystem or device Out of band updates have no dependency on an operating system executing on the core CPU However most out of band operations do require the solution to be in the S0 Working power state On Target update The installation or update is initiated from an Operating System executing on the solution s operating system Off Target update T...

Страница 73: ...alled operating system driver updates Lenovo XClarity Essentials Bootable Media Creator Supports core system firmware and I O firmware updates You can update the Microsoft Windows operating system but device drivers are not included on the bootable image Lenovo XClarity Administrator Supports core system firmware and I O firmware updates The latest firmware can be found at the following site http ...

Страница 74: ...ur solutions The update can be performed within the host operating system of the solution in band or remotely through the BMC of the solution out of band Specific details about updating firmware using Lenovo XClarity Essentials OneCLI is available at http sysmgt lenovofiles com help topic toolsctr_cli_lenovo onecli_c_update html Lenovo XClarity Essentials UpdateXpress Lenovo XClarity Essentials Up...

Страница 75: ...interface that is displayed when you press F1 Lenovo XClarity Essentials OneCLI You can use the config application and commands to view the current system configuration settings and make changes to Lenovo XClarity Controller and UEFI The saved configuration information can be used to replicate or restore other systems For information about configuring the server using Lenovo XClarity Essentials On...

Страница 76: ...isk or logical drive is a partition in the drive group that is made up of contiguous data segments on the drives Virtual drive is presented up to the host operating system as a physical disk that can be partitioned to create OS logical drives or volumes An introduction to RAID is available at the following Lenovo Press website https lenovopress com lp0578 lenovo raid introduction Detailed informat...

Страница 77: ...sure that you create backups for the following solution components Management processor You can back up the management processor configuration through the Lenovo XClarity Controller interface For details about backing up the management processor configuration see http sysmgt lenovofiles com help topic com lenovo systems management xcc doc NN1ia_c_ backupthexcc html Alternatively you can use the s ...

Страница 78: ...74 ThinkSystem SD650 Dual Node DWC Tray and NeXtScale n1200 DWC Enclosure Setup Guide ...

Страница 79: ...e error recurs check FFDC logs for more details The solution immediately displays the POST Event Viewer when it is turned on Complete the following steps until the problem is solved 1 Correct any errors that are indicated by the light path diagnostics LEDs 2 Make sure that the solution supports all the processors and that the processors match in speed and cache size You can view processor details ...

Страница 80: ...MM error LEDs are lit on the system board Memory mirrored channel does not account for the discrepancy The memory modules are seated correctly You have installed the correct type of memory If you changed the memory you updated the memory configuration in the Setup utility All banks of memory are enabled The solution might have automatically disabled a memory bank when it detected a problem or a me...

Страница 81: ...vice is changed you must update the configuration 2 Reseat the device that you just installed 3 Replace the device that you just installed Voltage planar fault is displayed in the event log Complete the following steps until the problem is solved 1 Revert the system to the minimum configuration See Specifications on page 3 for the minimally required number of processors and DIMMs 2 Restart the sys...

Страница 82: ...78 ThinkSystem SD650 Dual Node DWC Tray and NeXtScale n1200 DWC Enclosure Setup Guide ...

Страница 83: ...stem products at the following location http thinksystem lenovofiles com help index jsp You can take these steps to try to solve the problem yourself Check all cables to make sure that they are connected Check the power switches to make sure that the system and any optional devices are turned on Check for updated software firmware and operating system device drivers for your Lenovo product The Len...

Страница 84: ...ta To clearly identify the root cause of a solution issue or at the request of Lenovo Support you might need collect service data that can be used for further analysis Service data includes information such as event logs and hardware inventory Service data can be collected through the following tools Lenovo XClarity Provisioning Manager Use the Collect Service Data function of Lenovo XClarity Prov...

Страница 85: ...ort to obtain help for your issue You can receive hardware service through a Lenovo Authorized Service Provider To locate a service provider authorized by Lenovo to provide warranty service go to https datacentersupport lenovo com serviceprovider and use filter searching for different countries For Lenovo support telephone numbers see https datacentersupport lenovo com supportphonelist In the U S ...

Страница 86: ...82 ThinkSystem SD650 Dual Node DWC Tray and NeXtScale n1200 DWC Enclosure Setup Guide ...

Страница 87: ...s LED 17 drive removal 37 DWC tray install 63 E enclosure rear view 18 F Fan and Power Control connectors 19 features 1 front view connectors 17 LED location 17 front view of the solution 17 G Getting help 79 guidelines options installation 30 system reliability 31 H handling static sensitive devices 32 hardware options installing 32 hardware service and support telephone numbers 81 help 79 I IFT ...

Страница 88: ...re you call 79 hardware 81 software 81 service data 80 software 15 software service and support telephone numbers 81 solution setup 29 solution setup checklist 29 solution front view 17 static sensitive devices handling 32 support web page custom 79 System configuration ThinkSystem SD650 Dual Node DWC Tray and NeXtScale n1200 DWC Enclosure 67 system reliability guidelines 31 system error LED 17 T ...

Страница 89: ......

Страница 90: ...Part Number SP47A36229 Printed in China 1P P N SP47A36229 1PSP47A36229 ...

Отзывы: