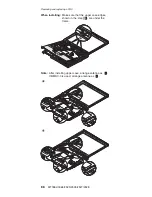
When
installing:
Follow
the
steps
below.
1.
Attach
the
connector.
2.
Make
sure
that
the
keyboard
edges,
shown
in
the
step
1
,
are
under
the
frame.
Then
press
the
keys
indicated
by
step
2
to
latch
the
keyboard
firmly
in
place.
1
1
2
3.
To
make
sure
that
the
front
side
of
the
keyboard
is
housed
firmly,
gently
press
the
keys
with
your
thumbs
and
try
to
slide
the
keyboard
toward
you.
3
3
4.
Secure
the
keyboard
by
tightening
the
screws
from
the
bottom
side
of
the
computer.
Removing
and
replacing
a
FRU
ThinkPad
X41
85
Содержание 1866 - ThinkPad X41 Tablet
Страница 6: ...2 MT1864 1865 2525 2526 2527 2528 ...
Страница 94: ...3 4 Removing and replacing a FRU 90 MT1864 1865 2525 2526 2527 2528 ...
Страница 98: ...Remove LCD module 4 4 Removing and replacing a FRU 94 MT1864 1865 2525 2526 2527 2528 ...
Страница 147: ...Trademarks ThinkPad X41 143 ...
Страница 148: ...Part Number 39T5971 1P P N 39T5971 ...

