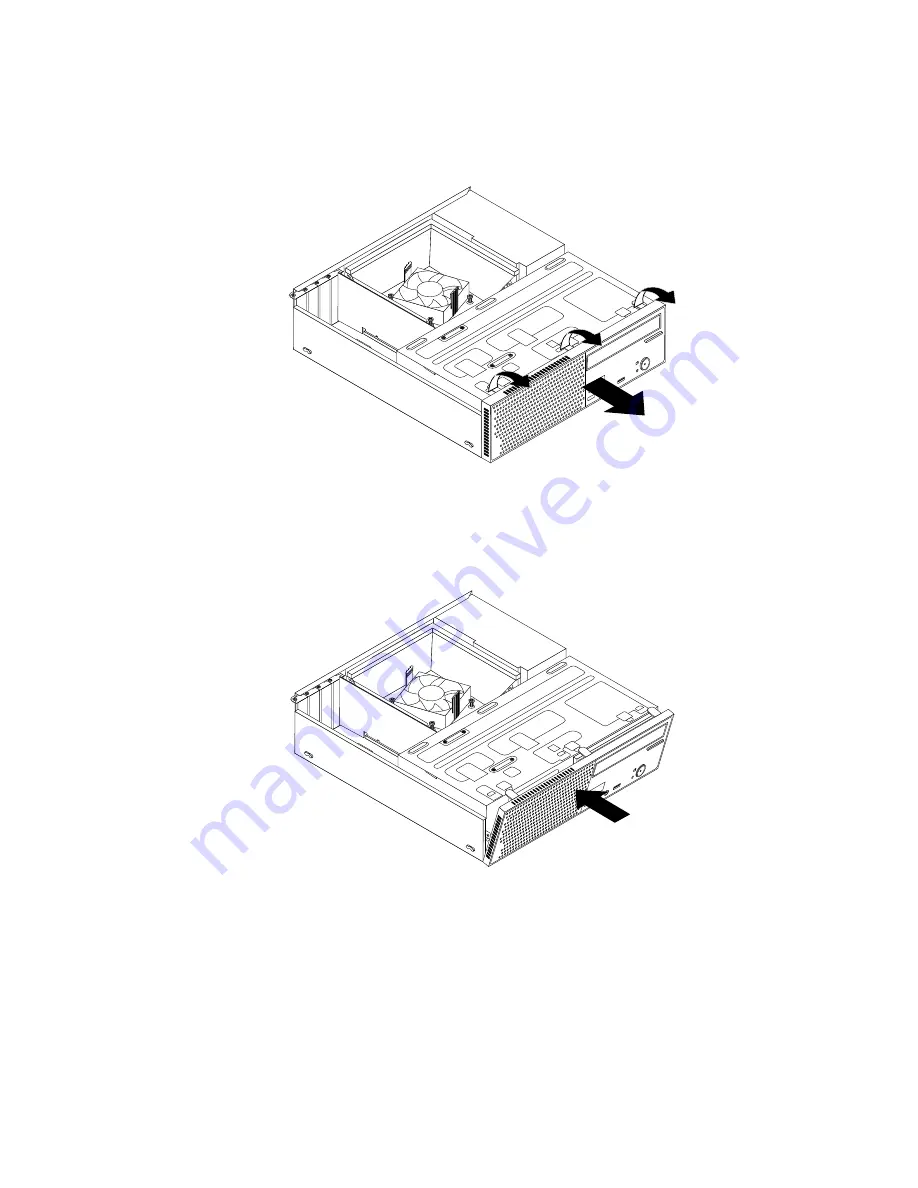
3. Remove the front bezel by releasing the three plastic tabs on the top of the front bezel and pivoting
the front bezel outward to remove it from the computer. Carefully lay the front bezel aside without
disconnecting the power switch and light-emitting diode (LED) assembly cable.
Figure 10. Removing the front bezel
4. To reinstall the front bezel, align the other three plastic tabs on the bottom of the front bezel with the
corresponding holes in the chassis, then pivot the front bezel inward until it snaps into position.
Figure 11. Reinstalling the front bezel
What to do next:
• To work with another piece of hardware, go to the appropriate section.
• To complete the installation or replacement, go to “Completing the parts replacement” on page 76.
Accessing the system board components and drives
Attention:
Do not open your computer or attempt any repair before reading and understanding the
“Important safety information” on page v.
Chapter 5
.
Installing or replacing hardware
37
Содержание 10AU
Страница 1: ...ThinkCentre E73 User Guide Machine Types 10AU 10AW 10BF 10BG 10DU and 10DT ...
Страница 6: ...iv ThinkCentre E73 User Guide ...
Страница 12: ...x ThinkCentre E73 User Guide ...
Страница 28: ...16 ThinkCentre E73 User Guide ...
Страница 90: ...78 ThinkCentre E73 User Guide ...
Страница 104: ...92 ThinkCentre E73 User Guide ...
Страница 112: ...100 ThinkCentre E73 User Guide ...
Страница 136: ...124 ThinkCentre E73 User Guide ...
Страница 146: ...134 ThinkCentre E73 User Guide ...
Страница 148: ...Ukraine RoHS India RoHS RoHS compliant as per E Waste Management Handling Rules 2011 136 ThinkCentre E73 User Guide ...
Страница 149: ...Appendix E China Energy Label Copyright Lenovo 2013 2014 137 ...
Страница 150: ...138 ThinkCentre E73 User Guide ...
Страница 152: ...140 ThinkCentre E73 User Guide ...
Страница 156: ...144 ThinkCentre E73 User Guide ...
Страница 157: ......
Страница 158: ......


