background image

GB-2 


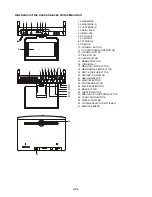
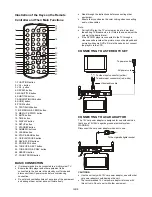
Illustration of the Controls/Jacks On the Main Unit 

 
1. FM ANTENNA 
2. AM ANTENNA IN   
3. TV ANTENNA IN 
4. AUDIO JACKS   
5. VIDEO JACK   
6. DC IN JACK   
7. AC SOCKET   
8. TFT DISPLAY   
9. CD DOOR   
10.  BUTTON   
11. CD DOOR OPEN/CLOSE BUTTON   
12. VOLUME - BUTTON   
13. TIME BUTTON   
14. ALARM BUTTON   
15. MEMORY BUTTON   
16. LCD DISPLAY   
17. MEM UP & F.FWD BUTTON   
18. MEM DOWN & F.BWD BUTTON 
19. NEXT & TUNE UP BUTTON   
20. DVD/DVB-T INDICATOR   
21. RADIO INDICATOR   
22. STANDBY BUTTON   
23. STOP/BAND BUTTON   
24. PLAY/PAUSE BUTTON   
25. MENU BUTTON 
26. FUNCTION BUTTON   
27. PREVIOUS & TUNE DOWN BUTTON 
28. COUNT DOWN BUTTON 
29. DISPLAY ROTATOR   
30. VOLTAGE SELECTOR (OPTIONAL)   
31. REMOTE SENSOR 


1  2 

3 4 

6 7 

30

29

9 10 

11 

12 

13 

14 

15 

16 

17 

18

20

31

21

22

23
24
25

19

26
27
28

Содержание KDV-310

Страница 1: ...SELECT READ THESE INSTRUCTIONS INCLUDED IN THIS IM THOROUGHLY PRIOR TO CONNECTING AND OPERATING PLEASE RETAIN THIS MANUAL IN CASE YOU MAY NEED IT FOR FUTURE REFERENCE THE ILLUSTRATIONS GRAPHICS HEREIN ARE FOR REFERENCE ONLY AND SUBJECT TO CHANGE WITHOUT NOTICE For information and support www lenco eu ...

Страница 2: ...ous voltage within the product s enclosure that may be of sufficient magnitude to constitute a risk of electric shock to persons The exclamation point within an equilateral triangle is intended to alert the user to the presence of important operating and maintenance servicing instructions in the literature accompanying the appliance Important Safety Instructions 1 Read these instructions 2 Keep th...

Страница 3: ...ON 14 ALARM BUTTON 15 MEMORY BUTTON 16 LCD DISPLAY 17 MEM UP F FWD BUTTON 18 MEM DOWN F BWD BUTTON 19 NEXT TUNE UP BUTTON 20 DVD DVB T INDICATOR 21 RADIO INDICATOR 22 STANDBY BUTTON 23 STOP BAND BUTTON 24 PLAY PAUSE BUTTON 25 MENU BUTTON 26 FUNCTION BUTTON 27 PREVIOUS TUNE DOWN BUTTON 28 COUNT DOWN BUTTON 29 DISPLAY ROTATOR 30 VOLTAGE SELECTOR OPTIONAL 31 REMOTE SENSOR 1 2 3 4 5 6 7 8 30 29 9 10 1...

Страница 4: ...the equipment and arrange them so that air can circulate freely y Read through the instructions before connecting other equipment y Ensure that you observe the color coding when connecting audio video cables Note y During DVD play the TV volume may be at a lower level than during TV broadcasts etc If this is the case adjust the volume to the desired level y If the DVD CD player is connected to the...

Страница 5: ... a track or all tracks for CD or repeat the specified points A B SEARCH FOR PREFERRED SCENE 1 Press SEARCH button during play and highlight the item to be played Title Chapter or Chapter time by navigation buttons 2 Input the desired number or time via the numeric buttons 3 Press OK button to confirm and the playback from the located scene starts 4 To exit search menu press SEARCH button directly ...

Страница 6: ...ayer Once the initial settings are done they are retained in the CPU of the player until otherwise modified COMMON PROCEDURES FOR INITIAL SETTINGS 1 Press SETUP button 2 Use the navigation buttons to select the item you want to modify setting page with further setting items displayed shows on the TV screen Again use navigation buttons to make changes Press OK button to confirm modifications 3 Use ...

Страница 7: ...CLOSE button again to confirm and the minute flashes for adjusting 4 Use NEXT TUNE UP button or PREVIOUS TUNE DOWN button to adjust minute 5 Finally press OK button to save the time Note You only could set time in standby mode ALARM OPERATION The unit is with alarm function you could set alarm as below steps in standby mode 1 Press and hold ALARM button on the unit until the hour flashes in the LC...

Страница 8: ...els It is used to enter the TV channels list for you to select or sort the TV channels as your desired Radio channels It is used to enter the Radio channels list for you to select or sort the Radio channels as your desired Channels class Select this option to edit the programs as your desired Channels edit Select this option to edit the channels name move or delete the channels as your desired 2 S...

Страница 9: ...properly connected Distorted video or sound x Use a disc without scratches or dents Image is unclear or distorted x Check the direction position and connection of the antenna No image or image is black and white x Adjust color settings x Check color settings CAUTION y The apparatus shall not be exposed to dripping or splashing and that no objects filled with liquids such as vases shall be placed o...

Страница 10: ...pose of this product please note that Waste electrical products should not be disposed of with household waste Please recycle where facilities exist Check with your Local Authority or retailer for recycling advice Waste Electrical and Electronic Equipment Directive Template Spacer X 4 Assign the spacers Mounting screw ...

Отзывы: