background image

5.4002.8501.0

B

Operating Instructions

5-3

3.

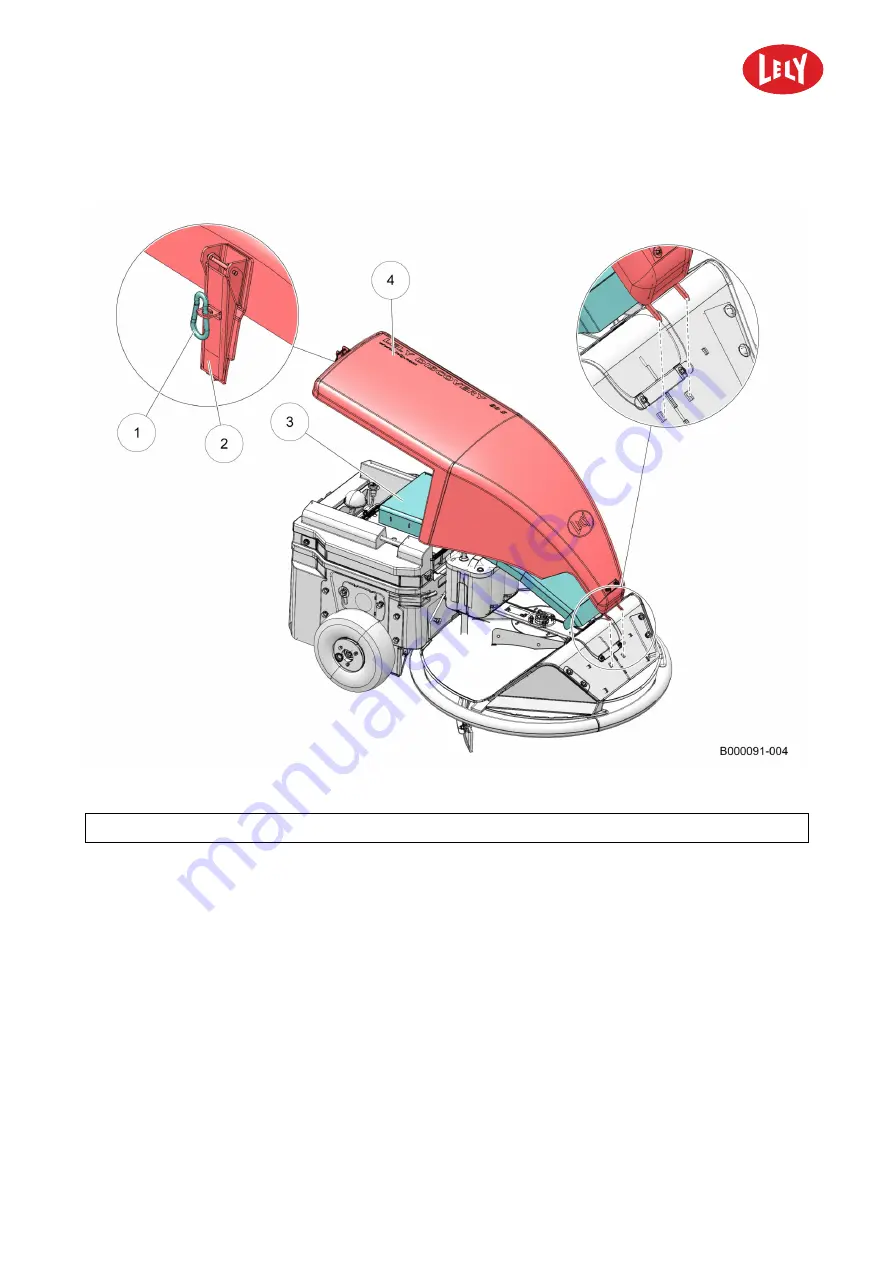
Remove the carabiner hook (1) (see figure 18 on page 5-3).

Figure 18. Remove or install the cover

KEY: 1. Carabiner hook - 2. Fastener - 3. Lower cover - 4. Upper cover

4.

Pull the fastener on the rear (2) towards you.

5.

Rotate the upper cover (4) towards the front side of the machine to remove the cover.

6.

Only if necessary, remove the lower cover from the vehicle (3).

5.4.2

Install the Cover

1.

Install the lower cover (3) (see figure 18 on page 5-3).

2.

Put the bracket of the upper cover in the slot at the front side of the machine.

3.

Lower the upper cover (4) at the rear side.

4.

Close the fastener on the rear (2).

5.

Install the carabiner hook (1) on the fastener (2).

in n o vato rs in  ag ric u ltu re

Содержание DISCOVERY 90 S

Страница 1: ...www lely com LelyIndustriesN V Operator Manual EN English Original 5 4002 8501 0 B Lely Discovery 90 S Mobile Barn Cleaner...

Страница 2: ...INTENTIONALLY BLANK 5 4002 8501 0 B innovators in agriculture...

Страница 3: ...part of this publication may be copied or published by means of printing photocopying microfilm or any other process whatsoever without prior permission in writing by Lely Holding b v Although the co...

Страница 4: ...INTENTIONALLY BLANK 5 4002 8501 0 B 4 Trademarks Copyright and Disclaimer innovators in agriculture...

Страница 5: ...aper assembly see Replace the Manure Scraper on page 6 8 PCB box see Switch ON the Machine on page 5 4 Removed procedure Tighten the drive chains Added EG declaration Disposal instructions 2015 03 A A...

Страница 6: ...INTENTIONALLY BLANK 5 4002 8501 0 B 6 List of Included Amendments innovators in agriculture...

Страница 7: ...pictures and specifications in this manual are based on the latest information that was available at the time of publication Your machine may comprise improvements features or options that are not co...

Страница 8: ...f the machine under the red cover Always include the type and serial number of your machine when you contact your local Lely service provider or order spare parts Figure 1 Type and serial number plate...

Страница 9: ...on the machine except for the maintenance done by the operator as indicated in the operator manual If people who are not certified by Lely Industries do maintenance on the machine the warranty on the...

Страница 10: ...5 4002 8501 0 B 10 Preface Left Right Rear and Front The positions left right rear and front in this manual refer to the machine as seen in the driving direction innovators in agriculture...

Страница 11: ...e 4 2 4 2 1 1 Covers 4 3 4 2 1 2 Cleaning Mechanism 4 3 4 2 1 3 Driving Mechanism 4 3 4 2 1 4 Power System 4 4 4 2 1 5 Control System 4 4 4 2 2 Charging Station 4 8 4 3 User Interface 4 8 4 3 1 Work 4...

Страница 12: ...ver 5 2 5 4 2 Install the Cover 5 3 5 5 Switch OFF the Machine 5 4 5 6 Switch ON the Machine 5 4 5 7 Start the Lely Control Application 5 5 5 8 Manually drive the Machine 5 7 5 9 Drive the Machine to...

Страница 13: ...ures 6 2 6 3 1 Clean the Charging Strips and the Charging Electrodes 6 2 6 3 2 Clean the Ultrasonic Sensor 6 4 6 3 3 Clean the Sensing Wheel 6 5 6 3 4 Clean the Manure Scraper 6 6 6 3 5 Clean the Cove...

Страница 14: ...ormation Report List 8 13 8 3 Troubleshooting Tables 8 14 8 3 1 Troubleshooting Table Vehicle 8 14 8 3 2 Troubleshooting Table Charging Station 8 16 8 3 3 Troubleshooting Table iPhone 8 18 8 4 Recover...

Страница 15: ...r must also read and understand the safety instructions in section Safety 1 2 Intended Use The Lely Discovery 90 S Mobile Barn Cleaner is designed as an autonomous driving machine to clean the slatted...

Страница 16: ...INTENTIONALLY BLANK 5 4002 8501 0 B 1 2 Lely Discovery innovators in agriculture...

Страница 17: ...e following guidelines Danger Indicates a hazardous situation which if not avoided will result in death or serious injury Warning Indicates a hazardous situation which if not avoided could result in d...

Страница 18: ...in the operating zone and working area pose a risk of fatal injury to unauthorized persons Unauthorized persons who do not satisfy the requirements described herein are not aware of the hazards in th...

Страница 19: ...safety related items with all operators frequently annually 2 3 2 Electrical Safety Only an authorized electrician must install the electrical power supply for the charging station of the machine Mak...

Страница 20: ...and understand this manual and all safety signs before you connect power supplies to operate maintain or adjust the machine Block the cow traffic before you do maintenance Always be alert for unexpec...

Страница 21: ...f actions per route 125 Max number of time route combinations per time path 48 Max duration of a time path 24 hours Drive on thresholds and level differences 10 mm 0 4 in Cleaning capacity Max cleanin...

Страница 22: ...current 20 A Max power 295 W Electrical properties battery charger blue Type Impulse II L Input voltage 220 240 VAC 50 60 Hz Nominal output voltage 12 VDC Max charge current 20 A Max power 400 W Requ...

Страница 23: ...5 4002 8501 0 B Specifications 3 3 3 1 Dimensions A B C D B000126 009 Figure 4 Machine dimensions KEY A 860 mm 33 86 in B 575 mm 22 64 in C 1285 mm 50 59 in D 125 mm 4 92 in innovators in agriculture...

Страница 24: ...5 4002 8501 0 B 3 4 Specifications A B C B000128 004 Figure 5 Dimension charging station KEY A 1650 2050 mm 65 0 80 7 in B 380 mm 15 0 in C 220 mm 8 7 in innovators in agriculture...

Страница 25: ...scribes the parts of the machine It also explains how the parts work together to clean the barn floor Figure 6 Main components KEY 1 or 1a View hole for indicator LEDs 2 Charging station 3 Sensing whe...

Страница 26: ...4 Concrete frame 5 PCB box 6 Pause button 7 Bluetooth antenna 8 Acoustic warning device 9 Ultrasonic sensor 4 2 Component Description 4 2 1 Discovery Mobile Barn Cleaner 90 S Vehicle The machine has...

Страница 27: ...xtra protection to the main parts of the machine 4 2 1 2 Cleaning Mechanism A manure scraper 3 see figure 7 on page 4 2 installed underneath the machine pushes the manure through the openings of the s...

Страница 28: ...g station also functions as the starting point of each route The power system stores and distributes the electrical power for the driving mechanism and the ADS3840 PCB The power supply is a single rec...

Страница 29: ...l or fence at a pre determined distance A foam ring is adhered on the sensor to minimize reflections and to focus the reflected beam The sensor gets inputs from and sends outputs to the ADS3840 PCB Gy...

Страница 30: ...the LED in the pause button blinks The alarm must be confirmed with the Lely Control app on the smartphone Status of the machine LED status of the pause button Start up Blink Out of operation Lely Co...

Страница 31: ...so shows reports and alarms The Lely Control app communicates via bluetooth with the software on the ADS3840 PCB The user interface has the following buttons Execute the command on the display above t...

Страница 32: ...is no wall at the desired charging location an optional floor column can be installed Battery Charger Blue The 20 A electronic battery charger has two indicator LEDs on the upper right side The LEDs...

Страница 33: ...menu Work has the following submenus On Off to switch the time path On or Off MANUAL ROUTE to manually start a selected route MANUAL DRIVING to manually drive the machine MANUAL CHARGER to drive the...

Страница 34: ...of a display There are four levels Menu Work indicated by the upper dot MANUAL ROUTE indicated by the second dot MANUAL DRIVING indicated by the third dot MANUAL CHARGER indicated by the fourth dot 4...

Страница 35: ...Act nr sequence number for the action in this route Runnr run number Battery battery voltage Buttons to start or stop timed actions to go to the next menu to go to the previous menu With the pause but...

Страница 36: ...time path is switched Off Display Description Move the vehicle manually see Manually drive the Machine on page 5 7 Buttons to start or stop the action to go to the next menu to go to the previous menu...

Страница 37: ...rom the charging station The values on the display indicate the battery voltage and the charge current Buttons to start or stop the action to go to the next menu to go to the previous menu Soft button...

Страница 38: ...eel is pushed to the wall The display shows the following information Display Description Actionr sequence number for the action in this route RunDst distance travelled in mm Speed1 left wheel speed i...

Страница 39: ...and left The chosen turn can be adjusted according to the specific situation The standard curves are Display Description Turn right 60 degrees gradually following wall maximum cleaning Turn right 90 d...

Страница 40: ...t 180 degrees Adjust the Turn After selecting an option the variables of the turn can be adjusted The display shows the following information Display Description Actionr Sequence number for the action...

Страница 41: ...mm UltraDst Actual distance to the wall mm 2000 mm 78 7 in max ULTRADST Adjustable distance to the wall mm Buttons or to adjust the value of the selected variable to start or stop Soft button MAN to...

Страница 42: ...the setting 4 3 2 2 Delete Route This menu is used to delete an existing route see Delete a Route on page 5 29 The display shows the following information Display Description List of set routes Butto...

Страница 43: ...is option can be used if a part of the barn is reconstructed or if a cow is calving 4 3 2 5 Route Analysis The menu Route analysis has the following options Fail problty Failure analys Fail problty gi...

Страница 44: ...ons in a route that have bump points must be more than 20 and the percentage short actions versus long actions must be less than 50 The third table displays explanations Table 1 display Failure analys...

Страница 45: ...tance a collision with a cow leg H Straight 5 m Deviation caused by driving straight for more than 5 m 15 4 ft 4 3 2 6 Speed Route This menu is used to set the speed for a route The maximum speed is 3...

Страница 46: ...y route is used to modify parts of an existing route Since a route is built of many actions changing one action influences the rest of the route Therefore modification is restricted to Modify the run...

Страница 47: ...the software and thus the driving distance see Wheel Diameter on page 4 24 4 3 2 12 Backup Route This menu is used to make a backup with the Lely Control app on the smartphone or to restore the inform...

Страница 48: ...m uses the current value to detect an obstacle The motor power can be set to Average Low Do not modify the motor power without the consent of your local Lely service provider 4 3 4 5 Wheel Diameter Sp...

Страница 49: ...nformation 4 3 6 Service The menu Service has the following sub menus Hour counter to display the hours in use since the last counter reset Version to display the software version Installation 1 passw...

Страница 50: ...on the right track 4 4 2 1 Driving Distance The encoders on the drive motor measure the number of rotations of the motor shafts This value is used to calculate the travelled distance If due to slip t...

Страница 51: ...angle with the wall is 0 degrees During the route the gyroscope calculates each deviation from a straight line see Gyroscope on page 4 5 This information is used to control the direction of the vehic...

Страница 52: ...tions compensate for the deviations caused by short actions It is therefore very important to program a subsequent long action after a succession of short actions In a situation with a succession of s...

Страница 53: ...ber Explanation 1 The vehicle doesn t reach the wall due to skidding There is no bump point to correct this error 3 5 7 Due to deviations in the gyroscope drift and or skidding the turns are less than...

Страница 54: ...where cows are eating followed by Turn L 3 The vehicle follows the wall on the left side Ultrasound L until the cubicles bump point 4 The vehicle drives back and follows the cubicles on the left side...

Страница 55: ...2 5 Obstacles If the machine unexpectedly comes across an obstacle for example the leg of a cow or a pile of manure the machine acts as follows It reverses and tries again up to 3 times It reverses a...

Страница 56: ...INTENTIONALLY BLANK 5 4002 8501 0 B 4 32 Description and Operation innovators in agriculture...

Страница 57: ...the software on the iPhone 1 You must pair the machine in the bluetooth list of devices on the iPhone and enter the password 0000 2 Check in the list of Bluetooth devices if the machine is connected t...

Страница 58: ...lled machines on a farm 5 4 Remove or Install the Covers 5 4 1 Remove the Cover 1 Stop the time path to take the machine out of operation see Start or Stop the Time Path on page 5 33 2 Manually drive...

Страница 59: ...the upper cover 4 towards the front side of the machine to remove the cover 6 Only if necessary remove the lower cover from the vehicle 3 5 4 2 Install the Cover 1 Install the lower cover 3 see figur...

Страница 60: ...rive the machine away from the charger see Manually drive the Machine on page 5 7 Unexpected cow movement Risk of being crushed or trampled Block the cow traffic 2 Remove the upper and lower cover see...

Страница 61: ...r line of sight Remote operation of the smartphone or tablet by remote desktop software such as but not limited by Teamviewer is strictly forbidden to avoid dangerous situations Make sure you are in t...

Страница 62: ...ith the selected machine A green light is displayed in the title when the connection is made The smartphone shows a set of control buttons and a display that can be used to operate the software If the...

Страница 63: ...turns left when it is manually driven or L and R both motors to go straight forward or backward 6 Push to change the direction if necessary 7 Push to start hold it 8 Release to stop Figure 21 Manual...

Страница 64: ...the left side R if the charging station is on the right side 6 Push to start The machine approaches the charging station and stops by itself Figure 22 Manual charger Figure 23 Drive to the charging st...

Страница 65: ...This will enable you to easily return the vehicle back to the charging station in case it gets lost Make a backup after programming a route Adapt the route or settings to the herd The beep can be modi...

Страница 66: ...can be set based on these 3 routes To see how to set a time path see Set a Time Path on page 5 30 Also keep in mind that after ending the first route after midnight the machine will charge until the...

Страница 67: ...day Figure 26 Route 3 clean the areas between the cubicles and the feed fence 2 times a day Each route is built of many actions The following figure shows the actions of route 1 on the left side of t...

Страница 68: ...ight Driving straight is the only option because the distance to a wall is more than 2 meter 4 Wall flw R Vehicle will turn right until it hits the cubicle floor and will then follow the cubicle floor...

Страница 69: ...turn 90 degrees modify if the nose of vehicle doesn t point in the correct direction 11 Straight Straight until the first cubicle on the left side 12 Ultrasound L Ultrasound drive 1100 mm The followi...

Страница 70: ...after crossing over 12 Straight Drive straight until bump point 13 Turn L 180 degrees Standard turn stop in adjacent lane 14 Straight 15 Ultrasound L Ultrasound drive 1100 mm 16 Ultrasound L Ultrasoun...

Страница 71: ...2 Straight Drive straight until bump point 3 Turn R 90 degrees 4 Wall flw L 5 Turn R 90 degrees 6 Straight Drive straight until start of a cubicle row 7 Wall flw R 8 Ultrasound L Ultrasound drive 1100...

Страница 72: ...robot There is no free cow traffic to the milking parlour If the cows are milked a half of the barn is closed and can be cleaned Figure 30 Example route barn with milking parlour 5 10 4 To pass a Cros...

Страница 73: ...l bump point Drive back to enable turning Turn 180 degrees with a certain radius You can choose from 4 standard turns both left and right each with a different radius Go back turn 180 degrees stop in...

Страница 74: ...6 in C 80 cm 31 in 5 10 6 To approach the Charging Station from the opposite Direction Figure 32 Approach the charging station Number Action Explanation 1 Wall flw R Follow the wall on the right side...

Страница 75: ...1 5 3 m 5 10 ft from the charging station 8 Charger Go to the charging station 5 10 7 To follow a Bend in a Wall Figure 33 Follow a bend in a wall Number Action Explanation 1 Wall flw L Wall follow 2...

Страница 76: ...the Time Path on page 5 33 Program 1 In the main menu of the Lely Control app select Routes and push 2 Select the menu New route and push 3 The message SAFETY WARNING Manual operation is permitted on...

Страница 77: ...n Yes to save the new route Close up 1 Test the route see Test a Route on page 7 4 2 Make a backup of the route see Make a Backup on page 5 31 5 11 1 1 Follow a Wall Left or Right Try to avoid to move...

Страница 78: ...e machine approaches a bump point approx 30 cm 12 in 1 Push to smoothly reduce speed 2 Push to stop the machine immediately The display shows the status Manual stop or Bump stop and the travelled dist...

Страница 79: ...t after going straight Before starting make sure the machine points in the correct direction Use the Straight option as little as possible If it really is necessary for example to get the machine thro...

Страница 80: ...iving Straight 4 If the machine approaches a bump point approx 30 cm 12 in push to smoothly reduce speed 5 Push to stop the machine immediately The display shows the status Manual stop or Bump stop an...

Страница 81: ...an choose from 12 standard turns see Turn Right or Left on page 4 15 and modify the turn afterwards Preferably do not make sharp turns in heavy polluted areas less power 4 Push until the most appropri...

Страница 82: ...left or right 10 Push soft button MAN to modify the position 1 Push soft button to turn left or to turn right 2 Push to confirm and go one level up 11 Push soft button Save 5 11 1 4 Follow a Wall or...

Страница 83: ...is within 1 5 3 m from the charging station and points towards it see Manually drive the Machine on page 5 7 2 Select the menu Charger 3 Push soft button MAN to modify the position 1 Push soft button...

Страница 84: ...Stop the Time Path on page 5 33 3 Test the route see Test a Route on page 7 4 4 In the main menu of the Lely Control app select Routes and push 5 Select Modify route and push 6 Select Modify route an...

Страница 85: ...ush soft button Yes to confirm 5 11 5 Delete a Route 1 Start the Lely Control Application see page 5 5 2 Stop the time path to take the machine out of operation see Start or Stop the Time Path on page...

Страница 86: ...sh or to select the route you want to delete 2 Push soft button Reset 5 11 7 Set a Time Path The machine must not drive more than 40 of the total time in a time path It must spend minimum 60 of the to...

Страница 87: ...or time path or when another smartphone is used Backups are made on the smartphone Make sure to give each backup you make a unique name Make sure the phone has a proper connection with the machine and...

Страница 88: ...elect the applicable backup file bkp 7 Click Save to 8 Select the location on the PC where you want to save the backup file 5 11 10 Copy a Backup file from a PC to the Smartphone Android 1 Connect the...

Страница 89: ...upper side of the menu that displays the actual time is grayed out the time path is On 3 Push or 4 Push the pause button on the machine to pause restart the time path of the machine Figure 37 Start o...

Страница 90: ...the manual route push soft button Yes else push soft button No To Pause or Stop a Manual Route 1 Push or the pause button on the machine 2 If you want to Stop the route immediately push soft button Y...

Страница 91: ...Stop the time path to take the machine out of operation see Start or Stop the Time Path on page 5 33 2 In the main menu of the Lely Control app select Routes and push 3 Select Speed route and push 4...

Страница 92: ...5 4002 8501 0 B 5 36 Operating Instructions 7 Push twice to confirm and go two levels up 8 Push Yes to save the modification 9 Push to confirm and go one level up innovators in agriculture...

Страница 93: ...nce must obey local regulations if applicable The frequencies of the tasks shown in the table are the minimum frequencies recommended Maintenance Tasks Frequencies Operating Weeks Operating Months Not...

Страница 94: ...r supply to the charging station 2 Manually drive the machine to a clean and quiet location see Manually drive the Machine on page 5 7 3 Switch OFF the Machine see page 5 4 Clean Unexpected cow moveme...

Страница 95: ...e 5 4 During the calibration process you must not move the machine 3 Push soft button Yes to start the gyroscope calibration process 4 Wait until a beep is heard about 10 minutes to confirm that the c...

Страница 96: ...lly drive the Machine on page 5 7 Clean Unexpected cow movement Risk of being crushed or trampled Block the cow traffic Do not use sharp objects to clean the ultrasonic sensor Figure 40 Ultrasonic sen...

Страница 97: ...or trampled Block the cow traffic Heavy parts Risk of personal injury Use suitable lifting or tilting equipment 1 Use a suitable lifting or tilting tool to lift the front of the machine and put the v...

Страница 98: ...ng Station on page 5 7 2 Start the time path to put the machine into operation see figure 37 on page 5 33 6 3 4 Clean the Manure Scraper Preparation 1 Manually drive the machine to a clean and quiet l...

Страница 99: ...and a brush Close up 1 Use a suitable lifting or tilting tool to put the machine back onto its wheels 2 Clean the ultrasonic sensor with a tissue if it got dirty during cleaning of the manure scraper...

Страница 100: ...raper Preparation 1 Manually drive the machine to a clean and quiet location see Manually drive the Machine on page 5 7 2 Switch OFF the Machine see page 5 4 Removal Unexpected cow movement Risk of be...

Страница 101: ...8 to the fixation plate 9 Installation 1 Loosely install the new manure scraper 8 see figure 45 on page 6 9 between the fixation plate 9 and the clamping strip 7 with the ten bolts washers and nuts 2...

Страница 102: ...cope calibration process 6 Wait until a beep is heard about 5 minutes to confirm that the calibration is complete 7 Drive the Machine to the Charging Station see page 5 7 8 Start the time path to put...

Страница 103: ...nut 2 Close up 1 Use a suitable lifting or tilting tool to put the machine back onto its wheels 2 Switch on the machine see Switch ON the Machine on page 5 4 3 Open the Lely Control app on the smartph...

Страница 104: ...INTENTIONALLY BLANK 5 4002 8501 0 B 6 12 Maintenance innovators in agriculture...

Страница 105: ...ly Control Application see page 5 5 2 In the main menu select Settings and push 3 In the menu Settings select RealTime clock and push 4 Push soft button see RealTime clock on page 4 23 The real time c...

Страница 106: ...tart the Lely Control Application see page 5 5 2 In the main menu select Routes and push 3 Select Beepfreq route and push 4 Select the route you want to modify and push 5 Push or to modify the number...

Страница 107: ...To Analyse the Reliability per Route 1 Select Route analysis and push 2 Select Fail problty and push Push or to display routes that are not displayed 3 If a route has a failure probability of more th...

Страница 108: ...ake a new route 7 3 2 Test a Route 1 Put the route into a manual route 2 Start the manual route see Start Stop or Pause a Manual Route on page 5 33 3 Find the actions and action numbers on the display...

Страница 109: ...e main power is connected to the battery charger 9 If the machine is still not charging make sure the electrodes are connected to the battery charger 10 If the machine is still not charging Clean the...

Страница 110: ...sure the machine is between you and the wall Make sure not to interrupt the sensing beam while turning the wheel 7 Monitor the display of the user interface while you turn the sensing wheel 8 Make su...

Страница 111: ...Test and Adjustment 7 7 Close up 1 Drive the Machine to the Charging Station see page 5 7 2 Start the time path to put the machine into operation see Start or Stop the Time Path on page 5 33 innovator...

Страница 112: ...INTENTIONALLY BLANK 5 4002 8501 0 B 7 8 Test and Adjustment innovators in agriculture...

Страница 113: ...8 11 The system also displays information about the operation of the machine see Information Report List on page 8 13 8 2 1 Recover Alarms When the machine is in normal operation and a critical alarm...

Страница 114: ...e 8 3 6 Do the recovery procedure described in the alarm list 8 2 3 Read a Report 1 Start the Lely Control Application see page 5 5 2 Stop the time path to take the machine out of operation see Start...

Страница 115: ...ur local service provider 2 DOUBLE_ACTION Software failure 1 Call your local Lely service provider 3 DIS_OFF_RANGE Discovery lost searching bump point Slip reduce wall bump force motor power No bump p...

Страница 116: ...is see Analyse the Reliability of a Route on page 7 3 2 Modify the routes that are unreliable see Modify a Route on page 5 28 1 If the machine is blocked at a different place calibrate the gyroscop se...

Страница 117: ...see Manually drive the Machine on page 5 7 4 Make sure the Battery is Charging see page 7 4 5 If the machine is still not charging call your local service provider 10 STARTUP Alarm appears with every...

Страница 118: ...ing Check charge LEDs on charger and clean charge strips Battery not full despite charging 1 Clean the Charging Strips and the Charging Electrodes see page 6 2 2 Manually drive the machine to the char...

Страница 119: ...remains decrease the motor power 23 HEAVY DRIVE Discovery drives hard The machine has difficulties driving the route If the alarm is repeated more that 5 times per week 1 Make sure there are no obstac...

Страница 120: ...our local Lely service provider 33 FULL CHARGING Not enough charging time between routes The machine must recharge fully during nighttime 1 Modify the routes see Modify a Route on page 5 28 2 Make sur...

Страница 121: ...ff to protect the battery 1 Clean the Charging Strips and the Charging Electrodes see page 6 2 2 Make sure the Battery is Charging see page 7 4 3 Charge the machine 49 BATTERY_CABLE Loader error Check...

Страница 122: ...e provider 59 GYRO_TIMEOUT 1 Call your local Lely service provider 60 61 64GYRO_BIAS 1 2 5 1 Call your local Lely service provider 65 Gyroscope type does not match output signal Reset PCB 1 Switch OFF...

Страница 123: ...vice provider 8 2 5 Report List The table below gives the report numbers and any actions to be taken Report code and report Description Procedure 2 Left chain is slack Check chain tension 1 Call your...

Страница 124: ...e PCB box 14 Battery is overloaded too many times See battery yield and check battery and capacity Vehicle drives back 20 cm automatically to protect the battery 1 Call your local Lely service provide...

Страница 125: ...viate check drift 1 Calibrate the Gyroscope see page 8 19 2 If the problem remains 1 Do a route analysis see Analyse the Reliability of a Route on page 7 3 2 Modify the routes that are unreliable see...

Страница 126: ...20 ERROR Distance correction on exist routes check on skid during drive The control system has corrected the drive distance because the expected bump point was not reached in time This could be due to...

Страница 127: ...rvice provider The power supply is not connected Connect the power supply Other Call your local Lely service provider The machine drives more shaky than before The chains are not tightened correctly C...

Страница 128: ...correct If the version is not correct update the smartphone software Machine is not starting a route The time path is not correct Make sure the time path is correct see Set a Time Path on page 5 30 Th...

Страница 129: ...seconds rest Internal temperature is higher than 85 degrees C 185 degrees F Remove plug from the mains Connect plug and retry after one hour Green and Yellow LED together blink 7 times followed by a...

Страница 130: ...chine in the bluetooth list of devices on the iPhone and enter the password 0000 4 Check in the list of Bluetooth devices if the machine is connected tap once to connect if it is not connected The iPh...

Страница 131: ...e Machine on page 5 7 3 Remove the upper cover see Remove the Cover on page 5 2 4 Remove the lower cover 5 On the PCB box push button Off 6 On the PCB box push button On 7 Calibrate the gyroscope see...

Страница 132: ...ou hear a beep sound approximately 5 minutes 8 4 3 Charge the Machine 1 Drive the Machine to the Charging Station see page 5 7 2 Make sure the machine is charging orange and green LEDs are ON see Char...

Страница 133: ...nd must be done only by qualified recycling organizations All components must be disposed in compliance with the local rules and regulations Lubricants and fluids must be disposed correctly to prevent...

Страница 134: ...INTENTIONALLY BLANK 5 4002 8501 0 B 9 2 Disposal innovators in agriculture...

Страница 135: ...5 4002 8501 0 B EG Declaration of Conformity 10 1 10 EG Declaration of Conformity innovators in agriculture...

Страница 136: ...INTENTIONALLY BLANK 5 4002 8501 0 B 10 2 EG Declaration of Conformity innovators in agriculture...

Страница 137: ......

Страница 138: ...www lely com CornelisFvanFderFLelylaanF1 NL 3147FPB FMaassluis Tel 31F 0 88F F12F28F221 Fax 31F 0 88F F12F28F222 Lely Industries N V...

Отзывы: