


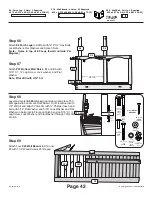


Page 43
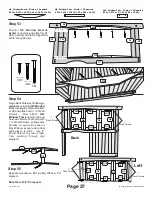
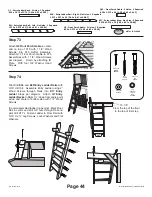
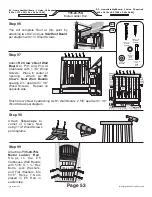
Step 71
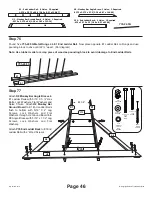
Step 72
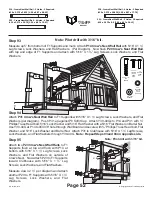
Step 70
Build two
Porch Roof Rafter
Assemblies with K16L
and K16R. Run 2” Wood Screws through each edge
per diagram. Lay one assembly flat on ground and
attach Y1-19G Triangle Brace to face of one Rafter set
with ¾” Washer Head Screws.
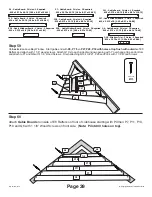
Attach five
SA3 Right Porch Roof
Boards
to K16 Rafter Assemblies
flush at peak and flush at back of
K16 and to front of K16 assembly
with 2” overhang with 1 ½” Wood
Screws (per diagram). Now
attach five
SA4 Left Porch Roof
Boards
flush at top with 1 1/2”
Wood Screws to match opposite
side.
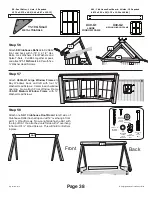
Attach
P19 Front Porch Support
and Front
Porch Roof Assemblies using 5/16” X 2 ¾”
Hex Bolts, Lock Washers, Flat Washers and
Spike T-Nuts by pushing bolt through K16 and
through P19 Front Porch Support and into E6
Leg into Spike T-Nuts. Attach K16 to K5 Rail
on left with 1 ½” Hex Bolt, Lock Washer, Flat
Washer, and Spike T-Nut. Level Roof and
fasten Back Rafter Assembly to K5 Rail on
right side with 5/16” X 1 ½” Lag Screw, Lock
Washer, and Flat Washer per diagram.
P19
K16L - Porch Roof Rafter - 1 Holes - 2 Required
.9375 x 3.375 x 24.5 [2.38 x 8.57 x 62.23]
K16R - Porch Roof Rafter - 1 Holes - 2 Required
.9375 x 3.375 x 24.5 [2.38 x 8.57 x 62.23]
P19 - Front Porch Roof Support - 2 Holes - 1 Required
.625 x 3.375 x 31 [1.59 x 8.57 x 78.74]
SA3 - Left Porch Roof Panel - 4 Holes - 5 Required
.6875 x 5.25 x 32.75 [1.75 x 13.34 x 83.19]
SA4 - Right Porch Roof Panel - 4 Holes - 5 Required
.6875 x 5.25 x 32.75 [1.75 x 13.34 x 83.19]
SMALL TRIANGLE BRACE
Y1-19G
K16L
K16R
Front
Back
Note: Counter sunk hole to front.
SA3
2”
overhang
Porch Roof
Flush with
Rafter on
back side
K16L
K16R
K16L
K16R
E6
E6
#8 X 3/4
WASHER
HEAD
SCREW
"
#8 X 1-1/2"
WOOD
SCREW
5/16 X 2 3/4"
HEX
HEAD
BOLT
5/16 X 1 1/2"
HEX
HEAD
BOLT
5/16 X 1 1/2"
LAG
SCREW
5/16"
INTERNAL
TOOTH
LOCK
WASHER
5/16" FLAT
WASHER
5/16"
SPIKE TEE
NUT
© Copyright Leisure Time Products Inc.
Sky Fort 09-0112
#8 X 2"
WOOD
SCREW
Front
Back
Pilot drill 1 1/2” down
with 1 1/8” bit.
Note: Counter sink holes


