Page 36
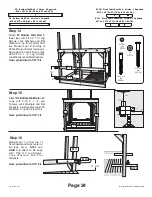
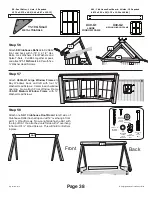
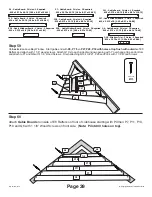
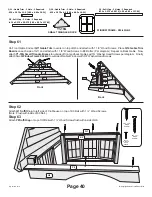
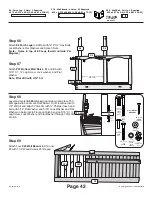
Step 51
Step 52
Attach
Q2 Clubhouse Wall Board
and
P10 Wall
Board
between B6 and B2 Posts with 1 1/8”
Wood Screws. Place
SD1 Clubhouse Wall
Board
on top of B2 post and attach to H8 and K19
with 1 1/8” Wood Screws. Attach Q2 Wall Board
then two P10 Wall Boards against B7 Corner Post
with 1 1/8” Wood Screws to Rails.
To attach
E5 Clubhouse Wall
Boards
first drive 5/16 Spike
T-Nuts into board per diagram.
Attach to
H8 Upper Rail
with
5/16” X 2” Lag Screws, Lock
Washers and Flat Washers
then attach to P2 Bottom Rail
with 5/16” X 2” Hex Bolts, Lock
Washers and Flat Washers.
Use 3” Wood Screws in Pilot
Holes to attach E5 to B8
Mounting Board.
Attach two P21, then one Q4
and two more P21 with 1 1/8”
Wood Screws
(Note: These holes will be
used in later step.)
Q2
P10
SD1
B6
H8
B2
E5
E5
Q2
P10
B7
K19
P2
B8
Q2 - Club House Wall Board - 3 Hole - 2 Required
.625 x 2.375 x 50.5 [1.59 x 6.03 x 128.27]
Q4 - Club House Wall Board - 6 Holes - 1 Required
.625 x 2.375 x 29.875 [1.59 x 6.03 x 75.88]
E5 - Club House Wall Board - 5 Holes - 2 Required
1.375 x 3.375 x 50.5 [3.49 x 8.57 x 128.27]
P10 - Club House Wall Board - 5 Holes - 8 Required
.625 x 3.375 x 50.5 [1.59 x 8.57 x 128.27]
P21 - Club House Wall Board - 6 Holes - 5 Required
.625 x 3.375 x 29.875 [1.59 x 8.57 x 75.88]
SD1 - Club House Wall Board - 4 Holes - 1 Required
.625 x 3 x 27 [1.59 x 7.62 x 68.58]
E5
E5
5/16"
INTERNAL
TOOTH
LOCK
WASHER
5/16" FLAT
WASHER
#8 X 1-1/8"
WOOD
SCREW
#8 X 3"
WOOD
SCREW
5/16 X 2"
LAG
SCREW
5/16"
SPIKE TEE
NUT
5/16 X 2"
HEX
HEAD
BOLT
© Copyright Leisure Time Products Inc.
Sky Fort 09-0112
Q2
P10
SD1
B6
H8
B2
E5
E5
Q2
P10
Q4
P21
P21
B7
K19
P2
B8


