


Selecting A Good Location
LEVEL, FLAT & SOLID LOAD BEARING SITE CRITICAL
Solid Load Bearing Site
The site must provide a solid foundation with a minimum load bearing capacity
of 135 pounds per square foot (61.23 kgr per 929.03 sq. cm). Concrete slabs
and decks must be designed to support this weight. Do not select a site composed
of individual unsupported bricks, blocks or other materials which will shift unevenly
and cause damage to your spa’s internal frame.
Site Selection...
Your new spa will provide you and yours with hour upon hour of healthy, relaxing enjoyment. The following suggestions and
recommendations will help you select a safe and compatible site for your spa, maximizing your enjoyment.
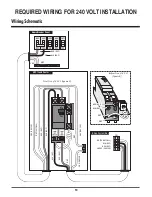
1. Certified Licensed Electrician Required
Electrical installation, (approval of and connection to power source) must
be completed by a qualified certified licensed electrician in compliance
with all codes.
2. No Overhead Power Lines
Do not locate your spa under overhead power lines or in near proximity to
existing buried or exposed electrical circuits. See your certified licensed
electrician.
READ ALL SAFETY INSTRUCTIONS!
See pages 1 and 2 for other safety requirements and instructions
3. Childproof Your Spa
Plan for limiting access of children. Precautions such as self closing and
locking gates or access doors, fencing and other child barriers, as dictated
by the site would be recommended.
4. UL Safety Cover Required
In addition to its insulating factors, a good cover also provides a measure
of additional protection from unwanted access. Select a cover which is
classified by the Underwriters Laboratories meeting ASTM F1346-91
requirements.
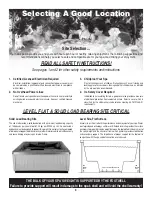
Level Site, Flat Surface
A level site is critical to both the performance and enjoyment of your spa. Water
is unforgiving and will always settle level. A flat and level site provides the surface
necessary to properly disperse weight between the footwell which bears most of
the spa’s weight and the structural frame which primarily provides stabilization
and secondary support. The importance of proper support for the footwell in
conjunction with the spa cabinet cannot be over stressed.
THE BULK OF YOUR SPA’S WEIGHT IS SUPPORTED BY THE FOOTWELL
Failure to provide support will result in damage to the spa’s shell and will void the shell warranty!
15%
W
EIGHT
L
OAD
70%
OF
THE
S
PA
’
S
W
EIGHT
L
OAD
15%
W
EIGHT
L
OAD
3
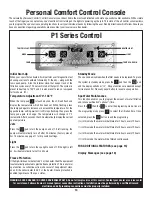
Содержание P1Series
Страница 22: ...MAINTENANCE NOTES 20...
Страница 23: ...MAINTENANCE NOTES 21...
Страница 24: ...MAINTENANCE NOTES 22...
Страница 25: ...MAINTENANCE NOTES 23...
Страница 26: ...0007100 6 06...