Advanced (Playback)
88
ments
®
”, double-click the file “Setup.exe”,
and follow the installation routine.
Installing Apple
®
QuickTime 6.3
Insert the DVD into the DVD-drive of your
computer. Open the DVD in your Windows
Explorer, open the folder “Apple
®
Quick-
Time”, double-click the file “QuickTime
Installer.exe”, and follow the installation
routine. Leave the field for the serial
number blank and proceed.
Installation on computers equipped with
Apple
®
Macintosh operation systems:
Installing Apple
®
QuickTime 6.3
Insert the DVD into the DVD-drive of your
computer. Double-click the icon of the DVD
on your Macintosh desktop. Then select
your desired language and double-click the
corresponding icon. Follow the installation
routine.
Documentation and detailed
instructions
for installing Adobe
®
Photoshop
®
Ele-
ments
®
is available on the supplied DVD in
your specific language folder under “docu-
mentation”:
Engl: \ English \ User Documentation \
Support for Adobe
®
Photoshop
®
Elements
®
Support contact information for Adobe
®
Photoshop
®
Elements
®
is available on the
software DVD in the following folder:
Engl: \ English \ Customer Support \
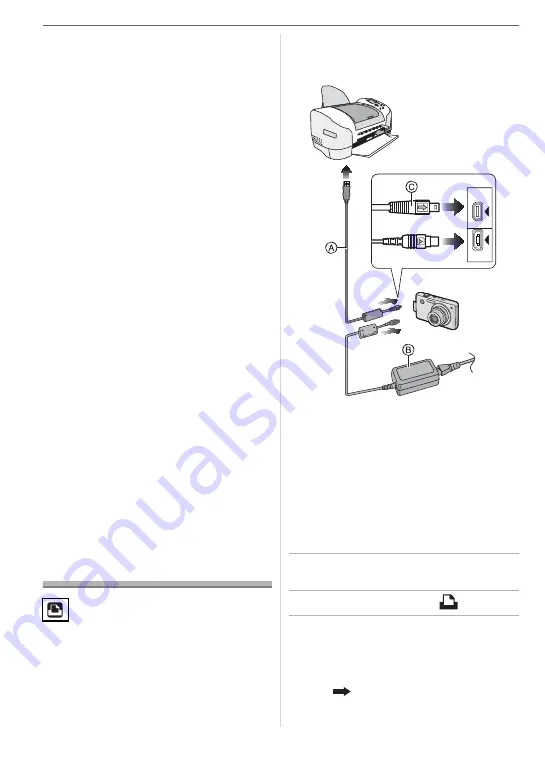
Printing the Pictures
By connecting the camera directly to a
printer supporting PictBridge via the USB
connection cable (supplied), you can select
the pictures to print and start printing on the
camera’s screen.
Set print settings such as the print quality
on the printer beforehand. (Read the printer
operating instructions.)
: USB connection cable (supplied)
: AC adaptor (ACA-DC4; optional)
• It may take time to print some pictures.
Use a battery with sufficient battery power
(P21) or the AC adaptor (ACA-DC4;
optional) when you connect to a printer.
• Turn the camera off before inserting or
removing the cable for the AC adaptor
(ACA-DC4; optional).
1
Turn on the camera and the
printer.
2
Set the mode dial to [
].
3
Connect the camera to a printer
via the USB connection cable
(supplied).
• Connect the USB connection cable with
the [
] mark facing the [
] mark on
the [DIGITAL] socket.
DIGITAL
AV OUT
DC IN


