background image

Introduction 

Page 4 of 31 

1


Introduction 

The new high-speed printer series 

Rapid

 is designed for all print jobs for which the current 

version of the JET3up is not fast enough. 
This document provides: 

o


Technical data 

o


Differences between the features and the possible applications of the available types of 

RAPID


o


Overview on the available inks 

o


Important information about recommended encoders 

o


Overview on the differences regarding the spare parts 

Important Information 

There are several significant differences between the JET3up and the printers of the RAPID series. 

The differences affect parts of the printer as well as service procedures. 

It is highly recommended thoroughly checking the manuals and the 

accessories catalogue for the differences between the JET3up and the 

JET3 RAPID series. 

The following list gives an overview about the parts that are different for the RAPID series in 

comparison to the JET3up: 

o


Controller board 

o


Parts of the Printhead (please see details in accessories catalog) 

o


Ink valve (VV) 

Regarding service and adjustment procedures the main differences are: 

o


Hydraulic settings 

o


Ink jet adjustments 

The differences are described in the manuals that come together with the printers. 

There are extracts of the manuals in the addendum of this document. 

Содержание RAPID Highspeed

Страница 1: ...Technical information The new LEIBINGER RAPID printer series Version 1 4 ...

Страница 2: ......

Страница 3: ...ighspeed The print head ventilation 15 5 1 Basics about the functionality 15 5 2 Technical details 16 6 Information about encoders 17 6 1 Basics 17 6 2 The resolution and the output frequency of the encoder 17 6 3 The specifications of the encoder input of the printer 18 6 4 Recommendations regarding the encoder Printer combination for high speed applications 19 6 5 Example for an encoder printer ...

Страница 4: ...the printers of the RAPID series The differences affect parts of the printer as well as service procedures It is highly recommended thoroughly checking the manuals and the accessories catalogue for the differences between the JET3up and the JET3 RAPID series The following list gives an overview about the parts that are different for the RAPID series in comparison to the JET3up o Controller board o...

Страница 5: ...appendix for details Available fonts 3x7 tower 4x5 5x5 7x5 3x7 tower 4x5 5x5 7x5 Same fonts as JET3up Up to 32 dots Print head dimensions Available inks Please see appendix for a detailed ink list Please see appendix for a detailed ink list Please see appendix for a detailed ink list Possible substrates Please see ink list in the appendix for details about substrates Please see ink list in the app...

Страница 6: ...4 2 5 0 25 0 52 216 449 240 500 RAPID Highspeed Font Height mm Recommended character width mm Recommended stroke distance mm Speed m min drop frequency 115 kHz 128 kHz 3x7 1 5 2 4 2 0 4 0 0 3 0 58 521 988 580 1100 4x5 0 9 2 4 0 9 2 5 0 2 0 52 234 719 260 800 7x5 2 2 2 6 1 4 2 5 0 25 0 52 216 449 240 500 there is also a 5x5 font available With the 5x5 the maximum speed is a bit lower Only available...

Страница 7: ... to the special print head High speed printing with a maximum print height of 2 5 mm JET3up applications that require higher production speeds especially if there is a 2 or 3 line print out required E g filling systems or bottling plants Restrictions There is a smaller range of approved inks available than for the JET3up There are only three fonts available o 3x7 tower o 4x5 o 5x5 o 7x5 The diamet...

Страница 8: ...f products as long as they fit to the special design of the print head Due to this design the print head should only be used for substrates with a diameter smaller than 5 mm For substrates with a larger diameter or thickness it is recommended using the RAPID Highspeed or the RAPID Universal The print head of the RAPID Wire designed for wire printing at high speeds The illustrations show the specia...

Страница 9: ...d at the same speed as the RAPID Wire but the quality of the print outs are not expected to be as good as they are with the RAPID Wire The print head of the RAPID Highspeed The slightly angled surface allows an optimized mounting of the print head Ink drops that hit the surface of a substrate tend to burst in smaller drops and not all drops are absorbed by the substrate When the print head is moun...

Страница 10: ...b for the JET3up with a 32 dot high quality font allows a printing speed of 30 meter minute it will be possible to print the same job with the RAPID Universal at a speed of around 40 m min In order to reach a good quality for the print outs at the faster speeds the recommended distance between print head and substrate is 15 mm The print head of the RAPID Universal From the dimensions the print hea...

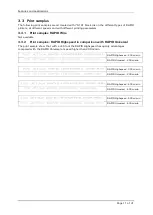
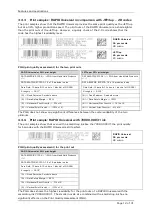
Страница 11: ...D Wire Not available 3 3 2 Print samples RAPID Highspeed in comparison with RAPID Universal The print sample show that with a 7x5 font the RAPID Highspeed has quality advantages compared with the RAPID Universal at speed higher than 200 m min RAPID Highspeed 200 m min RAPID Universal 200 m min RAPID Highspeed 300 m min RAPID Universal 200 m min RAPID Highspeed 400 m min RAPID Universal 400 m min R...

Страница 12: ...6 x 16 modules in size Data Field 12 data 12 chks in 1 block s of GF 256 X roughly 0 019 A Fixed Patterns 0 module errors A Data Safety Margin 100 A Horizontal Print Growth 14 of X A Vertical Print Growth 4 of X The PQA does not show any significant differences between the code readability of the two printouts 3 3 4 Print sample RAPID Universal with 70000 00031 ink The print samples show that even...

Страница 13: ...the print out quality of the RAPID Wire and Rapid Highspeed printers at 800 m min and 1000 m min printing speed Printout RAPID Wire 1000 m min 3x7 tower font full printout Printout RAPID Wire 1000 m min 3x7 tower font details Printout RAPID Highspeed 800 m min 5x5 font full printout Printout RAPID Highspeed 800 m min 5x5 font details ...

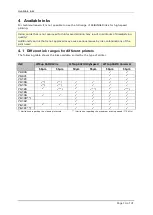
Страница 14: ...s not approved may cause serious issues by ink contaminations of the print head 4 1 Different ink ranges for different printers The following table shows the inks available sorted by the type of printer INK JET3up RAPID Wire JET3up RAPID Highspeed JET3up RAPID Universal 50μm 55μm 50μm 55μm 50μm 55μm 70 030 70 031 70 101 70 106 70 115 70 120 70 126 70 134 70 139 72 102 76 101 78 101 Limitations reg...

Страница 15: ...sting ink droplets With the head ventilation there is a constant air stream at the outlet of the print head that works like a protective shield against the remains of ink droplets that burst on the surface of the substrate Example print head ventilation with the RAPID Wire The print head of the RAPID Wire during the printing process The ink jet is illustrated as a series of red droplets With the R...

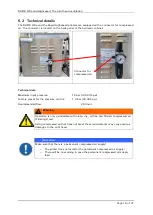
Страница 16: ...set for the pressure control 1 4 bar 20 305 psi Recommended flow 20 l min Warning Operation is only permissible with clean dry oil free and filtered compressed air Filtering 8 μm Using compressed air that does not meet these requirements may cause serious damages to the print head Attention Make sure that there is a permanent compressed air supply o The printer does not monitor the permanent compr...

Страница 17: ...e axis of the encoder The given circumference of the measuring wheel and the resolution of the encoder results in the pulses per mm 𝑛𝑛𝑛𝑛𝑛𝑛𝑛𝑛𝑛𝑛𝑛𝑛 𝑜𝑜𝑜𝑜 𝑝𝑝𝑝𝑝𝑝𝑝𝑝𝑝𝑝𝑝𝑝𝑝 𝑝𝑝𝑝𝑝𝑝𝑝 𝑟𝑟𝑟𝑟𝑟𝑟𝑟𝑟𝑟𝑟𝑟𝑟𝑟𝑟𝑟𝑟 𝐶𝐶𝐶𝐶𝐶𝐶𝐶𝐶𝐶𝐶𝐶𝐶𝐶𝐶𝐶𝐶𝐶𝐶𝐶𝐶𝐶𝐶𝐶𝐶𝐶𝐶 𝑚𝑚𝑚𝑚𝑚𝑚𝑚𝑚𝑚𝑚𝑚𝑚𝑚𝑚𝑚𝑚𝑚𝑚 𝑤𝑤ℎ𝑒𝑒𝑒𝑒𝑒𝑒 𝑚𝑚𝑚𝑚 𝑝𝑝𝑝𝑝𝑝𝑝𝑝𝑝𝑝𝑝𝑝𝑝 𝑚𝑚𝑚𝑚 If for instance the circumference of the measuring wheel is 200 mm the resolution is 2 500 200 𝑝𝑝𝑝𝑝𝑝𝑝𝑝𝑝𝑝𝑝𝑝𝑝 𝑚𝑚𝑚𝑚 12 5 𝑝𝑝𝑝𝑝𝑝𝑝𝑝𝑝𝑝𝑝𝑝𝑝 𝑚𝑚𝑚...

Страница 18: ... L encoder channel B HTL 24V F encoder channel B RS422 M PowerOn Option Signal Parameter Value RS422 Input level Differential 200mV Input voltage range 0 3 to 5 5V Max frequency 10 MHz Terminating resistance 120 Ohm TTL Input level high 2 4V to 5 5V Input level low 0 5V to 0 7V Max frequency 500 kHz Input resistance 1 MOhm HTL Input level high 12 to 28V Input level low 0 5 to 3 5V Max frequency 50...

Страница 19: ...Therefore at the maximum speed permitted mechanically the output frequency stays below the 300 kHz allowed How to calculate the actual output frequency In order to calculate the actual number of revolutions per minute the following parameters are required The resolution per rotation of the encoder The circumference of the measuring wheel that is used The maximum production speed This example calcu...

Страница 20: ...the available inks depends on the RAPID type and the nozzle size There are only specific ink types tested and approved for the RAPID printer When you select an unapproved ink in the hydraulic menu there will be no default settings displayed Attention Using an ink that is not approved for high speed printing may result in printouts of dissatisfying quality Additionally an ink that is not approved m...

Страница 21: ...printers of the RAPID series is selected The appropriate default values for o Max Frequency KHz o Pressure mbar and o Fall Time msec are listed beside the input fields 2 The settings are confirmed with a click on the button Yes Confirm the settings With an ink not approved X The ink 70000 00105 is not approved for the RAPID printer With this ink selected no default values will be listed No default...

Страница 22: ...niversal The following steps show how to get to the Printstyle tab in the Job settings dialog box Select Settings in the menu of the job editor and then select the Printstyle tab Information The available print modes for the RAPID Universal are the same as for the standard JET3up For the RAPID Universal are the same print modes available as for the JET3up ...

Страница 23: ... in the Job settings dialog box Select Settings in the menu of the job editor and then select the Printstyle tab Information Depending on the selected oscillator frequency a different number of print modes are available Oscillator frequency 115 128 KHZ Nozzle size 50 55µ 4 Printmodes available The 4 print modes of the RAPID Highspeed ...

Страница 24: ...n the Job settings dialog box Select Settings in the menu of the job editor and then select the Printstyle tab Information Depending on the selected oscillator frequency a different number of print modes are available Oscillator frequency 115 128 KHZ Nozzle size 50 55µ 4 Printmodes available The 4 print modes of the RAPID Highspeed ...

Страница 25: ...rding the print head adjustments 7 2 1 Adjustment of the ink jet Tools required six fold magnifier 2mm hex key T6x50 Torx 3 Switch on the JET3up and wait while the system is bleeding 4 Touch the softkey Hydraulic settings 1 and change to the menu Printhead 2 Turn off the function Ink Flow Sensor 3 1 Softkey Hydraulik settings 2 Menu Printhead 3 Button Ink Flow Sensor 1 2 3 ...

Страница 26: ...nd take off the inside cover 6 Switch to the tab Printhead 1 and touch on the button Jet Adjust 2 The nozzle seal opens automatically to the head adjustment position 1 Menu Printhead 2 Button Jet Adjust 7 Unloose the fixing screw of the top side of the nozzle retainer see picture below only as far as it is necessary to adjust the retainer Attention Use the T6 Torx only Unloose this fixing screw 1 ...

Страница 27: ...he edge of the gutter tube but the ink jet must not touch the gutter tube Correct adjustment Incorrect adjustment 9 After finishing the adjustments refasten the fixing screw of the retainer Attention Use the T6 Torx only Correct ink jet position inside the gutter tube The ink jet should be as close as possible to the outer edge of the gutter tube The ink jet position inside the gutter tube is too ...

Страница 28: ...on unit with the charging tunnel and deflecting plates The position of the ink jet must be in the middle of the charging tunnel and in parallel to the edges of the tunnel Make sure that your point of view is exactly vertical above the charging tunnel in order to avoid parallax errors Top view 1 The charging tunnel 2 The inner edge of the charging tunnel 2 To adjust the drop production unit you nee...

Страница 29: ...ur accessories catalogue Bring the printhead in adjustment position and switch off the ink jet Insert the 0 1 mm blade between the drop creating unit and the charging electrode Optimal adjustment It should be easily possible to insert the blade of the feeling gauge free from play The swivel mechanic should work without touching the block of the charging electrode 4 After adjusting the drop product...

Страница 30: ...arging tunnel and in parallel to the inner edge of the charging tunnel Readjust the position if necessary 1 The charging tunnel 2 The inner edge of the charging tunnel 1 Button Ink Flow Sensor 2 Button arrow 6 Close the nozzle seal and fix the inside cover Attention Be careful not to damage any tubes or cables 7 Open the nozzle seal again and control the Ink stream position to finish the adjustmen...

Страница 31: ...nit it may be necessary to adjust the distance between the ink drop voltage detector and the ink jet The optimal distance between ink jet illustrated as blue dotted line and the surface of the ink drop voltage detector is 5 10 mm It must be less than 1 mm Use the set screw to adjust the distance turn the screw to the right to increase the distance turn the screw to the left to decrease the distanc...

Отзывы: