


Chapter 7: Using the Web Interface
338
HTTPS and HTTP enable the access to the web interface. Telnet and SSH enable
the access to the command line interface. See
Using the Command Line
Interface
(on page 524).
By default, SSH is enabled, Telnet is disabled, and all TCP ports for supported
services are set to standard ports. You can change default settings if necessary.
Note: Telnet access is disabled by default because it communicates openly and
is thus insecure.
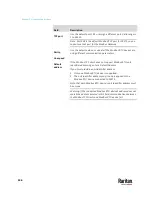
Submenu command
Refer to
HTTP
Changing HTTP(S) Settings
(on page 338)
SNMP
Configuring SNMP Settings
(on page 340)
SMTP Server
Configuring SMTP Settings
(on page 342)
SSH
Changing SSH Settings
(on page 343)
Telnet
Changing Telnet Settings
(on page 344)
Modbus
Changing Modbus Settings
(on page 344)
Server Advertising
Enabling Service Advertising
(on page 347)
Important: Raritan uses TLS instead of SSL 3.0 due to published security
vulnerabilities in SSL 3.0. Make sure your network infrastructure, such as
LDAP and mail services, uses TLS rather than SSL 3.0.
Changing HTTP(S) Settings
HTTPS uses Transport Layer Security (TLS) technology to encrypt all traffic to
and from the PX3TS so it is a more secure protocol than HTTP. PX3TS disables
TLS
1.0
and
1.1
by default. It enables only TLS
1.2
and
1.3.
By default, any access to the PX3TS via HTTP is automatically redirected to
HTTPS. You can disable this redirection if needed.
To change HTTP or HTTPS port settings:
1.
Choose Device Settings > Network Services > HTTP.
2.
Enable either or both protocols by selecting the corresponding 'Enable'
checkbox.
3.
To use a different port for HTTP or HTTPS, type a new port number.
Warning: Different network services cannot share the same TCP port.
4.
To redirect the HTTP access to the PX3TS to HTTPS, select the "Redirect
HTTP connections to HTTPS."
▪
The redirection checkbox is configurable only when both HTTP and
HTTPS have been enabled.
Содержание Raritan PX3TS
Страница 4: ......
Страница 6: ......
Страница 20: ......
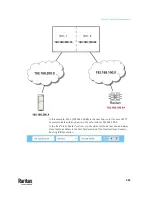
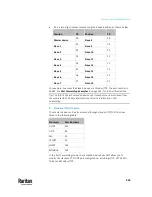
Страница 52: ...Chapter 3 Initial Installation and Configuration 32 Number Device role Master device Slave 1 Slave 2 Slave 3...
Страница 80: ...Chapter 4 Connecting External Equipment Optional 60...
Страница 109: ...Chapter 5 PDU Linking 89...
Страница 117: ...Chapter 5 PDU Linking 97...
Страница 440: ...Chapter 7 Using the Web Interface 420 If wanted you can customize the subject and content of this email in this action...
Страница 441: ...Chapter 7 Using the Web Interface 421...
Страница 464: ...Chapter 7 Using the Web Interface 444...
Страница 465: ...Chapter 7 Using the Web Interface 445 Continued...
Страница 746: ...Appendix A Specifications 726...
Страница 823: ...Appendix I RADIUS Configuration Illustration 803 Note If your PX3TS uses PAP then select PAP...
Страница 824: ...Appendix I RADIUS Configuration Illustration 804 10 Select Standard to the left of the dialog and then click Add...
Страница 825: ...Appendix I RADIUS Configuration Illustration 805 11 Select Filter Id from the list of attributes and click Add...
Страница 828: ...Appendix I RADIUS Configuration Illustration 808 14 The new attribute is added Click OK...
Страница 829: ...Appendix I RADIUS Configuration Illustration 809 15 Click Next to continue...
Страница 860: ...Appendix J Additional PX3TS Information 840...
Страница 890: ...Appendix K Integration 870 3 Click OK...
Страница 900: ......


