background image

3

Important Safety Instructions

NOTES:

1. Read these instructions.
2. Keep these instructions.
3. Heed all warnings.
4. Follow all instructions.
5. Do not use near water.
6. Clean only with dry cloth.
7. Do not block any ventilation openings. Maintain well ventilated conditions around the

product. Do not put product on a bed, sofa or anything that blocks ventilation. Install

according to the manufacturer’s instructions.

8. Do not install near any heat sources such as radiators, heat registers, stoves or other

apparatus (including amplifiers) that produce heat.

9. Do not defeat the safety purpose of the polarized. A polarized plug has two blades with

one wider than the other. The wide blade are provided for your safety. If the provided plug

does not fit into your outlet, consult an electrician for replacement of the obsolete outlet.

10. Read, heed and follow all instructions to ensure correct and safe installation and

interconnection of the apparatus;

11. The apparatus shall not be exposed to dripping or splashing and that no objects filled with

liquids, such as vases, shall be placed on the apparatus.

12. The mains socket-outlet shall be installed near the apparatus and the mains plug shall

remain readily operable.

13. Protect the power cord from being walked on or pinched particularly at plugs, power

sockets, and the point where they exit from the apparatus.

14. Only use attachments/accessories specified by the manufacturer.
15. Use only with the stand, tripod, bracket, or table specified by the manufacturer, or sold

with the apparatus.

16. Unplug the apparatus during lightning storms or when unused for long periods of time.
17. Batteries (battery pack or batteries installed) shall not be exposed to excessive heat such

as sunshine, fire or the like.

18. Well disposed the disused battery, spent batteries must be deposited at the designated

collection points.

19. Refer all servicing to qualified service personnel. Servicing is required when the apparatus

has been damaged in any way, such as power-supply cord or plug is damaged, liquid has

been spilled or objects have fallen into the apparatus, the apparatus has been exposed to

rain or moisture, does not operate normally, or has been dropped.

Do not touch the color LED screen directly by hand.

Содержание LE2833

Страница 1: ... Video IN YPbPr 11 Connecting to an amplifier or home theater system 11 Connecting to COAX Output jack 11 Connecting to a PC 12 Connecting to TV Signal Input 12 Connecting to AV Input 13 Basic Operation 14 Turning the TV On and Off 14 Source selecting 14 Channel Selection 14 The First Time Installation 14 TV Operation and System Setup 15 Picture 15 Audio 16 Time 16 Setup 17 Lock 18 Channel 19 Medi...

Страница 2: ...used for a long period of time 3 The manufacturer will not be held responsible for the damage caused by any substitutions and modification of the product without authorisation from the manufacturer s or authorised service agent WARNING The apparatus shall not be exposed to dripping or splashing and that no objects filled with liquids such as vases shall be placed on the apparatus The information s...

Страница 3: ...o objects filled with liquids such as vases shall be placed on the apparatus 12 The mains socket outlet shall be installed near the apparatus and the mains plug shall remain readily operable 13 Protect the power cord from being walked on or pinched particularly at plugs power sockets and the point where they exit from the apparatus 14 Only use attachments accessories specified by the manufacturer ...

Страница 4: ...n be determined by turning the equipment off and on the user is encouraged to try to correct the interference by one or more of the following measures Reorient or relocate the receiving antenna Increase the separation between the equipment and receiver Connect the equipment into an outlet on a circuit different from that to which the receiver is connected Consult the dealer or an experienced radio...

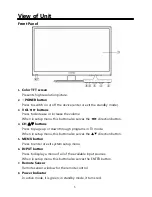
Страница 5: ...ection button 4 CH buttons Press to page up or down through programs in TV mode When in setup menu this button also serves the direction button 5 MENU button Press to enter or exit system setup menu 6 INPUT button Press to display a menu of all of the available input sources When in setup menu this button also serves the ENTER button 7 Remote Sensor Remote sensor window for the remote control 8 Po...

Страница 6: ...UDIO IN Jacks Connecting for COMPONENT or AV audio signal input 5 COMPONENT IN Jacks Connecting for the Y PB PR or the AV input in COMPONENT or AV mode 6 HDMI1 ARC HDMI2 MHL HDMI3 Input Jacks Connecting for HDMI signal 7 RF INPUT Jack Connect an antenna or cable connection for television reception 8 VGA IN Jack Connected to the VGA output jack on a personal computer 9 VGA AUDIO IN Jack Connecting ...

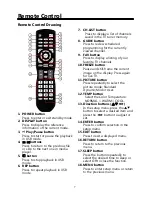
Страница 7: ...el 9 FAV button Press to display a listing of your favorite TV channels 10 FREEZE button Pause and still frame the current image on the display Press again for live TV 11 PICTURE button Press repeatedly to select the picture mode Standard Dynamic Mild or User 12 TEMP button Select the Color Temperature NORMAL WARM COOL 13 Direction buttons In the setup menu press the button to select a desired ite...

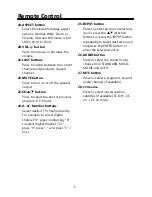
Страница 8: ...Number buttons Select desired TV channel directly For example to select digital channel 8 press number key 8 to select digital channel 4 1 press 4 press and press 1 4 1 25 INPUT button Press to enter the source selecting menu press the direction buttons or press the INPUT button repeatedly to select desired source and press the ENTER button to enter the selected source 26 AUDIO button Press to sel...

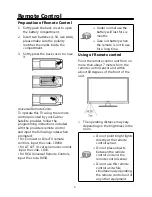
Страница 9: ...code 10030 For AT T U verse remote controls input the code 1043 For RCA Universal Remote Controls input the code 0030 Under normal use the battery will last for six months Take out battery when the remote is not in use for a long time Using of Remote control Point the remote control unit from no more than about 7 meters from the remote control sensor and within about 60 degrees of the front of the...

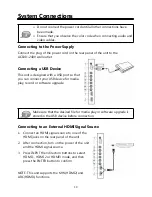
Страница 10: ...u can connect your USB device for media play record or software upgrade Make sure that the desired file for media play or software upgrade is stored in the USB device before connection Connecting to an External HDMI Signal Source 1 Connect an HDMI signal source to one of the HDMI jacks on the rear panel of the unit 2 After connection turn on the power of the unit and the HDMI signal source 3 Press...

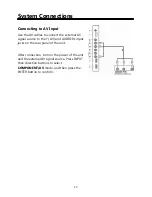
Страница 11: ... L R output jacks on your external equipment to the AUDIO L R input jacks on the TV s rear panel 4 Press INPUT then direction buttons to select COMPONENT AV mode and then press the ENTER button to confirm Connecting to an amplifier or home theater system Use the AV cables to connect the external AV signal source to the AUDIO OUT jacks on the rear panel of the unit Connecting to COAX Output jack Co...

Страница 12: ...20 x 1080 60Hz 4 After connection turn on the power of the unit and the PC 5 Press INPUT then direction buttons to select VGA mode and then press the ENTER button to confirm Connecting to TV Signal Input Connect the TV signal cable the antenna cable for example to the RF input Jack on the back of the unit so that you can receive television programs 1 Connect TV signal input source from the aerial ...

Страница 13: ...external AV signal source to the Y AV and AUDIO IN input jacks on the rear panel of the unit After connection turn on the power of the unit and the external AV signal source Press INPUT then direction buttons to select COMPONENT AV mode and then press the ENTER button to confirm ...

Страница 14: ...lected source Or after you selected the desired source press the ENTER button to enter the selected source immediately Use the INPUT button and the ENTER button On the input menu press the INPUT button repeatedly to select the desired input source After several seconds the TV will enter the selected source Or after you selected the desired source press the ENTER button to enter the selected source...

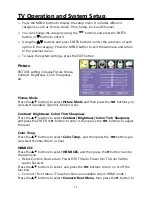
Страница 15: ...to select Picture Mode and then press the buttons you can select Standard Dynamic Mild or User Contrast Brightness Color Tint Sharpness Press the buttons to select Contrast Brightness Color Tint Sharpness and press the ENTER or button to enter it then press the buttons to adjust the level Color Temp Press the buttons to select Color Temp and then press the buttons you can select Normal Warm or Coo...

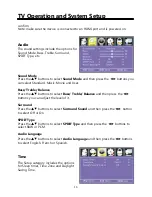
Страница 16: ...ss Treble Balance Press the buttons to select Bass Treble Balance and then press the buttons you can adjust the level of it Surround Press the buttons to select Surround Sound and then press the button to select Off or On SPDIF Type Press the buttons to select SPDIF Type and then press the buttons to select RAW or PCM Audio Language Press the buttons to select Audio Language and then press the but...

Страница 17: ... Setup The Setup category includes the options for Menu Language Transparent Zoom Mode Noise Reduction Advanced Closed Caption DLC and Restore Default Menu Language This option is for setting the Menu Language Press the buttons to select Menu Language and press the buttons to select the Menu Language Closed Caption Press the buttons to select Closed Caption and press the button to enter the submen...

Страница 18: ...select On or Off US It is available when System Lock is on Press the buttons to select US press the ENTER button to enter the submenu In the submenu you can select TV or MPAA with the buttons and press the ENTER or button to enter it TV In this menu you can press the buttons to select the ratings that you want to lock or unlock press the ENTER button to confirm MPAA In this menu you can press the ...

Страница 19: ...em and press button to enter the submenu Use the buttons to select channels to be added or deleted from your list press ENTER button to add or delete a channel A checkmark indicates a channel has been added You may also display your list of Favourite channels by pressing the FAV button on the remote control Show Hide Press the buttons to Select this item and press button to access the list of avai...

Страница 20: ...ed as a FAT32 or NTFS file system provided with the Windows operating system In case of a storage device formatted as a different utility program which is not supported by Windows it may not be recognized Some USB storage devices may not be supported or operated smoothly If the name of a folder or file is too long it will not be displayed or recognized Please backup the important file because a da...

Страница 21: ... storage device and press the ENTER button to open it The songs list will appear 4 In the songs list you can use the buttons to select one of them and press ENTER or button to play it 5 Press the INPUT button and select the other source to exit the USB mode Function Buttons Button Function Button Function Start or pause the playback Return to the previous file or skip to the next file Stop the pla...

Страница 22: ...ck if the video type input signal is not corresponding to the unit Make sure the unit is turned on and in the correct video type The remote control does not work Make sure there are no obstructions between the remote control and the player Make sure the remote control is pointing at the player Make sure the batteries are inserted and the polarity is correct Make sure the battery is not weak Other ...

Страница 23: ...on without stand 644 mm 399mm 76 mm W H D Net Weight About 4 6 kg Ambient Temperature 10 40 Specifications subject to change without pre notice Weight and dimensions are approximate If at any time in the future you should need to dispose of this product please note that Waste electrical products should not be disposed of with household waste Please recycle where facilities exist Check with your Lo...

Отзывы: