


23
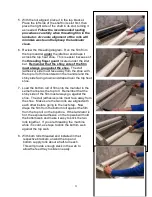
5. With the roll aligned, place it in the top bracket.
Place the left side of the shaft in its slot first, then
place the right side of the shaft in its slot, turning it
as needed.
Follow the recommended loading
procedures carefully when threading film in the
laminator. Accurate alignment of the rolls will
minimize waste and help keep the laminator
clean.
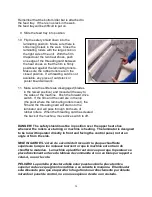
6. Review the threading diagram. Run the film from
the top mandrel
under
the idler bar and drape it
across the top heat shoe. This is easier because of
the
threading finger guard
located under the idler
bar.
Remember that the shiny side of the film
must always go against the shoe.
The dull
(adhesive) side must face away from the shoe with
the top roll of film centered on the mandrel and the
shiny side facing down and draped over the top heat
shoe.
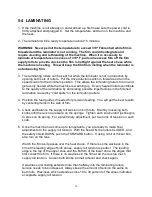
7. Load the bottom roll of film onto the mandrel in the
same manner as the top roll. Remember that the
shiny side of the film must always go against the
shoe. The dull (adhesive) side must face away from
the shoe. Make sure the two rolls are aligned with
each other before going to the next step. Now
drape the film from the bottom roll against the film
from the top roll on the top shoe. If the laminator is
hot, the exposed adhesive on the top web will hold
the bottom web and make it easy to stick the two
rolls together. If you are threading the machine
while it is cold, use tape to stick the bottom web
against the top web.
8. With both rolls threaded and installed in their
respective brackets, unwind the top and
bottom supply rolls about a half-turn each.
This will provide enough slack in the web to
allow the feed tray to slide on easily.
Содержание Premier 4
Страница 25: ...25 5 3 FILM THREADING DIAGRAM ...
Страница 43: ...43 ...