

Hub Installation Instructions
page 7
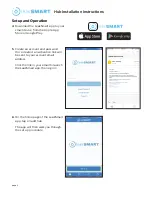
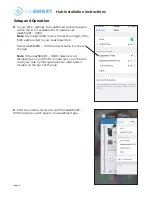
12.
When the hubs LED indicator light turns blue, the hub
has been successfully activated to your account.
13.
You are now ready to pair all other devices to your
LeakSmart System. Simply tap on add devices and
follow the in app instruction screens.
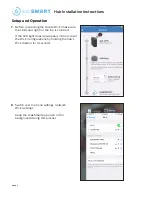
Visit www.leaksmart.com/installation to download
the valve or sensor instruction sheet for next steps on
how to pair a specific device.
Setup and Operation
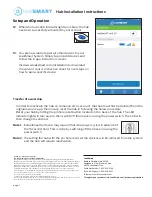
Transfer of ownership.
• In order to reactivate the hub on someone else’s account, that hub must first be deleted from the
original owner’s app, then locally reset the hub in following the below procedure.
• Reset your hub by hitting the pinhole reset button located on the back of the hub. The LED
indicator light will turn purple. then switch off then back on using the power switch. The LED will
then change to solid red
Note 1:
Sometimes the device may require that it be power cycled in advance of
the 15 second hold. This is done by switching off then back on using the
power switch.
Note 2:
If resetting the hub with the pin hole reset, all the devices will be removed from the system
and the hub will require reactivation.
LeakSmart
Bedford Heights, Ohio 44146
Designed in U.S.A. Made in China.
©2018 LeakSmart
®
Inc.
Customer Service: 1-855-532-5768
Technical Support: 1-855-532-5457
To learn more visit, leaksmart.com
To register your product visit: LeakSmart.com/product-registration
LeakSmart® Snap FCC Compliance
FCC: W72-ZICM357SP1, IC:8254A-ZICM357SP2
This equipment has been tested and found to comply with the limits for a Class B digital device,
pursuant to part 15 of the FCC Rules. These limits are designed to provide reasonable protection against
harmful interference in a residential installation. This equipment generates, uses and can radiate radio
frequency energy, and if not installed and used in accordance with the instructions, may cause harmful
interference to radio communications. However, there is no guarantee that interference will not occur in
a particular installation. If this equipment does cause harmful interference to radio or television
reception, which can be determined by turning the equipment off and on, the user is encouraged to try
to correct the interference by one or more of the following measures:
• Reorient or relocate the receiving antenna
• Increase the separation between the equipment and the receiver
• Connect the equipment into an outlet on a circuit different from that to which the receiver is connected
• Consult the dealer or an experienced radio/TV technician for help