background image

ВАЖНЫЕ ПРАВИЛЫ ТЕХНИКИ БЕЗОПАСНОСТИ

При использовании швейной машины следует всегда соблюдать основные правила техники 

безопасности, включая следующие:

Прочтите все инструкции перед началом использования данной швейной машины.

ОПАСНОСТЬ – Для снижения риска электрического удара:

1. Швейную машину никогда нельзя оставлять без надлежащего присмотра во включенном состоянии.

2. Всегда отключайте швейную машину от сети электропитания сразу после использования перед началом 

чистки.

ПРЕДУПРЕЖДЕНИЕ – Для снижения риска получения ожогов, возникновения пожара, получения 

электрического удара или травмы пользователя:

1. Внимательно прочтите настоящие инструкции перед использованием швейной машины.

2. Храните настоящие инструкции в надлежащем месте рядом со швейной машиной и прилагайте 

их в случае передачи машины третьим лицам.

3. Используйте швейную машину только в сухом месте.

4. Швейная машина может использоваться детьми начиная с 14 лет и старше, а также людьми со 

сниженными физическими, сенсорными или умственными способностями, или с недостатком 

опыта и знаний, если за ними будет вестись надлежащий присмотр или они будут 

проинструктированы касательно правильного и безопасного применения швейной машины и 

возможных опасных ситуаций.

5. Детям запрещено играть со швейной машиной.

6. Чистку и техническое обслуживание не могут выполнять дети без надлежащего присмотра.

7. Всегда выключайте швейную машину при подготовке к работе (замена иглы, заправка нити в 

машину, замена прижимной лапки и т.д.).

9. Всегда выключайте швейную машину, если она остается без присмотра. Это позволит избежать 

травм при случайном включении машины.

10. Всегда выключайте швейную машину при проведении технического обслуживания (смазка, 

чистка).

11. Не используйте швейную машину в сыром или влажном помещении.

12. Не выключайте швейную машину, потянув за шнур электропитания. Для выключения 

устройства держите за вилку, а не за шнур.

13. Если светодиодная лампа неисправна или повреждена, её должен заменить 

 квалифицированный специалист. Это позволит избежать возникновения опасности.

14. Никогда не кладите на педаль посторонние предметы.

15. Не используйте швейную машину при блокировке вентиляционных отверстий. 

Обеспечьте открытость вентиляционных отверстий машины и позаботьтесь, чтобы ножная 

педаль была свободна от волокна, пыли и т.д.

16. Швейную машину можно использовать только с ножной педалью типа 4C-333B.

17. Не утилизируйте электрические приборы вместе с обычным бытовым мусором, 

обращайтесь в пункты раздельного сбора.

18. Обратитесь в местные органы власти для получения информации касательно доступных 

пунктов раздельного сбора.

19. Если электрические приборы отправлены в места захоронения отходов или свалки, 

опасные вещества могут проникать в грунтовые воды и попадать в пищевую цепочку, 

нанося вред вашему здоровью и благополучию.

20. При замене старых швейных машин на новые, розничный продавец, по закону, должен 

забрать ваше старое устройства на утилизацию совершенно бесплатно.

СОХРАНИТЕ ИНСТРУКЦИЮ!

ДАННАЯ ШВЕЙНАЯ МАШИНА ПРЕДНАЗНАЧЕНА ТОЛЬКО ДЛЯ ДОМАШНЕГО ПРИМЕНЕНИЯ.


Содержание Like Me

Страница 1: ......

Страница 2: ...lation of lint dust and loose cloth 6 Never drop or insert any object into any opening 7 Do not use outdoors 8 Do not operate where aerosol spray products are being used or where oxygen is being admin...

Страница 3: ...upper thread 9 Threading the bobbin case 10 Drawing up the bobbin thread 11 Seam guide line 11 Thread tension 12 Basic Sewing Selecting stitch sewing 13 Changing sewing directions 14 Reverse sewing 14...

Страница 4: ...bbin winder spindle Spool pins Carry handle Stitch length adjustor Thread guide Bobbin winding thread guide Thread take up lever Thread tension dial Face plate Sewing table accessory box Stitch select...

Страница 5: ...Machine Plug into the Machine Socket c Insert the Power Supply Plug into the Wall socket d Turn on the Power Switch to turn on the power and the sewing light will also automatically turn on Please re...

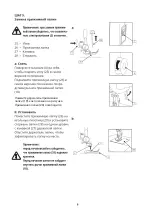
Страница 6: ...the hem of pant legs or sleeves To remove hold the end of the sewing table and pull away from the sewing machine To replace push the sewing table until it fits into the machine Accessory storage Sewi...

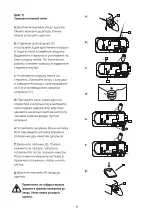
Страница 7: ...ts highest position Raise the Presser foot arm Press the Press Foot Holder on the back of the foot holder the Presser Foot will release b To attach Place the Presser Foot on the Needle Plate and align...

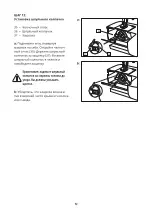
Страница 8: ...h the Flat Side to the rear Then tighten the Needle Clamp Screw b To check if a needle is bent Place the Flat Side of the needle onto something flat e g needle plate or glass The gap between the needl...

Страница 9: ...hread 40 to 50 synthetic cotton covered polyester 7 Note The dial can not repeat rotating 360 Please reverse rotate in the position shown arrow Please keep the calibration tails and the pattern on lin...

Страница 10: ...clockwise direction d Place the Bobbin on the Bobbin Winder Spindle and push it the right to the bobbin winding position e Turn on the power switch Press the Foot Controller gently The bobbin will st...

Страница 11: ...Thread guide c Hold the end of the thread and carefully draw the thread down and up around the Check Spring Holder d Carefully draw the thread up and through the Thread Take up Lever threading from r...

Страница 12: ...pull straight out of the shuttle c Place a Bobbin in the Bobbin Case making sure the thread feeds clockwise from the bobbin d Draw the thread through the slot in the case Continue to draw the thread u...

Страница 13: ...needle thread c Pull both thread 6 15cm under and behind the presser foot Make sure you have correctly completed step 9 before staring this step Must rotate the hand wheel anticlockwise toward you Ot...

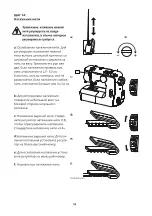
Страница 14: ...d tension remove the bobbin case with the bobbin from the machine and hold the bobbin case suspended by the thread Shake it once or twice If the tension is correct the thread will unwind by about an i...

Страница 15: ...suitable stitch length for most fabtic The higher the number the longer the stitch length Note calibration tail calibration tail 3 6 1 2 3 0 2 6 calibration tail calibration tail The dial can not rep...

Страница 16: ...in the fabric Raise the presser foot and turn the fabric to line up to its new direction using the needle as a turning point Lower the presser foot and continue sewing in the new direction Note The d...

Страница 17: ...ength Note calibration tail calibration tail calibration tail 3 6 1 2 3 0 calibration tail 2 5 calibration tail The dial can not repeat rotating 360 Please reverse rotate from the arrow position arrow...

Страница 18: ...e slit in the Thread Cutter and press down The dial can not repeat rotating 360 Please reverse rotate from the arrow position arrow Turn the Hand Wheel anti clockwise to ensure the needle is higher th...

Страница 19: ...ot zigzag presser d Stitch length adjustor 0 3 6 Stitches Pic e Note You can select the suitable stitch length for most fabtic The higher the number the longer the stitch length Note 3 6 1 2 3 0 calib...

Страница 20: ...ic The higher the number the longer the stitch length When cutting take care not to cut the stitches Note calibration tail 1 4 calibration tail 3 6 1 2 3 0 calibration tail The dial can not repeat rot...

Страница 21: ...an select the suitable stitch length for most fabtic The higher the number the longer the stitch length Note calibration tail calibration tail 1 4 calibration tail 3 6 1 2 3 0 calibration tail The dia...

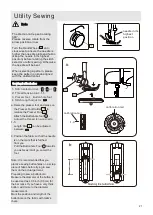
Страница 22: ...titch length for most fabtic The higher the number the longer the stitch length Note calibration tail calibration tail calibration tail calibration tail 3 6 1 2 3 0 calibration tail 6 8 6 7 8 calibrat...

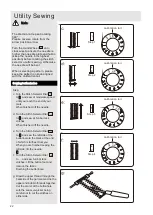
Страница 23: ...and ass 1 8 inch 0 3cm for the bar tacks If you have a very thick button add more to the diameter measurement Mark the position and length of the buttonhole on the fabric with tailor s chalk Note 1 S...

Страница 24: ...he fabric Finishing the buttonhole g Draw the upper thread through the backside of the garment and tie the upper and bobbin threads together Cut the center of the buttonhole with the seam un picker be...

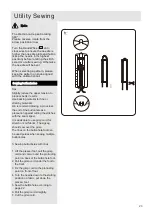
Страница 25: ...oint on back of the buttonhole foot 2 Pull the gimp cord under the foot to the front 3 Fix the gimp cord to the protruding point on front of foot 4 Turn the needle down to the starting position on fab...

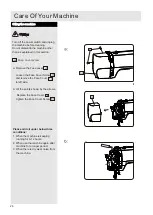
Страница 26: ...hinged Latch of the Bobbin Case and take it out of the machine c Open the Shuttle Race Cover Holder d Remove the Shuttle Race Cover e Remove the Shuttle f Clean the Shuttle Race with a brush and soft...

Страница 27: ...ders back into position until heared a click sound k Insert the Bobbin Case until heared a click sound a Remove the needle and the presser foot Remove the Needle Plate Screws and remove the Needle pla...

Страница 28: ...ace cover Loosen the Face Cover Screw and remove the Face Cover to left side b Oil the points shown by the arrows Replace the Face Cover tighten the Face Cover Screw Please add oil under below three c...

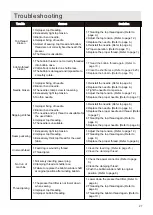
Страница 29: ...4 Adjust the top tension Refer to page 12 5 Replace the proper needle Refer to page 7 1 Improper xing of needle 2 Blunt or bend needle 3 The needle and or thread is unsuitable for the used fabric 4 I...

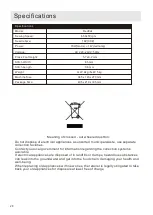
Страница 30: ...iances as unsorted municipal waste use separate collection facilities Contact you local government for information regarding the collection systems available If electrical appliances are disposed of i...

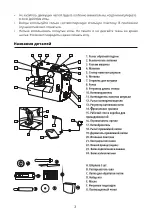
Страница 31: ...1 2 3 4 4 5 6 7 8 8 9 10 11 12 15 14 13 18 18 17 16 16 22 21 21 20 19 19 24 30 28 27 18 25 25...

Страница 32: ...1 2 1 2 3 4 14 5 6 7 9 10 11 12 13 14 15 16 4C 333B 17 18 19 20...

Страница 33: ......

Страница 34: ......

Страница 35: ......

Страница 36: ......

Страница 37: ...19 26...

Страница 38: ......

Страница 39: ......

Страница 40: ......

Страница 41: ......

Страница 42: ...38...

Страница 43: ...35...

Страница 44: ......

Страница 45: ......

Страница 46: ......

Страница 47: ......

Страница 48: ......

Страница 49: ......

Страница 50: ......

Страница 51: ......

Страница 52: ......

Страница 53: ......

Страница 54: ......

Страница 55: ......

Страница 56: ......

Страница 57: ......

Страница 58: ......

Страница 59: ......

Страница 60: ......

Страница 61: ...ZHEJIANG HENGQIANG SEWING MACHINE GROUP CO LTD CHINA 123308 2 3 1 19 1 220136 12 90 1 04071 29 58 98 2006000001 20 2020 06 000001 8 6 5...

Отзывы: