background image

Troubleshooting

1. If the range hood or halogen light does not operate

after installation:

2. The range hood vibrates when the blower is on:

3. The blower or fan seems weak:

4. The lights work but the blower is not spinning at all, 

is stuck or is rattling.

5. The hood is not venting out properly:

• Check if the range hood has been plugged in, make 

sure that all power has been turned back ON, fused 

not blown and all electrical wiring are properly 

connected.

• Swap out light assembly to working ones to deter- 

mine whether it is caused by defective bulbs. 

• The range hood might not have been secured 

Properly  on  to  the  ceiling  or  wall.  Check  with  your 

installer

• Check that the duct sized used is at least 6” or 3-1/4 

x 10”. Range hood WILL NOT function efficiently with 

insufficient  duct  size.  For  example:  7”  duct  over  6” 

hole and loosely secured.

• Check if duct is clogged or if damper unit (half-cir- 

cular  flapper)  is  not  installed  correctly  or  opening 

properly. A tight mesh on a side wall cap unit might 

also cause restriction to the air flow.

• The blower might be jammed or scraping the 

bottom due to shipping damage. Please contact us 

immediately.

• Make sure the distance between the stove top and 

the 

bottom of the hood is within* 28” and 31” in 

distance.  *Due  to  different  ceiling  height  configura- 

tions,  recommended  height  may  not  be  applicable. 

Reduce  the  number  of  elbows  and  length  of  duct 

work.  Check  if  all  joints  are  properly  connected, 

sealed, and taped.

Make  sure  the  power  is  on  high  speed  for  heavy 

cooking.

6. Purpose of the slots/holes/openings near the top of 

the upper chimney:

•  These  slots/holes/openings  are  used  to  exhaust 

cleaned air with optional re-circulating kit. If you did 

not install one, you do not need them.

14

Содержание WALL MOUNT HOODS

Страница 1: ...INSTRUCTIONS GUIDE AND USER MANUAL WALL MOUNT HOODS IMPORTANT Read and save these instructions NOTICE Installer Leave this guide with the homeowner Homeowner Keep this guide for future reference ...

Страница 2: ...aden surfaces frequently To reduce the risk of fire and to disperse air properly make sure to vent air outside DO NOT vent exhaust into spaces between walls crawl spaces ceiling attics or garages Ducted fans MUST always be vented to the outdoors Use only metal ductwork and this unit MUST be grounded Sufficient air is needed for proper combustion and exhausting of gases through the duct to prevent ...

Страница 3: ...art ment or dial your local emergency service immediately Your safety and the safety of others is very important We have provided many important safety mes sages in this manual and on your appliance Always read and obey all safety messages All safety mes sages will tell you what the potential hazard is tell you how to reduce the chance of injury and tell you what can happen if the instructions are...

Страница 4: ...ng methods Re calculating functions 7 Charcoal Filter Installation 8 Electrical Requierements 8 Preparations 9 Installation 10 USE AND CARE Range hood operations 11 12 13 Troubleshooting 14 Use and care information 15 Specifications 15 16 MAINTENANCE Cleaning replacing filter light bulb 17 WARRANTY Warranty Coverage exceptions 18 3 ...

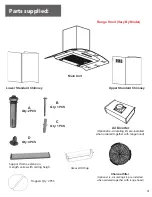
Страница 5: ...Qty 4PCS B Qty 1PCS C Qty 1PCS Air Diverter Optional re circulating kit pre installed when ordered together with range hood Charcoal filter Optional re circulating kit pre installed when ordered together with range hood Support frame extension Length varies with ceiling heigh Grease Oil Cup Flappers Qty 2PCS 4 ...

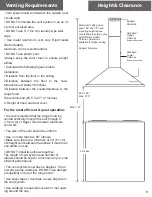
Страница 6: ...oof through 6 15 24 cm or bigger round metal aluminum vent work The size of the vent should be uniform Use no more than two 90 elbows Make sure there is a minimum of 24 61 cm of straight vent between the elbows if more than one elbow is used DO NOT install two elbows together The length of vent system and number of elbows should be kept to a minimum to pro vide efficient performance The vent syste...

Страница 7: ...ld be no higher than 31 inch It is important to install the hood at the proper mounting height Hoods mounted too low could result in heat damage and fire hazard while hoods mounted too high will be hard to reach and will loose its performance and efficiency If available also refer to stove top manufacturer s height clearance requirements and recommended hood mounting height above range Due to diff...

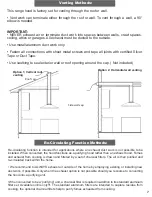
Страница 8: ...t work is not possible to be installed When converted the hood functions as a purifying hood rather than an exhaust hood Fumes and exhaust from cooking is drawn and filtered by a set of charcoal filters The air is then purified and re circulated back within the home We recommend to ALWAYS exhaust air outside of the home by employing existing or installing new duct work if possible Only when the ex...

Страница 9: ...20 Volt 60 Hz AC only USA Canada standard fused electrical supply is required on a separate 15 amp circuit fused on both sides of the line DO NOT ground to a gas pipe Check with a qualified electrician if you are not sure that the range hood is properly grounded DO NOT have a fuse in the neutral or ground circuit IMPORTANT Save this Installation Guide for electrical inspector s use The range hood ...

Страница 10: ...ly cable cutout on the ceiling Use drill and saber saw or keyhole saw to cut openings for power supply cable and vent see Venting requirements and Electrical requirements 6 If venting to the outside installs vent system see Venting Methods Use caulking to seal exterior wall or roof openings 7 Disconnect main electrical supply prepare and run electrical wiring through ceiling or wall 8 Leave approx...

Страница 11: ...uded Mount the range hood on the wall with the two screws and anchors and tighten 3 Install the one way valve on top of the range hood and assemble the exhaust pipe and decorative cover 4 Affix the decorative cover with two M4 tapping screws on the hood body 5 Make sure all switches are off and then insert the electrical plug into an outlet Technical Parameters ITEM Rated Voltage Rated frequency M...

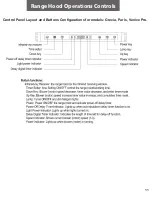
Страница 12: ...Control Panel Layout and Buttons Configurations for models Grecia Paris Venice Pro Range Hood Opeations Controls Range Hood Operations Controls 11 ...

Страница 13: ...Control Panel Layout and Buttons Configurations for models Moon Viena Range Hood Operations Controls 12 ...

Страница 14: ...Control Panel Layout and Buttons Configurations for models Messina Athenas See your specific model Range Hood Operations Controls 13 ...

Страница 15: ...h insufficient duct size For example 7 duct over 6 hole and loosely secured Check if duct is clogged or if damper unit half cir cular flapper is not installed correctly or opening properly A tight mesh on a side wall cap unit might also cause restriction to the air flow The blower might be jammed or scraping the bottom due to shipping damage Please contact us immediately Make sure the distance bet...

Страница 16: ... be cleaned periodically and free from accumulation of cooking residue see cleaning instruc tions on Page 17 Old and worn filters must be replaced immediately DO NOT operate blowers when filters are removed Never disassemble parts to clean without proper instruc tions Disassembly is recommended to be performed by qualified personnel only Read and under stand all instructions and warnings in this m...

Страница 17: ...as 3M or ZEP to polish and buff out the stainless luster and grain Always scrub lightly with clean cotton cloth and with the grain DO NOT allow deposits to accumulate or remain on the hood DO NOT use ordinary steel wool or steel brushes Small bits of steel may adhere to the surface and cause rusting DO NOT allow salt solutions disinfectants bleaches or cleaning compounds to remain in contact with ...

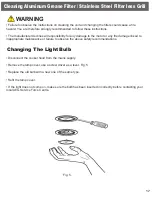
Страница 18: ...r declines all responsibility for any damage to the motor or any fire damage linked to inappropriate maintenance or failure to observe the above safety recommendations Disconnect the cooker hood from the mains supply Remove the lamp cover use a screw driver as a lever Fig 5 Replace the old bulb with a new one of the same type Refit the lamp cover If the light does not come on make sure the bulb ha...

Страница 19: ...original identification information has been altered obliterated or removed has not been handled or packaged correctly or has been sold as second hand What is Not Covered Consumable parts such as light bulbs metal and charcoal filters The natural wear of finish and wear due to improper maintenance use of corrosive and abrasive cleaning products pads and oven cleaner products Chips dents or cracks ...

Отзывы: