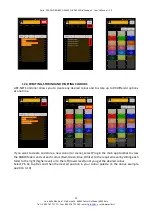
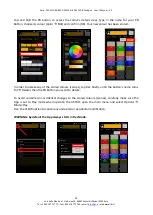
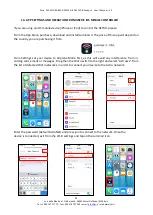
background image

Astro  250 Wi-Fi RGBW, DMX 512+ RDM LED followspot -  User’s Manual – 1.0 


Luci della Ribalta srl, Via Berna 14, 46042 Castel Goffredo (MN) Italy 

Tel. +39 0376 771 777 – fax +39 0376 772 140 – emai

[email protected]

 – web www.ldr.it 


10.5  STROBE (Strobe) : 

This function allows to activate the strobe function . Factory setting is DISABLE.  


10.6  STROBE SPEED (SetStr) : 

It allows to set the strobe speed. This menu is not active when the strobe function is disabled or 

when it is remotely controlled through DMX. Factory setting is OPEN . 


10.7  DIMMING CURVE (Curves) : 

This function allows to select a response curve for the Astro. A choice of two curves is available: 

Square and Linear.  Factoring setting is SQUARE . 


5  Strobe 

DISABLE 


5  Strobe 

DISABLE 


5  Strobe 

ENABLE   


TURN  TO ENABLE OR 

DISABLE STROBE AND 

PRESS TO CONFIRM 

PRESS TO ACTIVATE 

THE MENU  AN 

ARROW SHOULD 

APPEAR  

PRESS TO ACTIVATE 

THE MENU  AN 

ARROW SHOULD 

APPEAR  

6 SetStr 

OPEN 

PRESS TO ACTIVATE 

THE MENU  AN 

ARROW SHOULD 

APPEAR  

7 Curves 

SQUARE 

WITH STROBE ENABLED 

THE LIGHT IS SET TO ON 

6 SetStr 

OPEN       


6 SetStr 

SPEED #   


CHOOSE STROBE’S 

SPEED VALUE FROM 

1(SLOW) TO 10 (FAST)  

6 SetStr 

CLOSED  


WITH STROBE ENABLED 

THE LIGHT IS SET TO 

OFF  

SQUARE TO INCREASE 

VOLTAGE RESPONSE AT 

LOWER VALUE 

7 Curves 

SQUARE  


7 Curves 

LINEAR   


LINEAR DIMMING 

CONTROL 

PRESS TO ACTIVATE 

THE MENU  AN 

ARROW SHOULD 

APPEAR  

4 DMXMem 

ON 

LAST SCENE HOLD 

4 DMXMem 

ON            


4 DMXMem 

OFF=80% 


DIM THE LED TO 80%  

OF ITS MAXIMUM 

POWER 

4 DMXMem 

OFF=00% 


DIM THE LED TO 0% 
Содержание Astro 250

Страница 1: ... istruzioni per l uso operating instructions Bedienungsanleitung instrucciones de manejo mode d emploi gebruiksaanwijzing Luci della Ribalta srl Via Berna 14 46042 Castel Goffredo mn Italy tel 39 0376 771 777 fax 39 0376 772 140 email info ldr it ...

Страница 2: ...ponse page 9 10 9 Dimming behaviour page 9 10 10 Fan Setting page 9 10 11 LCD Screen Illumination page 10 10 12 Red colour intesity page 10 10 13 Green colour intensity page 10 10 14 Blue colour intensity page 10 10 15 White colour intensity page 10 10 16 Temperature control page 11 10 17 Software version page 11 10 18 Net page 11 10 19 Sub Net page 11 10 20 Universe page 11 10 21 Manual dimmer Ty...

Страница 3: ...e battery page 27 17 Clamp on mobile digital dimmer page 27 18 Focusing page 27 19 Cleaning and maintenance page 27 20 Spare sparts page 28 21 Warranty page 28 22 Available accessories page 28 23 Summery of controls and functions page 30 24 DMX charts page 32 24 1 DMX CHART 1 16 bit dimmer and strobe disabled page 32 24 2 DMX CHART 2 16 bit dimmer inabled strobe disabled page 32 24 3 DMX CHART 3 s...

Страница 4: ...indirect incidental special or consequential damages resulting from the customer s failure to follow the installation operating maintenance and safety procedures in this manual or those generally applicable to lighting equipment The limitation extends to damages for personal injury property damage loss of operations loss of profits loss of product or loss of time whether incurred in by the custome...

Страница 5: ...702073 3 MOUNTING THE SPIGOT A spigot is supplied in standard delivery for you to tripod mount your followspot Make sure the tripod you are going to use can withstand the product load as indicated on the product s label Make sure the tripod you are going to use features a top aperture over 28mm dia Remove the M12 nut and the washer from the spigot Insert the spigot in the central hole of the yoke ...

Страница 6: ...rectly aligned horizontally Tighten the 4 M5 screws 7 WIRING Before being connected to the mains power this unit may need to be wired with a suitable plug if not already installed Make sure the plug you are using is rated for the proper power load This fixture must be grounded Ensure the plug conforms to the relevant EU UL or local electrical standards To perform a correct wiring please note that ...

Страница 7: ...and push to access or to confirm the selected data or functions To exit the selected menus without saving the data press the rotary selector for at least 1 second 10 1 Wi Fi DMX OR MANUAL Mode Colour control of the Astro is achieved through a totally innovative technology The Astro Wi Fi generates a proprietary Wi Fi access which will recognize one device only and whose range reaches 15m approxima...

Страница 8: ...RESOLUTION 8 16b The dimming resolution can be controlled at 8 bits from one DMX channel to 16 bits with 2 DMX channels Factory setting is 8 Bit 10 4 LOST DMX SIGNAL DMXMem In case of signal failure this function allows to store in memory the last DMX value This function is forced ON in Wi Fi mode Factory setting is ON Three options are available 2 Addr 001 PRESS TO ACTIVATE THE MENU AN ARROW SHOU...

Страница 9: ...is available Square and Linear Factoring setting is SQUARE 5 Strobe DISABLE 5 Strobe DISABLE 5 Strobe ENABLE TURN TO ENABLE OR DISABLE STROBE AND PRESS TO CONFIRM PRESS TO ACTIVATE THE MENU AN ARROW SHOULD APPEAR PRESS TO ACTIVATE THE MENU AN ARROW SHOULD APPEAR 6 SetStr OPEN PRESS TO ACTIVATE THE MENU AN ARROW SHOULD APPEAR 7 Curves SQUARE WITH STROBE ENABLED THE LIGHT IS SET TO ON 6 SetStr OPEN ...

Страница 10: ...ed by the LED temperature In Silent mode the fan runs slowly to reduce noise In Steady mode the fan runs at constant speed halfway between the minimum and maximum speed In all cases if the LED temperature exceeds the maximum admitted value the LED is protected by a de rating security system Factory setting is AUTO PRESS TO ACTIVATE THE MENU AN ARROW SHOULD APPEAR 8 CutOff SLOW PRESS TO ACTIVATE TH...

Страница 11: ... allows to set the intensity of the blue color for the manual mode By selecting the manual mode 100 is automatically set 10 15 WHITE COLOR INTENSITY White This function allows to set the intensity of white color for the manual mode By selecting the manual mode 100 is automatically set 11 BackL AutoOFF 11 BackL AutoOFF PRESS TO ACTIVATE THE MENU AN ARROW SHOULD APPEAR LCD BACKLIGHT OFF AFTER 1 MINU...

Страница 12: ...Art Net 3 Port Address in a range between 0 an 15 Factory setting is 00 10 21 MANUAL DIMMER TYPE Manu This function allows to select the manual dimmer type when Astro is set in Manual mode see chapter 10 1 When in Wi Fi mode this setting is disregarded as dimming on the Astro will be achieved through the manually operated Digital Clamp on Dimmer A20702071 supplied or through the dimming function o...

Страница 13: ...Net and Universe for Art Net Port Address Factory setting is PRO 10 23 B FACTORY SETTINGS Reset The RESET control is a special function which allows to RESET the product to factory settings 10 24 C ID REMOTO ID Rem It allows to select the ID number to connect the Wi Fi Astro to the REMOTO gateway to upload and download firmware To change the initial ID press the rotary switch until an arrow appear...

Страница 14: ...ro Subnet Mask when operating in Wi Fi mode The Subnet Mask cannot be changed 10 28 G SERVICE SET IDENTIFIER SSID It allows to set the name of the network generated by the Astro Default SSID is Astro where is a value between 000 and 254 Because the SSID is assigned randomly you might experience the unlikely case of receiving different fixtures with identical SSID In order to avoid conflicts we str...

Страница 15: ...ord to connect the controller to the network generated by Astro Default password is AstroNet We strongly recommend you change the password of your Astro should you have purchased more than one unit You will be allowed to create an 8 digit password of your choice NOTICE Reset see chapter 10 23 B doesn t restore the default settings of the password 10 30 I EXIT HIDDEN MENU Exit It allows to exit fro...

Страница 16: ...le device please refer to chapter 12 and 13 of this manual for all the necessary steps needed to set up the control system under either Android or IOS Set the Operation Mode of the ASTRO to WI FI refer to chapter 10 1 Make sure the controller is connected to the network generated by Astro From the home screen tap Settings Wi Fi and check that the controller is connected to the Wi Fi network Astrox...

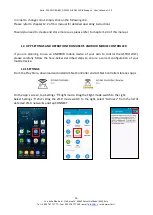
Страница 17: ...2 3 of this manual 12 APP SETTINGS AND OPERATION FROM USER S ANDROID MOBILE CONTROLLER If you are planning to use an ANDROID mobile device of your own to control the ASTRO WI FI please carefully follow the here below described steps to ensure a correct configuration of your mobile device 12 1 SETTINGS From the Play Store download and install Art Net Controller and Art Net Controller Libraries Apps...

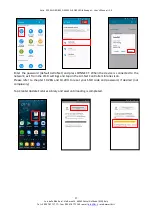
Страница 18: ...info ldr it web www ldr it 17 Enter the password default AstroNet and press CONNECT When the device is connected to the network exit from the Wi Fi settings and tap on the Art Net Controller Libraries icon Please refer to chapter 10 28G and 10 29H to reset your SSID code and password if desired not complusory Tap Create Update Fixtures Library and wait until loading is completed ...

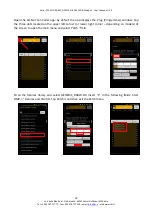
Страница 19: ...t 18 Open the Art Net Controller app by default the app displays the Prog Programmer window Tap the three dots located on the upper left corner or lower right corner depending on models of the screen to open the main menu and select Patch Lib Scroll the fixtures library and select GENERIC_RGBW D4 Insert 1 in the following fields Start DMX n Fixtures and Start ID Tap Patch it and then exit the Patc...

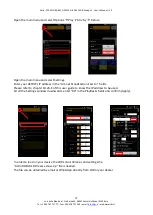
Страница 20: ...he main menu and select Settings Enter your ASTRO s IP address in the Art net broadcast unicast to fields Please refer to chapter 10 26 E of this user guide to know the IP address to be used Scroll the Settings window downwards enter 99 in the PlayBacks fields and confirm Apply In order to load on your device the LDR colour libraries and settings the Astro RGBW LDR revxxx show zip file is needed T...

Страница 21: ... Tap on the desired colour to get the Astro to reproduce it and choose the next one when needed A Rec function top right button above the colours is active by default If accidentally pressed it will cause the settings of your colours scenes to change We strongly recommend you de activate this function as follows Open the main menu 3 dots top left or bottom right and choose OPTIONS Tap on REC to ma...

Страница 22: ... you to create any desired colour and to store up to 99 different options at one time If you want to create and store a new colour or scene select Prog in the main app toolbar to view the RGBW faders and set each colour Red Green Blue White to the required level by sliding each fader to the right higher level or to the left lower level until you get the desired colour Select Pb 0v tap Rec and then...

Страница 23: ...our Color Edit and confirm OK Your new colour has been stored In order to delete any of the stored colours scenes tap Rec briefly untili the button s name turns to Delete then the PB Button you want to delete To avoid undesired or accidental changes to the stored colours scenes carefully make sure the App is set to Play mode when operatin the ASTRO open the main menu and select Options Mode Play U...

Страница 24: ...Store purchase download and install Luminair 3 The price of this app will depend on the country you are purchasing it from From Settings set your device to Airplane Mode first as this will avoid any interference from in coming calls emails or messages Drag then the Wi Fi switch to the right and select Astroxxx from the list of detected Wi Fi networks in order to connect your device to the Astro ne...

Страница 25: ...rectly from LDR or your dealer and can be received by email or WhatsApp Once the file has been loaded your mobile device is ready to take control of the Astro 13 1 Operating the Astro WI FI Make sure the clamp on digital dimmer is connected and its fader above zero Please see relevant instruction manual supplied with the item By default Luminair will take you to the buttons area Each button carrie...

Страница 26: ...tings if desired Buttons can be customized by adding pictures or emoticons to them but this option risks to overload and slow down your system Any change to the colour levels made when a colour scene is selected active will automatically be recorded into that scene Switching between colours scenes will automatically recall the levels last auto saved into the newly selected scene Luminair will fade...

Страница 27: ...ILE DEVICE HOLDER supplied Your Astro Wi FI will have been delivered with an universal 360 rotating mobile device holder The holder is factory mounted in a convenient position on the right hand side control bar in order to avoid damages in transit You can re position the holder anywhere on one of the two control bars at your best convenience In order to do so slacken the knob at the bottom of the ...

Страница 28: ...ton at the rear of the holder to release the arms open 16 RE CHARGING YOUR MOBILE S BATTERIES A USB Port is provided on the rear of the Astro This will allow you to re charge your device while the Astro is being operated without risking to run flat on batteries during a show or having to rely on an external power supply unit 17 CLAMP ON MOBILE DIGITAL DIMMER supplied The Astro Wi fi is supplied wi...

Страница 29: ... unit 21 WARRANTY Our warranty covers all structural and manufacture defects from one year from the date you purchased this product In case of complaints we strongly recommend you use the complaint form at the end of this manual or contact the local dealer who supplied the product to you In any case you will be asked to report the serial number of the product so make sure you have noted it down be...

Страница 30: ...www ldr it 29 A20107180 Flight case with braking wheels stackable A20202401 Set of 3 braking wheels for followspot tripod A20702071 Spare side handle clamp on digital dimmer A20702072 Remoto control unit for software upgrade A20702073 Spare universal mobile phone holder A20702074 Smartphone HONOR 7S BLACK with pre loaded app settings and libraries V90MLRT100FR Braking wheel 1pc for flight case ...

Страница 31: ...be Activate the Strobe function ENABLE DISABLE DISABLE 6 SetStr Select the Strobe speed This menu is inactive when the Strobe function is disabled or when is remotely controlled through DMX OPEN ON SPEED select value from 01 slowest to 10 fastest CLOSED OFF OPEN 7 Curves Select the dimming curve SQUARE LINEAR SQUARE 8 CutOff Replicate the halogen lamp dimming behaviour at cut off FAST NOT ACTIVE S...

Страница 32: ...tion Description Available Options Factoring Setting A ProBasic Set the functions available from the control menu PRO Enable acces to all functions BASIC Limit the access to 1 Mode 2 Addr 12 13 14 15 Color Intensity 16 Tled 17 SwVer 18 19 20 Art Net Port Address PRO B RESET Factory RESET Return to factory settings C ID Rem Set the ID number to activate Remoto control for upload and download firmwa...

Страница 33: ...0 100 6 White Proportional Proportional setting of the white color from 0 to 100 0 255 0 100 Projector Astro RGBW Table name DMX512 Functions chart 1 Default Edition 1 Date 03 09 2018 24 2 DMX chart 2 16 bit dimmer enable strobe disabled This DMX chart refers to the followspot set at 16 bits resolution See chapter 10 3 of this user guide DMX Channel Function Type of Control Effect Decimal Percenta...

Страница 34: ... red color from 0 to 100 0 255 0 100 4 Green Proportional Proportional setting of the green color from 0 to 100 0 255 0 100 5 Blue Proportional Proportional setting of the blue color from 0 to 100 0 255 0 100 6 White Proportional Proportional setting of the white color from 0 to 100 0 255 0 100 7 Strobe Step Open 0 20 0 8 Step Strobe speed 1 minimum frequency 21 40 9 15 Step Strobe speed 2 41 60 1...

Страница 35: ... 0 255 0 100 4 Green Proportional Proportional setting of the green color from 0 to 100 0 255 0 100 5 Blue Proportional Proportional setting of the blue color from 0 to 100 0 255 0 100 6 White Proportional Proportional setting of the white color from 0 to 100 0 255 0 100 7 Strobe Step Open 0 20 0 8 Step Strobe speed 1 minimum frequency 21 40 9 15 Step Strobe speed 2 41 60 16 24 Step Strobe speed 3...

Страница 36: ...d que los productos aquì listados I sono conformi alle seguenti norme ed ai requisiti delle seguenti direttive CEE GB conform to the following standards and to the requirements of following EEC directives D den nachfolgend aufgeführten Normen und EEC Vorschriften entsprechen F sont conformes aux normes et prescriptions CEE ci aprés E cumplen de hecho con las siguientes normas y directivas CEE EN 6...

Страница 37: ...t défectueux Producto defectuoso Descrizione del problema Problem found Beschreibung des Defekts Description du défaut Descripciòn del problema ________________________________________________________________________________________________________ ________________________________________________________________________________________________________ ______________________________________________...

Страница 38: ...ble for delivering the appliance to an appropriate collection facility at the end of its useful lifespan Appropriate separate collection to permit recycling treatment and environmentally compatible disposal helps prevent negative impact on the environment and human health and promotes recycling of the materials making up the product For more information on available collection facilities contact y...

Страница 39: ...Luci della Ribalta srl Via Berna 14 46042 Castel Goffredo mn Italy tel 39 0376 771 777 fax 39 0376 772 140 email info ldr it ...

Отзывы: