LD WS1000G2 Скачать руководство пользователя страница 26

26

CHANNEL / KANAL

EN

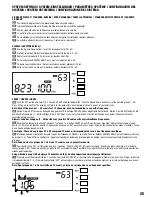
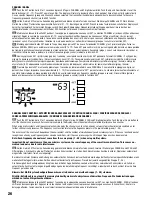
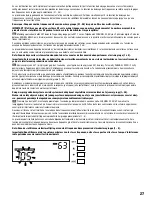
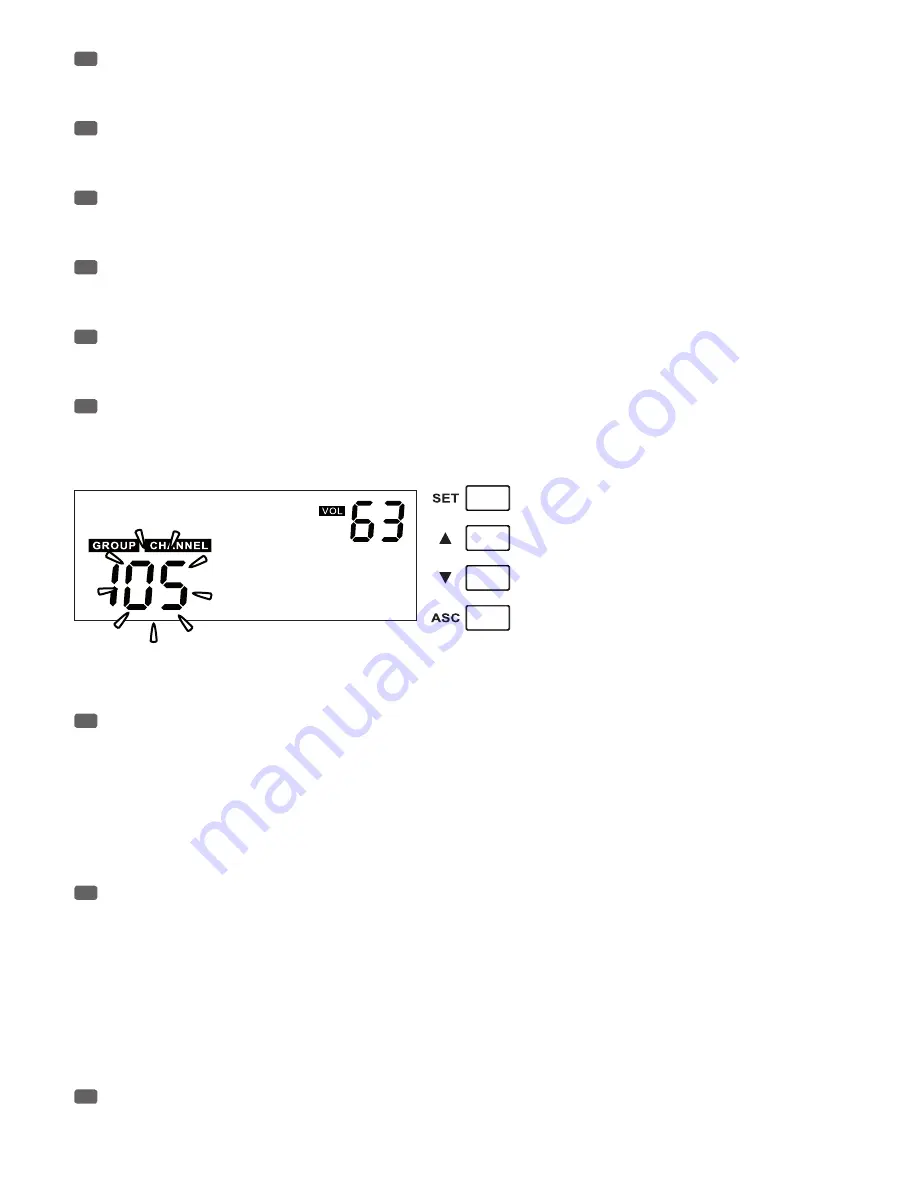
Push the SET button, hold it for 1 second and press SET again. CHANNEL and 2 digits below blink. Push the Up and Down buttons to set the 

desired channel (01 - 12). Press SET again to confirm. The display will return to standard after a short period of time of non-activity automatically. 

Once a specific frequency (group and channel) has been selected, the transmitter (handheld or bodypack) has to be synchronized to the same 

frequency (group and channel) via the ASC function.

DE

Halten Sie die SET-Taste eine Sekunde lang gedrückt und drücken Sie die Taste dann erneut. Die Anzeige CHANNEL und 2 Ziffern blinken. 

Stellen Sie mit den Pfeiltasten den gewünschte Kanal ein (01 - 12). Bestätigen Sie mit SET. Wenn Sie keine Taste drücken, schaltet das Display nach 

kurzer Zeit automatisch zur normalen Anzeige zurück. Nach jeder Änderung der Frequenzeinstellung (Gruppe oder Kanal) muss der Sender 

(Handmikrofon oder Taschensender) mit Hilfe der ASC-Funktion auf die neue Frequenz synchronisiert werden.

FR

Maintenez enfoncée la touche SET pendant 1 seconde, puis appuyez de nouveau sur SET. La mention CHANNEL et les deux chiffres en dessous 

clignotent. Réglez le numéro de canal désiré (01-12) avec les touches Haut/Bas. Appuyez de nouveau sur SET pour confirmer. L’écran revient 

automatiquement en mode standard à l’issue d’une courte période de non-activité. Une fois que vous avez sélectionné une fréquence spécifique 

(groupe et canal), il faut synchroniser l’émetteur (à main ou de poche) sur cette même fréquence (groupe et canal) via la fonction ASC.

ES

Mantenga pulsado el botón SET durante 1 segundo y luego pulse SET de nuevo. Parpadearán CHANNEL y los 2 primeros dígitos. Pulse los 

botones ARRIBA y ABAJO para establecer el número de canal (01 a 12). Pulse SET para confirmar. Si no pulsa ningún botón durante un breve periodo 

de tiempo, la pantalla vuelve automáticamente al menú principal. Una vez seleccionada la frecuencia (grupo y canal), será necesario sincronizar el 

transmisor (micro de mano o petaca) a la misma frecuencia (grupo y canal) mediante la función ASC.

PL

Nacisnąć przycisk SET i przytrzymać go przez 1 sekundę, a następnie nacisnąć przycisk SET ponownie. Parametr CHANNEL i 2 cyfry poniżej 

migają. Za pomocą przycisków Góra i Dół ustawić żądany kanał (01–12). Ponownie naciskając przycisk SET, zatwierdzić wybór. Po krótkim czasie 

bezczynności wyświetlacz automatycznie powróci do widoku podstawowego. Po wybraniu określonej częstotliwości (grupy i kanału) należy przy 

użyciu funkcji ASC odpowiednio zsynchronizować nadajnik (ręczny lub bodypack), aby działał na tej samej częstotliwości (grupy i kanału).

IT

Premere il pulsante SET, mantenerlo premuto per 1 secondo, quindi premerlo di nuovo. CHANNEL e 2 numeri sotto lampeggiano. Agire sui 

pulsanti Su e Giù per impostare il canale desiderato (01 - 12). Premere nuovamente “SET” per confermare. Lo schermo tornerà automaticamente al 

suo stato normale dopo un breve periodo di inattività. Una volta selezionata una frequenza specifica (gruppo e canale), il trasmettitore (gelato o 

bodypack) deve essere sincronizzato alla stessa frequenza (gruppo e canale) tramite la funzione ASC.

CHANNEL SCAN FUNCTION / AUTOMATISCHER KANALSUCHLAUF / FONCTION CHANNEL SCAN / FUNCIÓN ESCÁNER DE CANALES / 
FUNKCJA PRZESZUKIWANIA KANAŁÓW / FUNZIONE DI SCANNERIZZAZIONE CHANNEL

EN

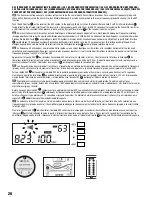
Push the SET button, hold it for 1 second and press SET again twice. CHANNEL, SCAN and 2 digits below blink. Push the Up or Down button to 

start the channel scan process. After scanning is complete, the display shows the automatically selected interference free channel. 
When using multi-systems and frequency selection is done by the channel scan function, already set up systems should remain switched on for 

further channel scan processes. The frequency scan function relates to the frequency presets in the pre-selected group (1 - 08). 
The accuracy of the scan result depends on the environment and the number of simultaneously used wireless systems. If the scan function does not 

recognize an already used frequency under adverse conditions, start the scan process again until an open frequency has been located.

Note: Each frequency channel must come from the same group (1 - 08) when using multi-systems.
Important: Do not operate more than one wireless system on the same frequency at the same time and location. This causes un-

wanted loud noise due to radio interference.

DE

Halten Sie die SET-Taste eine Sekunde lang gedrückt und drücken Sie die Taste dann noch zweimal. Die Anzeigen CHANNEL und SCAN und 2 

Ziffern blinken. Drücken Sie eine der Pfeiltasten, um den Kanalsuchlauf zu starten. Nach Abschluss des Suchlaufs wird im Display der automatisch 

eingestellte, Interferenz-freie Kanal angezeigt. 
Bei Einsatz mehrerer Systeme und Nutzung des automatischen Kanalsuchlaufs sollten die bereits eingestellten Systeme eingeschaltet bleiben, wenn 

weitere Suchläufe gestartet werden. Der Kanalsuchlauf basiert auf den Frequenz-Presets der jeweils ausgewählten Gruppe (1 - 08). 
Die Genauigkeit des Suchergebnisses hängt von den örtlichen Gegebenheiten sowie der Anzahl der verwendeten Funksysteme ab. Falls der 

automatische Suchlauf unter ungünstigen Bedingungen eine bereits belegte Frequenz vorschlägt, wiederholen Sie den Suchlauf, bis eine freie 

Frequenz gefunden wird.

Hinweis: Bei Multi-System-Konfigurationen müssen alle Kanäle aus derselben Gruppe (1 - 08) stammen.
Wichtig: Betreiben Sie an einem Ort niemals gleichzeitig mehrere Funksysteme auf derselben Frequenz. Die Funkeinstreuungen 

würden zu lauten Störgeräuschen führen.

FR

Maintenez enfoncée la touche SET pendant 1 seconde, puis appuyez de nouveau deux fois sur SET. Les mentions CHANNEL, SCAN et les deux 

chiffres en dessous clignotent. Appuyez sur la touche Haut ou Bas pour lancer le processus de balayage des canaux (Channel Scan). Une fois le 

balayage effectué, l’écran visualise le canal sélectionné automatiquement, dépourvu d’interférence. 

Содержание WS1000G2

Страница 1: ...1 USER S MANUAL BEDIENUNGSANLEITUNG MANUEL D UTILISATION MANUAL DE USUARIO INSTRUKCJA OBS UGI MANUALE D USO LD WS1000G2 96 CHANNEL UHF TRUE DIVERSITY WIRELESS SYSTEM...

Страница 2: ...ome e la pluriennale esperienza rappresenta un azienda produttrice di prodotti audio di qualit Leggete attentamente questo manuale d uso per utilizzare al meglio il vostro nuovo prodotto LD Systems Pe...

Страница 3: ...ely applicable national accident prevention rules and regulations As a manufacturer Adam Hall is obligated to notify you formally about the existence of potential health risks Hearing damage due to hi...

Страница 4: ...g da sonst das Risiko eines elektrischen Schlages besteht Im Inneren des Ger ts befinden sich keine Teile die vom Bediener repariert oder gewartet werden k nnen Lassen Sie Wartung und Reparaturen auss...

Страница 5: ...e fond de fa on r p t e veuillez consulter un centre de r parations agr 29 Pour s parer compl tement l appareil du secteur d branchez le cordon secteur ou l adaptateur de la prise murale 30 Si votre a...

Страница 6: ...ado Evite que el cable resulte pellizcado sobre todo en los extremos de conexi n al equipo y en la toma el ctrica 26 Al conectar el equipo aseg rese de que el cable el ctrico o el adaptador de corrien...

Страница 7: ...dzenia jest wyposa ony w zestyk ochronny nale y go pod czy do gniazda z przewodem uziemiaj cym Nigdy nie wolno dezaktywowa przewodu uziemiaj cego kabla sieciowego 23 Nie w cza urz dzenia bezpo rednio...

Страница 8: ...danneggiato in altro modo spegnerlo immediatamente e staccare la spina se si tratta di un dispositivo attivo La riparazione del dispositivo deve essere affidata esclusivamente a personale qualificato...

Страница 9: ...niedrigen Klirrfaktor Das System garantiert eine verl sslicheAudio bertragung mit einem Frequenzbereich von 60 Hz bis 16 kHz Sowohl die Handger te als auch derTaschensender verf gen ber eine praktisc...

Страница 10: ...fino a 13 ore di funzionamento con batterieAA di alta qualit Per utilizzare sistemi microfono wireless potrebbe essere necessario possedere una licenza conforme alle disposizioni di legge vigenti nei...

Страница 11: ...sport INSTALLATION Pour obtenir la meilleure r ception possible veuillez placer le r cepteur une hauteur minimale de 1 m et orienter les antennes vers le haut selon une disposition en V V rifiez que l...

Страница 12: ...u urz dze sterowanych cyfrowo IT I SISTEMI DEI RICEVITORI SINGOLI INCLUDONO 1 ricevitore singolo LDWS1000G2R 1 trasmettitore LDWS1000G2 gelato o bodypack con microfono cavo per chitarra 2 antenne 1 al...

Страница 13: ...tliwo ci poprzez port podczerwieni IT Sincronizzazione di frequenza a infrarossi 5 INFRARED INTERFACE INFRAROT SCHNITTSTELLE INTERFACE INFRAROUGE EMISOR DE INFRARROJOS PORT PODCZERWIENI PORTA A INFRAR...

Страница 14: ...erent transmission frequency should be selected DE Bitte sehr vorsichtig bedienen Verwenden Sie nur einen passenden Schraubendreher ACHTUNG Regeln Sie die Lautst rke der angeschlossenen PA zuerst ganz...

Страница 15: ...y regulacji poziomu wyciszenia nale y wybra inn cz stotliwo transmisji IT Manipolare con cura Utilizzare solo un cacciavite adeguato ATTENZIONE Impostare il volume del sistema PA al minimo prima di re...

Страница 16: ...STUFIGE PEGELANZEIGE F R RF FUNK SIGNAL F R ANTENNENEING NGE A B INDICATEUR DE NIVEAU HF 6 SEGMENTS ANTENNE A B V METRO DE 6 SEGMENTOS DEL NIVEL DE RF RADIOFRECUENCIA DE LAS ANTENAS A Y B 6 SEGMENTOWY...

Страница 17: ...ta uscita un mix di entrambi i segnali audio dei ricevitori Per il volume individuale regolare separatamente il volume sul pannello frontale di ogni ricevitore 5 UNBALANCED MIX 6 3 MM JACK OUTPUT UNSY...

Страница 18: ...sirable dispara t Remarque Des valeurs de Mute lev es peuvent r duire la port e de la liaison HF dans des conditions d favorables Si vous n arrivez pas supprimer les interf rences avec le potentiom tr...

Страница 19: ...t FR Visualise le groupe le canal et l tat des piles 4 segments Si l ic ne de pile clignote il faut remplacer les piles imm diatement Remarque Le r tro clairage de l cran se d sactive automatiquement...

Страница 20: ...e le batterie svitare il coperchio in senso antiorario estrarre le batterie inserire 2 batterie nuove di tipo AA nella direzione indicata sul vano e riavvitare il coperchio sul microfono gelato in sen...

Страница 21: ...asmettitore Premere brevemente per attivare la funzione Mute Premere di nuovo brevemente per disattivare la funzione Mute 2 BACKLIT LCD BELEUCHTETES LC DISPLAY CRAN LCD R TRO CLAIR PANTALLA LCD RETROI...

Страница 22: ...glisser vers l avant Enlevez les piles us es ins rez deux nouvelles piles LR06 AA en respectant le sens indiqu dans le compartiment puis refermez le capot ES Para sustituir las bater as presione lige...

Страница 23: ...bezczynno ci wy wietlacz automatycznie powr ci do widoku podstawowego IT Configurazione manuale del gruppo e del canale Aprire il coperchio premere e mantenere premuto il pulsante fino a quando appare...

Страница 24: ...dere hochohmige Signalquellen FR Guitare basse et autres sources de haute imp dance ES Guitarra bajo y otras fuentes de alta impedancia PL Gitara bas oraz inne r d a wysokiej impedancji IT Chitarra ba...

Страница 25: ...den Pfeiltasten die gew nschte Gruppe ein 1 08 Best tigen Sie mit SET Wenn Sie keine Taste dr cken schaltet das Display nach kurzer Zeit automatisch zur normalen Anzeige zur ck Hinweis Jede der Gruppe...

Страница 26: ...orner automaticamente al suo stato normale dopo un breve periodo di inattivit Una volta selezionata una frequenza specifica gruppo e canale il trasmettitore gelato o bodypack deve essere sincronizzato...

Страница 27: ...ukiwania kana w Po zako czeniu przeszukiwania na wy wietlaczu pojawi si automatycznie wybrany kana wolny od zak ce Przy korzystaniu z wielu system w po uko czeniu wyboru cz stotliwo ci za pomoc funkcj...

Страница 28: ...une distance comprise entre 5 et 20 cm Au bout de quelques instants le processus de synchronisation est termin l indicateur de niveau HF 3 du r cepteur indique la r ception d un signal ES Las frecuen...

Страница 29: ...too high Replace batteries Reduce gain of transmitter EN PROBLEM ANZEIGE L SUNG Kein Audiosignal oder zu niedriger Pegel Sender Anzeige ist ausgeschaltet berpr fen Sie ob der Sender eingeschaltet ist...

Страница 30: ...ez le gain sur l metteur FR ES PROBLEMA PANTALLA SOLUCI N No hay sonido o el volumen es muy bajo Transmisor La pantalla est apagada Aseg rese de que el transmisor est encendido Aseg rese de que las ba...

Страница 31: ...sok warto Wymieni baterie Zmniejszy wzmocnienie nadajnika PL IT PROBLEMA DISPLAY SOLUZIONE Nessun suono o volume troppo basso Trasmettitore Lo schermo spento Assicurarsi che il trasmettitore sia acces...

Страница 32: ...W 2 UCHWYTY DO MONTA U W SZAFIE TYPU RACK 2 KABLE TNC 2 ADAPTERY TNC ZESTAW RUB IT IL KIT DI MONTAGGIO IN RACK LDWS100RK OPTIONAL PER 1 RICEVITORE LDWS1000G2R INCLUDE 2 SUPPORTI PER RACK 2 CAVI TNC 2...

Страница 33: ...1000G2R 2 urz dzenia LDWS100RK2 i 1 rozdzielacz antenowy LDWIN42AD IT Esempio di un installazione wireless con 4 ricevitori singoli LDWS1000G2R 2 LDWS100RK2 e 1 splitter d antenna LDWIN42AD EN The ant...

Страница 34: ...functional LC display HF level antenna A B audio level 2 x multifunctional LC display 2 x HF level antenna A B 2 x audio level Operating voltage 12 18 V DC 500 mA 12 18 V DC 1000 mA Operating temperat...

Страница 35: ...09 kg Accessories included 2 x AA battery Features infrared frequency synchronisation GUITAR CABLE LDWS100GC Connector 1 3 pin mini XLR Connector 2 6 3 mm jack Lenght 1 5 m MICROPHONE LDWS100MH1 LDWS...

Страница 36: ...en Multifunktionales LC Display HF Pegel Antenne A B Audiopegel 2 x Multifunktionale LC Displays 2 x HF Pegel Antennen A B 2 x Audiopegel Betriebsspannung 12 18 V DC 500 mA 12 18 V DC 1000 mA Temperat...

Страница 37: ...ubeh r im Lieferumfang 2 x AA Batterien Mignon Zellen Merkmale IR Frequenzsynchronisation GITARRENKABEL LDWS100GC Anschluss 1 3 Pol Mini XLR Anschluss 2 6 3 mm Klinkenbuchse L nge 1 5 m MIKROFON LDWS1...

Страница 38: ...veau audio 2 x cran LCD multifonctions 2 x niveau HF Antenne A B 2 x niveau audio Tension alimentation 12 18 V alt 500 mA 12 18 V alt 1000 mA Temp rature de fonctionnement 10 C 45 C Taux d hygrom trie...

Страница 39: ...85 Dimensions L x H x P 65 x 90 x 24 mm Poids sans les piles 0 09 kg Accessoires livr s 2 piles AA Fonctionnalit s 2 x piles LR06 AA C BLE GUITARE LDWS100GC Connecteur 1 Mini XLR 3 points Connecteur...

Страница 40: ...B 2 niveles de audio Tensi n el ctrica 12 a 18 VDC 500 mA 12 a 18 VDC 1 000 mA Rango de temperatura operativa 10 C a 45 C Humedad relativa operativa 25 a 85 Dimensiones An x Al x F 212 x 45 x 163 mm...

Страница 41: ...racter sticas sincronizaci n de frecuencia por infrarrojos CABLE DE GUITARRA LDWS100GC Conector 1 mini XLR de 3 pines Conector 2 jack de 6 3 mm Longitud 1 5 m MICR FONO LDWS100MH1 LDWS100MH3 Tipo de m...

Страница 42: ...iejszania warto ci przycisk ASC regulacja poziomu g o no ci s uchawek 2 regulacje poziomu wyciszenia Wska niki wielofunkcyjny wy wietlacz LCD antena HF A B regulacja poziomu d wi ku 2 wielofunkcyjne w...

Страница 43: ...es wilgotno ci wzgl dnej w rodowisku pracy 25 85 Wymiary szer x wys x g 65 x 90 x 24 mm Waga bez baterii 0 09 kg Do czone akcesoria 2 baterie AA W a ciwo ci synchronizacja cz stotliwo ci poprzez port...

Страница 44: ...mento 2 set 2 su 2 gi 2 ASC volume cuffie 2 livello del mute Indicatori schermo LC multi funzione livello antenna HF A B livello audio 2 schermi LC multi funzione 2 livelli antenna HF A B 2 livelli au...

Страница 45: ...atura di funzionamento 10 C 45 C Umidit relativa di funzionamento 25 85 Dimensioni L x H x P 65 x 90 x 24 mm Peso senza batterie 0 09 kg Accessori inclusi 2 batterie di tipo AA Caratteristiche sincron...

Страница 46: ...rden FR GARANTIE FABRICANT LIMITATION DE RESPONSABILIT Nos conditions actuelles de garantie et de limitation de responsabilit sont disponibles l adresse suivante http www adamhall com media shop downl...

Страница 47: ...ento incontrollato dei rifiuti alla fine del suo ciclo di vita l apparecchio non deve essere smaltito insieme ai normali rifiuti domestici Il prodotto deve quindi essere smaltito separatamente da altr...

Страница 48: ...48 WWW LD SYSTEMS COM Adam Hall GmbH Daimlerstrasse 9 61267 Neu Anspach Germany Tel 49 0 6081 9419 0 Fax 49 0 6081 9419 1000 web www adamhall com e mail mail adamhall com REV 02...

Отзывы: