9
A STEELFORT PRODUCT
1.
2.
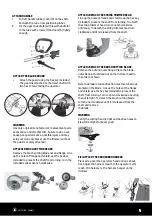
Move the choke lever to the START position.
3.
Hold the machine firmly on the ground with one
hand. Pull the starting cord 3-5 times until you
hear the engine start to turn over. Move choke
lever to the RUN position.
4.
Pull the starting cord again until the engine
starts.
5.
Before starting work, allow the engine running
one minutes at idling to warm up.
To begin
trimming, press the lock lever down with your
thumb and pull the throttle lever with your
fingers to increase power.
6.
To adjust the line length while working: This
trimmer is fitted with a “Bump-N-Feed” head.
To release more line, tap the cutting line head
against the ground with engine at top speed.
Line will be released automatically and the
knife on the blade guard will cut off the excess.
7.
7. If any problems occur during operation,
switch. The machine will stop running.
8.
If any problems occur during operation, release
the shoulder harness by pulling the pin to
release the trimmer immediately.
If the machine is still warm from running, warm start
the engine as follows:
1.
Move the throttle lever to the RUN position
2.
Pull the starting cord to start the engine.
REPLACING LINE
1.
Unclip the housing from the line trimmer and
remove spool from the spindle.
2.
Remove all remaining cutting line from the
spool.
3.
Cut 2m of line. Fold in half and attach the mid-
dle of the line into the grove/slot located in the
center of the spool.
4. Wind both sides of the line on to the
spool with tension in the same direction
as shown on the inside of the spool. (See
above right image).
11
STARTING PROCEDURES
Do not start the unit until it has been completely assembled.
Before starting the unit, always check the oil.
1. Inspect the device before use
DANGER OF INJURY!
Do not operate the device if you find any faults. If a part has become damaged or
defective, make sure to replace it before you use the device again.
Check the safe condition of the device:
t$IFDLUIFE
evice for leaks.
t$IFDLUIFE
evice for visual defects.
t$IFDLUI
at all parts of the device have been securely fitted.
t$IFDLUI
at all safety components are in proper working condition.
DANGER OF INJURY!
Before starting work, always check the ground and remove all objects which could be
thrown by the device.
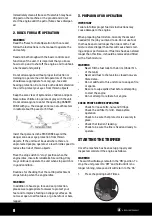
Once the machine has been set up properly and inspected,
cold start
the engine as follows:
1. Press the priming bulb 10 times.
2. Move the choke lever to the START position.
3. Hold the machine firmly on the ground with one hand. Pull the starting cord 3-5 times until you hear
the engine start to turn over. Move choke lever to the RUN position.
Attention: The switch will always remain in the ‘ON’ position. To stop the unit press it to ‘OFF’
and hold until it is no longer running, release and it will return to the ‘On’
12
4. Pull the starting cord again until the engine starts.
5. To begin trimming, press the lock lever down with your thumb and pull the throttle lever with
your fingers to increase power.
6. To adjust the line length while working: This trimmer is fitted with a “Bump-N-Feed” head. To
release more line, tap the cutting line head against the ground with engine at top speed. Line
will be released automatically and the knife on the blade guard will cut off the excess.
7. If any problems occur during operation, release the throttle lever and press the stop switch.
The machine will stop running.
8. If any problems occur during operation, release the shoulder harness by pulling the pin to
release the brush cutter immediately.
If the machine is still warm from running,
warm start
the engine as follows:
1. Move the throttle lever to the RUN position
2. Pull the starting cord to start the engine.
Before starting work,allow the engine running one minutes at idiling to warm up.


