background image

LAUNCH 


X-431 V User Manual — Table of Contents


iv 

TABLE OF CONTENTS 

1 INTRODUCTIONS ............................................................................................. 1


1.1 P

RODUCT 

P

ROFILE

 ................................................................................... 1 

1.2 F

EATURES

 ................................................................................................ 1 

1.3 K

NOWLEDGE OF 

X-431


V .......................................................................... 2 

1.3.1 X-431 V whole set .............................................................................. 2 
1.3.2 X-431 V handset ................................................................................. 2 
1.3.3 Diagnostic connector (Only applies for 12V cars) .............................. 3 

1.4 T

ECHNICAL 

P

ARAMETERS

 ......................................................................... 4 

1.5 P

ACKAGE 

L

IST

 .......................................................................................... 4 

2 PREPARATIONS ............................................................................................... 5


2.1


C

HARGING 

X-431


V ..................................................................................... 5 

2.2


U

SING YOUR BATTERY

 .................................................................................. 5 

2.3


P

OWER ON

/

OFF

 ............................................................................................ 5 

2.3.1 Power on ............................................................................................. 5 
2.3.2 Power off ............................................................................................. 5 

2.4


T

IPS ON FINGER OPERATIONS

 ....................................................................... 6 

2.5


L

OCK 

&

 UNLOCK THE SCREEN

 ...................................................................... 6 

2.5.1 Lock the screen .................................................................................. 6 
2.5.2 Unlock the screen ............................................................................... 6 

2.6


S

CREEN LAYOUT

 .......................................................................................... 7 

2.7


N

OTIFICATION PANEL

 ................................................................................... 7 

2.8


C

USTOMIZE YOUR DESKTOP

 ......................................................................... 7 

2.8.1 Create a widget on the desktop .......................................................... 7 
2.8.2 Move items on the desktop ................................................................ 7 
2.8.3 Delete items from the desktop ............................................................ 7 
2.8.4 Adjust brightness ................................................................................ 7 
2.8.5 Set standby time ................................................................................. 8 

2.9


S

ET SCREEN LOCK

 ....................................................................................... 8 

3 WI-FI SETTING ................................................................................................. 9


3.1


C

ONNECT TO A 

W

I

-F

I NETWORK

 ................................................................... 9 

3.2


D

ISCONNECT FROM A 

W

I

-F

I NETWORK

 ......................................................... 9 

4 HOW TO DIAGNOSE ...................................................................................... 10


4.1


D

IAGNOSIS 

F

LOWCHART

 ............................................................................ 10 

4.2


U

SER 

R

EGISTRATION 

&


C

ONNECTOR 

A

CTIVATION

 ...................................... 10 

4.2.1 User registration ............................................................................... 10 
4.2.2 Diagnostic software layout ................................................................ 14 

Содержание X-431 V

Страница 1: ...Version V1 00 000 Revised date 2016 03 10...

Страница 2: ...by LAUNCH Trademark Information LAUNCH is a registered trademark of LAUNCH TECH CO LTD also called LAUNCH for short in China and other countries All other LAUNCH trademarks service marks domain names...

Страница 3: ...NGER Do not attempt to replace the internal rechargeable lithium battery Contact the dealer for factory replacement y CAUTION Please use the included battery and charger Risk of explosion if the batte...

Страница 4: ...r in the Park for automatic transmission position to avoid injury y To avoid damaging the test equipment or generating false data please make sure the vehicle battery is fully charged and the connecti...

Страница 5: ...5 2 4 TIPS ON FINGER OPERATIONS 6 2 5 LOCK UNLOCK THE SCREEN 6 2 5 1 Lock the screen 6 2 5 2 Unlock the screen 6 2 6 SCREEN LAYOUT 7 2 7 NOTIFICATION PANEL 7 2 8 CUSTOMIZE YOUR DESKTOP 7 2 8 1 Create...

Страница 6: ...1 My Connector 25 4 7 2 Activate Connector 25 4 7 3 Firmware fix 25 4 7 4 My Report 25 4 7 5 Profile 25 4 7 6 Change Password 25 4 7 7 Help 25 4 7 8 Log Out 25 4 8 SETTINGS 26 4 8 1 Units of Measureme...

Страница 7: ...LAUNCH X 431 V User Manual Table of Contents vi 5 3 1 Connect to PC 30 5 3 2 Run on PC 30 5 3 3 Install an application 30 5 4 CLEAR CACHE 31 7 FAQ 32...

Страница 8: ...ystem of prevailing vehicle models covering Asian European American and Chinese Diagnosis functions include Read DTCs Clear DTCs Read data stream Special functions etc Specially designed for Android p...

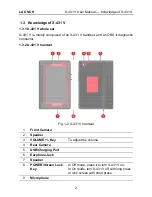
Страница 9: ...d an OBD II diagnostic connector 1 3 2 X 431 V handset Fig 1 2 X 431 V handset 1 Front Camera 2 Speaker 3 VOLUME Key To adjust the volume 4 Rear Camera 5 USB Charging Port 6 Earphone Jack 7 Speaker 8...

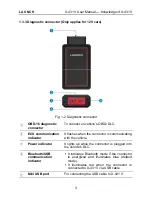
Страница 10: ...ator It flashes when the connector is communicating with the vehicle Power indicator It lights up while the connector is plugged into the vehicle s DLC Bluetooth USB communication indicator y It indic...

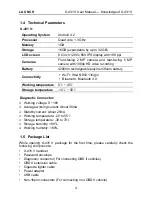
Страница 11: ...02 11b g n Bluetooth Bluetooth 4 0 Working temperature 0 45 Storage temperature 10 50 Diagnostic Connector Working voltage 9 18V Average working current About 35mA Standby current About 25mA Working t...

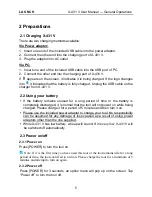
Страница 12: ...g period of time or the battery is completely discharged it is normal that the tool will not power on while being charged Please charge it for a period of 5 minutes and then turn it on Please use the...

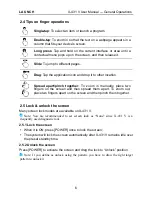
Страница 13: ...ly place two fingers on the screen and then spread them apart To zoom out place two fingers apart on the screen and then pinch them together 2 5 Lock unlock the screen Many screen lock modes are avail...

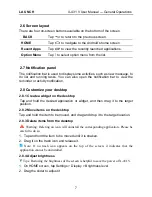
Страница 14: ...sktop 2 8 1 Create a widget on the desktop Tap and hold the desired application or widget and then drag it to the target position 2 8 2 Move items on the desktop Tap and hold the item to be moved and...

Страница 15: ...ttings Display Sleep 2 Choose the desired sleep time 2 9 Set screen lock This function is designed to lock the screen and buttons to avoid accidental operations while X 431 V keeps unused 1 On HOME sc...

Страница 16: ...tworks 3 Select a wireless network y If the chosen network is open X 431 V will connect automatically y If the selected network is encrypted a network password will need to be entered 4 When Connected...

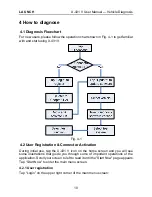
Страница 17: ...4 2 User Registration Connector Activation During initial use tap the X 431 V icon on the home screen and you will see some illustrations that guide you through some of important operations of the app...

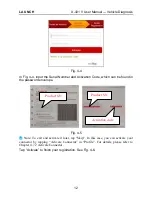
Страница 18: ...a new user tap New Registration See Fig 4 3 Fig 4 3 Note To obtain better service you need to provide real information In Fig 4 3 fill in the information in each field Items with must be filled After...

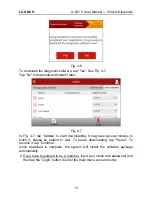
Страница 19: ...e found in the password envelope Fig 4 5 Note To exit and activate it later tap Skip In this case you can activate your connector by tapping Activate Connector in Profile For details please refer to C...

Страница 20: ...Update to start downloading It may take several minutes to finish it please be patient to wait To pause downloading tap Pause To resume it tap Continue Once download is complete the system will instal...

Страница 21: ...ange to your user name 4 Vehicle diagnosis software logo To start diagnosing a vehicle you have to download the corresponding diagnostic software 4 2 3 Function menu Tap to unfold function menu it mai...

Страница 22: ...nterface with a vehicle s on board control modules The DLC is usually located 12 inches from the center of the instrument panel under or around the driver s side for most vehicles If Data Link Connect...

Страница 23: ...power from A Power adaptor Connect one end of the included power adaptor to DC IN port of X 431 V tablet and the other end to AC outlet B Internal battery pack For non OBDII vehicle proceed as follow...

Страница 24: ...rt searching available Bluetooth device tap the desired connector to pair By default the Bluetooth name is 98549 00 where stands for 5 digits Note In case no Bluetooth setting is done before diagnosti...

Страница 25: ...ection and jump to the DEMO system selection screen Note No Bluetooth connection is required for DEMO program Fig 4 14 3 Tap Engine the system will jump to the function menu See Fig 4 15 Fig 4 15 4 5...

Страница 26: ...ated fault occurs certain vehicle conditions are recorded by the on board computer This information is referred to as freeze frame data Freeze frame data includes a snapshot of critical parameter valu...

Страница 27: ...lect all items of the current page Unselect Tap it to deselect all data stream items New Session Tap it to return to the home screen Print Tap it to print the current screen To perform printing you ne...

Страница 28: ...playback and analysis The saved file follows the naming rule It begins with vehicle type and ends with the record starting time To differentiate between files please configure the accurate system tim...

Страница 29: ...ion Reset Learn y Diesel Particulate Filter DPF Regeneration y Tire Pressure Monitor System Reset Oil Reset Service This function can be performed in the following cases 1 If the service lamp is on yo...

Страница 30: ...e assembly is replaced d The intake pipe is replaced or removed which affects idle speed control by ECU and throttle body e The throttle is cleaned Although the idle throttle potentiometer features re...

Страница 31: ...oring device is replaced or installed tire is replaced tire pressure sensor is damaged and tire is replaced for the car with tire pressure monitoring function Diesel Particulate Filter DPF Regeneratio...

Страница 32: ...ix diagnostic firmware During fixing please do not cut power or switch to other interfaces 4 7 4 My Report This option is used to view the diagnostic report generated in process of vehicle diagnosis A...

Страница 33: ...will be locked automatically and the system will prompt you to activate your connector if the expiration reminder is ON 4 8 4 Print Information This option lets you define your print information It m...

Страница 34: ...ebooting 3 Tap Reset to configure Wi Fi printer Step 1 Connect the printer Tap Scan to select the desired printer hotspot named with X 431PRINTER XXXX XXXX stands for 4 characters and then tap Connect...

Страница 35: ...ame LAN B If you have configured the Wi Fi printer to the LAN 2 Tap Connect to Printer a If the local network remains as it is tap Test Print directly to test the printing b If the local network chang...

Страница 36: ...ual setup is selected please consult your email service provider for detailed parameter setting 4 Follow the on screen instructions to proceed until the system prompts you that the account setup has b...

Страница 37: ...rces To configure it tap Settings Security and then slide the Unknown sources switch to off 5 3 Synchronization You can transfer media files and APK between the PC and X 431 V 5 3 1 Connect to PC 1 Us...

Страница 38: ...l browsing records and accounts and enables X 431 V to run smoothly and quickly 1 Tap Settings Apps 2 Tap and select Sort by size to arrange all applications in size order 3 Tap certain application th...

Страница 39: ...esired application and then tap Stop Check all installed applications remove the unnecessary applications Steps Settings Apps Downloaded Tap the desired application and then tap Uninstall If all steps...

Страница 40: ...he following to reset X 431 V 1 Tap Settings Back Reset 2 Tap Factory data reset 3 Tap Reset tablet 4 Tap Clear all data to start resetting until the tool automatically reboots 6 Why some videos on th...

Страница 41: ...hority to bind LAUNCH to any affirmation representation or warranty concerning LAUNCH automotive meters except as stated herein Disclaimer The above warranty is in lieu of any other warranty expressed...

Страница 42: ...s without notice The actual object may differ a little from the descriptions in the manual in physical appearance color and configuration We have tried our best to make the descriptions and illustrati...

Отзывы: