


7
6-cell 2/3A NiMH battery*
Pile NiMH 2/3A à 6 éléments*
Batería de NiMH de 6 celdas 2/3A*
6-Zellen 2/3 A NiMH-Batterie*
PREPARE YOUR MODEL
Charge the battery pack
Do not charge batteries inside of an automobile. Read the Safety
Precautions section of this guide.
1.
Plug the charger into a 12-volt automotive auxiliary power
socket.
The charger is compatible with 12-volt automotive
auxiliary power sockets only. The LED on the charger will
glow red to indicate it is ready to charge a battery.
2.
Connect the battery to begin charging.
Plug the battery into the charger. The
charger’s LED will flash green, indicating that
charging has begun. The flashing green LED
on the charger indicates the charge progress.
3.
Disconnect the battery when
charging is complete.
When
the battery is fully charged, the
LED will light solid green. The
battery will be warm in your hand.
Disconnect the battery and go
have fun
.
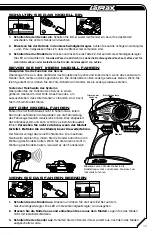
QUICK START GUIDE
The following guide is an overview of the procedures for preparing your model to drive. The
complete manual for your model can be viewed and downloaded by following the link on the
cover of this manual or by scanning the QR code. Please read this entire manual for complete
instructions on the proper use and maintenance of your model.
READ THE SAFETY PRECAUTIONS
For your own safety, understand where carelessness and misuse could lead to personal injury
and product damage.
INSTALL THE BATTERY PACK
IN THE MODEL
Your model includes a 7.2V 6-cell NiMH battery pack.
Install the battery pack into the battery compartment
with the battery wires facing the front of the model.
Secure the battery with the battery hold-down, making
sure not to pinch the battery wires.
Compatible batteries: 5- to 6-cell, 6.0-7.2V, 2/3A NiMH
CHARGE PROGRESS
1 green flashes
0 - 25% charged
2 green flashes
25% - 50% charged
3 green flashes
50% - 75% charged
4 green flash
75% or more charged
Solid green LED
100% charged
LED INDICATION
MEANING
Solid Red LED
Ready for Charging
Slowly Flashing Green LED
Charging (see Charge Progress chart)
Solid Green LED
Battery Fully Charged
Flashing Red LED
Charger Error
Install the transmitter batteries
The transmitter requires 4 AA alkaline or
rechargeable batteries.
Note:
If there is a problem with the battery, such as a short circuit,
the charger’s LED will flash red. Disconnect the battery and unplug the
charger from its power source to clear the error. Determine the cause
of the error before continuing.


