background image

10

Sound on / off

Coarse / fine detection

LCD display screen

Laser sensor

Speaker

Power

DETECTOR OVERVIEW: FRONT

Содержание HV2G

Страница 1: ...H V 2 G R O TA R Y L A S E R I N S T R U C T I O N M A N U A L...

Страница 2: ...d for your model Tool service must be performed only by qualified repair personnel Repairs service or maintenance performed by unqualified personnel will void the warranty Only approved and authorised...

Страница 3: ...securely on a level surface Damage to the laser or serious injury could result if the laser falls WARNING DO NOT DISASSEMBLE THE LASER There are no user serviceable parts inside Disassembling the lase...

Страница 4: ...hing is missing please contact your retailer Remote control Lasertec HV2R Laser glasses Carry case 3m staff Tripod Laser target Detector clamp Mount INCHES CM 1 1 2 3 4 5 6 7 2 3 4x AA rechargeable ba...

Страница 5: ...5 Rotating laser port Charging port Control panel LASER OVERVIEW FRONT Battery screw...

Страница 6: ...6 LASER OVERVIEW BASE 5 8 x 11 thread for horizontal operation on a tripod Battery screw Battery door Vertical mounting point...

Страница 7: ...7 LASER OVERVIEW CONTROL PANEL Power Tilt alarm indicator Power indicator Tilt alarm Manual automatic mode Manual automatic mode indicator...

Страница 8: ...8 Manual automatic mode Button indicator Grade adjustment Grade adjustment Grade adjustment Grade adjustment REMOTE CONTROL OVERVIEW...

Страница 9: ...9 REMOTE CONTROL OVERVIEW BACK Battery compartment...

Страница 10: ...10 Sound on off Coarse fine detection LCD display screen Laser sensor Speaker Power DETECTOR OVERVIEW FRONT...

Страница 11: ...11 DETECTOR OVERVIEW BACK Battery compartment Staff clamp thread LCD display screen...

Страница 12: ...s are supplied only partially charged Charge the rechargeable batteries before use Battery capacity decreases at low temperatures depleted batteries may not function when cold Indoor charger The indoo...

Страница 13: ...s Charging the rechargeable batteries Insert the charger into the charging port on the instrument Progress will be shown by the power indicator display on the charger as below Red flashing Charger and...

Страница 14: ...le Place the laser level onto the tripod with the lighthouse facing upwards and thread the yoke into the base until firm Do not over tighten as this may cause damage to the laser level or tripod Level...

Страница 15: ...site as possible and ensure that the location is clear of traffic Extend the tripod legs to the required height and then spread the legs wide enough so that the tripod platform is stable Connect the m...

Страница 16: ...reset its level position OPERATION Powering on Press the power button once and the instrument will power on and begin automatically self levelling When this levelling process is complete the penta pri...

Страница 17: ...st the grade on either the x axis or y axis To cancel out of manual mode press the manual automatic mode button When in manual mode the instrument will not self level and correct for vibrations and or...

Страница 18: ...tor on by pressing the power button The speaker will beep once indicating the instrument is operating The LCD screen will display the battery level detection mode and speaker function To change betwee...

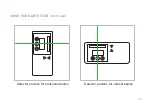
Страница 19: ...19 Detector position for horizontal beams Detector position for vertical beams USING YOUR DETECTOR continued...

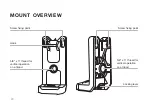
Страница 20: ...20 MOUNT OVERVIEW Screw fixing point Hook Screw fixing point 5 8 x 11 thread for vertical operation on a tripod 5 8 x 11 thread for vertical operation on a tripod Locking lever...

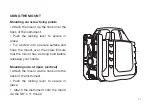
Страница 21: ...e in place Fix a screw into a secure surface and hook the mount over the screw Ensure that the mount has a strong hold before releasing your hands Mounting onto a tripod vertical Attach the mount via...

Страница 22: ...ment to level Detect and note laser position on the wall or staff Without moving the tripod rotate the instrument 180 Detect and note laser position on the wall or staff Calculate the distance between...

Страница 23: ...Adjust the instrument or tripod so it is level Laser does not remain on for long periods of use Check the batteries Check the battery compartment for signs of damage Ensure they are clean and not ben...

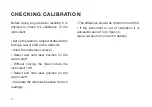
Страница 24: ...ent is recommended every six months if ongoing accurate levelling is required or an impact has occurred The operator should check the accuracy of the instrument before precision levelling is attempted...

Страница 25: ...any other reasonably foreseeable loss or damage You are also entitled to have the goods repaired or replaced if the goods fail to be of acceptable quality and the failure does not amount to a major f...

Страница 26: ...26 To assist you with any queries or technical questions please contact customer support Australia 1300 658 338 New Zealand 0800 367 527 CUSTOMER SUPPORT...

Страница 27: ...ec HV2G Product code 91335 Warranty 3 Years Accuracy 1 5mm at 30m Operating range 250m diameter Levelling range 9 5 Laser class 3 Green Battery life 20 hours Battery type 4x 1 5v AA IP rating 65 Weigh...

Страница 28: ...www spoton com au...

Отзывы: