background image

Troubleshooting

64

5

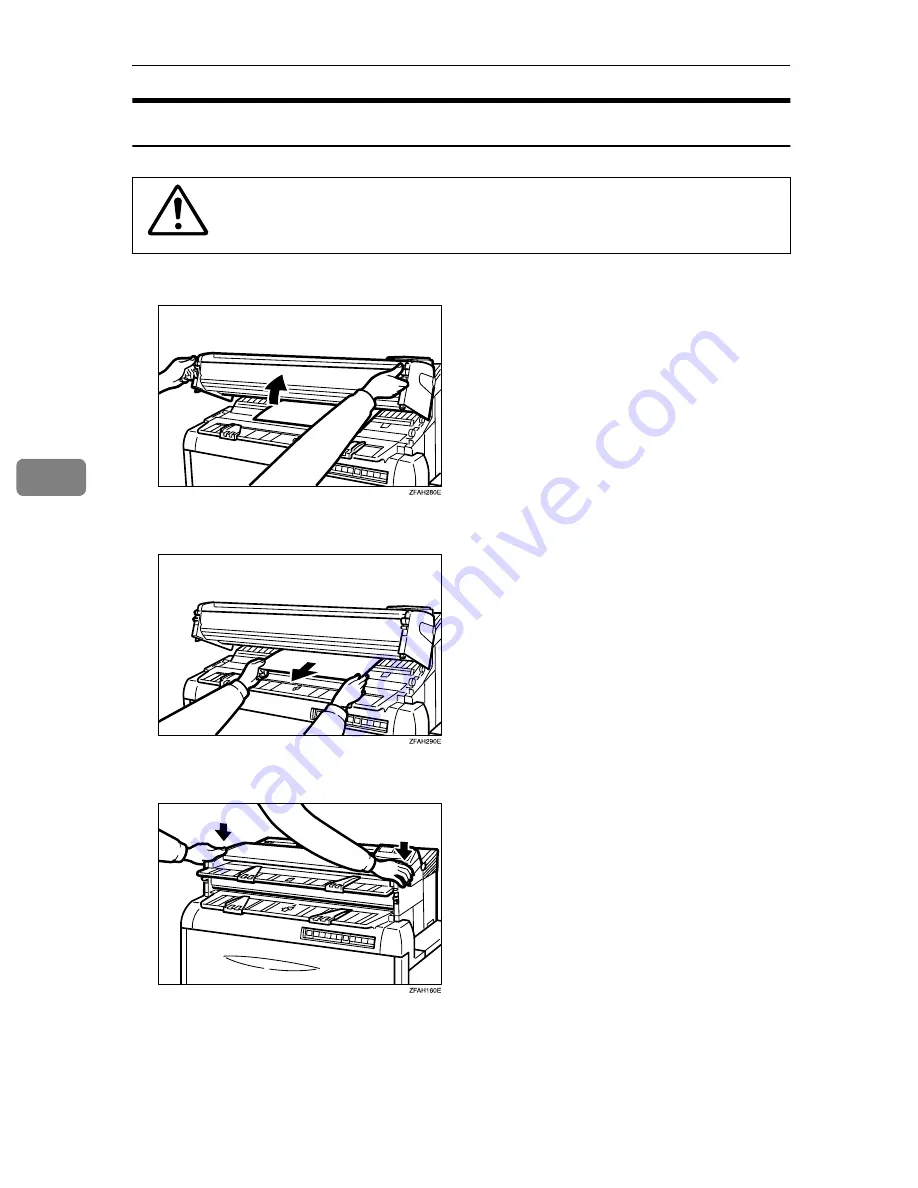
If Sheet Paper is Jammed in the Feed-in Slot

R


CAUTION:

A

Squeeze the locks on each side of the copier and lift the unit.

B

Pull out the copy paper. Do not leave any scraps of paper in the copier.

C

Close the unit. Press firmly on both sides until it clicks into place.

• The fusing unit can be very hot. Do not touch any parts under the 

fusing cover. If necessary, wait until the fusing unit has cooled 
down.

Содержание LW110

Страница 1: ...your document management partner Operating Instructions LW 110 LW 110 LW 110 LW 110 Wide Format Copier...

Страница 2: ...0 8261 4000 Germany RICOH DEUTSCHLAND GmbH Mergenthalerallee 38 40 65760 Eschborn Phone 49 0 6196 9060 France RICOH FRANCE S A 383 Avenue du G n ral de Gaulle BP 307 92143 Clamart Cedex Phone 33 0 821...

Страница 3: ...might not be available in some countries For details please contact your local dealer Warning Use of controls or adjustment or performance of procedures other than those specified in this manual migh...

Страница 4: ...Where symbols are used on or near switches they mean an under in accordance with IEC 60417 a a a a means POWER ON c c c c means STAND BY Copyright 2001 Ricoh Co Ltd...

Страница 5: ...s manual the following important symbols are used R WARNING Indicates a potentially hazardous situation which if instructions are not followed could result in death or serious injury R CAUTION Indicat...

Страница 6: ...f the machine has laser systems there is a risk of serious eye damage To avoid hazardous electric shock or laser radiation exposure do not remove any covers or screws other than those specified in thi...

Страница 7: ...Do not use aluminum foil carbon containing paper or other con ductive paper Otherwise a fire might occur Do not eat or swallow toner Keep toner used or unused and toner bottle out of the reach of chi...

Страница 8: ...e As an ENERGY STAR Partner we have determined that this machine model meets the ENERGY STAR Guidelines for energy efficiency The ENERGY STAR Guidelines intend to establish an international energy sav...

Страница 9: ...instructions under this symbol Be sure to read the instructions all of which are described in the Safety Information section The statements above are notes for your safety Important If this instructi...

Страница 10: ...r 10 2 Copying Basic Copying Copying to sheets 11 Using the Roll Feeder Option 15 Using the Rear Table 17 Copying onto Roll Paper Option 19 Semi Synchro cutting 19 Preset Cutting 22 Variable Cutting 2...

Страница 11: ...62 If Sheet Paper is Jammed in the Feed in Slot 63 If Sheet Paper is Jammed at the Paper Exit 64 If Roll Paper Jams 65 If You Cannot See the Roll Paper Jam 67 Others 70 Absolutely nothing happens 70 S...

Страница 12: ...viii...

Страница 13: ...ginal that can t be bent use the rear table see 6 4 Original Guides Use the guide to keep the original straight as you feed the original into the copier 5 Operation Panel P 3 Operation Panel 6 Rear Ta...

Страница 14: ...on t fall off as they come out Note Set the manual pocket as shown in the figure 13 Anti humidity Heater Switch When humidity is high the paper in the paper roll tray may absorb moisture which can eff...

Страница 15: ...t Varia ble Cut on and off 5 Energy Saver indicator Shows that the machine is in a state of wait Energy Saver Press key 9 6 Troubleshooting indicators P 61 Troubleshooting for details 7 Wait indicator...

Страница 16: ...p a copy job 16 Copy Media key Press to select the type of copy paper you are using The copier will apply more or less heat accordingly The top indicator Translucent paper indicator The bottom indicat...

Страница 17: ...e Power To turn the machine on press the main switch Turn On the Main Power A Make sure that the power cord is firmly plugged into the wall out let B Turn on the main switch Turn Off the Main Power A...

Страница 18: ...0mm 1 2 or more When you copy the following originals set them in the rear table P 17 Using the Rear Table Thick originals 0 19mm 3mm Originals which cannot be folded Originals less than 297mm 11 in w...

Страница 19: ...ing edge Originals with clips or staples Originals with wet ink or white out Carbon paper Originals made of materials other than paper or film thermosensitive paper aluminum foil etc Notes for Leading...

Страница 20: ...ore than 5mm 1 4 or falling more than 20mm 3 4 over a 40mm 1 5 radius When you make copies on film take out the copies delivered to the copy guide one sheet at a time and place them on a flat surface...

Страница 21: ...nt of paper from the bag Do not take all the paper out of the bag Anti humidity Heater When humidity is high the paper in the paper roll tray may absorb moisture which can effect the image quality of...

Страница 22: ...e exposed to heat Do not lay heavy objects on toner bottles Used Toner Toner cannot be re used Put the used toner in the plastic bag and dispose of it according to local reg ulations Do not incinerate...

Страница 23: ...en the right side and the left side of the paper is more than 5mm 1 5 creasing or a paper jam might occur You cannot copy to both sides of the paper at the same time The machine needs about 3 minutes...

Страница 24: ...the Wait indicator goes off and then Ready and the Set Pa per indicator go on Make sure that the Bypass Tray is selected C Select any copy settings you require such as the media type or copy densi ty...

Страница 25: ...t into the copier These illustrations show the copier with the Original Guides the Paper Guides and other optional equipment F Make sure that the Set Original indicator goes on G Set the Original Guid...

Страница 26: ...ot hold down or pull out the original during copying Do not put heavy object on the original table If you do not insert the original in a certain interval after inserting the pa per the paper will be...

Страница 27: ...condition Make sure that the paper feed indicator lights up B Select any copy settings you require such as the media type or copy densi ty Press the RF Select Cut key to select the Roll Feeder Note I...

Страница 28: ...hat the Set Original indicator goes on F Set the original guides to match the width of the original G Center your original face up on the original Table Slide the original straight into the copier unt...

Страница 29: ...llowing originals set them in the Rear Table Thick originals 0 19mm 3mm Originals which cannot be folded Originals less than 297mm 11 in width and more than 1 200mm 48 in length Note You cannot use th...

Страница 30: ...Copying 18 2 D Insert the original face down from the rear table E Hold and take the original which has been read and delivered in the front of the copier...

Страница 31: ...original or the thin original less than 0 1mm which can be easily bent down open the guides to keep the original away from the paper entrance R CAUTION Semi Synchro cutting This feature lets you cut t...

Страница 32: ...arrier sheet and rear table when you use Semi synchro cutting A fault might occur A Press the Cut Select key 1 The Semi Synchro indicator lights up 2 B Choose any copy settings you require C Make sure...

Страница 33: ...ption 21 2 E Press the Paper Feed key F Set the original guides to match the width of the original G Center your original face up on the original table Slide the original straight into the copier unti...

Страница 34: ...n you repeat the copy job with this function even if you select different sizes of the originals this function helps you to make same size copy Once you set the cut length and press the RF Select Cut...

Страница 35: ...th 1189mm or 48 0 B Press the Preset Cut key several times until the indicator shows the value you want C Choose any copy settings you require D Press the RF select Cut key to turn on the RF Select in...

Страница 36: ...et Cut length 1189mm or 48 B Press the Preset Cut key to display the nearest value to the one you want C Press key or key to specify the most appropriate length You can change the settings by 1mm 0 1...

Страница 37: ...use roll paper and cut your own sheets For how to set the roll cutting rail P 59 Loading A New Roll Onto Paper Cutting Rail Option A Pull a bit of paper out and insert it between the rail and the doub...

Страница 38: ...ing 26 2 D With your other hand insert the blade of a paper knife between the two rods and slide across the length of the rail E Make your copy as shown on P 27 Make sure the curl of the paper faces d...

Страница 39: ...the Translucent or Film indicator lights B When the wait indicator goes off and the Ready and the Set Paper indicator go on the copier enters the ready condition Note Even if you have set the Copy Me...

Страница 40: ...ess the i i i i key to decrease the temperature and press the j j j j key to increase the temperature The number of temperature levels 7 levels available depends on the paper type Plain paper 1234567...

Страница 41: ...the three right notches correspond to darker densities and the three left notches to lighter densities The brighter notch shows which level is now set If you go lower than the left most notch the Ligh...

Страница 42: ...set up to 99 Do not press the RF Select Cut key twice once you start preset cut with this function If you press the key twice the copy job will be interrupted A Press the and keys to specify the numbe...

Страница 43: ...mode or Variable Cut mode In the Semi Synchro Cut mode the paper length is increased by the leading margin width A Press the Function Select key until the Leading Edge indicator is lit B Press the key...

Страница 44: ...t point within 130 mm of the leading edge of the original the copier will regard the leading edge as the start point The minimum available space between the start point and the end point is 30 mm If y...

Страница 45: ...ding edge of the area to be cop ied reaches the edge of the original table cover The P will stay on not blinking The copier starts copying E Press the Function Select key when the trailing edge of the...

Страница 46: ...Copy Settings 34 3 The P will disappear...

Страница 47: ...stantly B Change the default settings to those you use most frequently Whenever you turn on the machine or press the Clear Modes Energy Saver key these settings will be ready to use A Program key Stor...

Страница 48: ...ey before copying B Enter the number of copies required with the and key C Make a copy B Changing the Default Setting A Turn off the main switch B While holding down the Emergency Stop key turn the co...

Страница 49: ...Programming Settings You Often Use 37 3 D Turn off the main switch Note The next time you turn the copier on the settings you programmed in step C will take effect...

Страница 50: ...tment Allows you to adjust the cut length 25mm 25mm 1 0 1 0 by 1mm or 0 1 Without the Roll Feeder A2 is not in use A Hold down the Program key for 3 seconds or more A1 blinks on the Copy Counter displ...

Страница 51: ...User Tools 39 3 D Use the and key to change the value E Press the Program key to return to step B B B B F Press the Clear Modes Energy Saver key to exit this mode...

Страница 52: ...2 2 Mode 3 3 Mode 4 4 Mode 5 5 Mode 6 6 Mode 7 Default 2 For details about each mode contact your service representative Fusing Temperature 2 High 02 Selects the fusing temperature for trans lucent p...

Страница 53: ...preset number of seconds before starting the rollers that will pull the paper in This pause gives you a chance to align the paper The time can be set to 0 7 1 2 3 4 or 5 seconds Note 0 2 0sec 1 0 7se...

Страница 54: ...0 None 1 Pre_heat 2 Hello I love you 3 0123456789 4 Sleeping 5 Have a good day Leading Edge Increase Decrease Adjustment Preliminary Interval 12 When changing a function setting margin multiple copie...

Страница 55: ...Up Down Speed Setting 21 The copier can scroll through the preset lengths forward or backward and at different speeds There are many sets of sizes from which to choose Note 0 0 10 seconds 1 0 5 secon...

Страница 56: ...Copy Settings 44 3 Note 0 Standard Density 1 Darker Image Density Default 0...

Страница 57: ...e used toner This will damage the machine A Open the upper unit of the copier Do not incinerate used toner toner bottle or toner cartridge Toner dust might ignite when exposed to an open flame Dispose...

Страница 58: ...t side of the copier and then carefully remove the plastic bottle Note Put the used toner to the plastic bag and dispose of it according to local reg ulations Do not throw away the bottle D Place the...

Страница 59: ...Changing The Used Toner Bottle 47 4 F Close the upper unit...

Страница 60: ...after the machine instructs you to add toner Do not use used toner This will damage the machine A Lift the original table until it locks in place Note If your machine does not have roll feeder pull d...

Страница 61: ...to the right A lift the left end and re move the cartridge B D Put the old toner cartridge in a plastic bag and dispose of it according to lo cal regulations E Shake the new toner cartridge lightly 5...

Страница 62: ...nd slowly remove it H Push the toner cartridge all the way to the left Then turn the toner cartridge all the way in as shown Note If you can t close the toner cartridge cover there might be problem se...

Страница 63: ...Adding Toner 51 4 The copier will need a few moments to warm up before it is ready to copy...

Страница 64: ...moving the Roll Paper Holder A Push the paper holder inwards and then pull it upwards to re move it Note The paper holder is attached with magnet and a hook The paper holder is on the right in this il...

Страница 65: ...Changing The Roll Paper Size 53 4 Metric version Roll Feeder A0 K A1 KL A2 KL A3 KL A4 K...

Страница 66: ...s could damage the machine A Pull out the Roll Feeder B Hold both sides of the empty paper roll and remove it from the unit Rolls of paper can be heavy so you should be careful when load ing one Be ca...

Страница 67: ...the empty core B B B B D Set the paper holder A A A A to the roll core and then lower the lever B B B B Note Insert the paper roll as far as it will go E Hold both sides of paper roll in the paper ro...

Страница 68: ...er Af ter you adjust it put it back to the roll feeder Do not force to remove the paper holder when you need to change the pa per size For how to remove and set the paper holder see P 52 Changing The...

Страница 69: ...e Insert it straight into the roller Watch carefully to make sure that the flap of the paper is inserted between feeder and the roller For how to change the Roll 2 refer to the following illustration...

Страница 70: ...Maintaining Your Copier 58 4 I Close the Roll Feeder...

Страница 71: ...ew Roll Onto Paper Cutting Rail Option 59 4 Loading A New Roll Onto Paper Cutting Rail Option A Lift the rail B Remove the spool from its support C Remove one of the end caps and slide the old roll of...

Страница 72: ...ning Your Copier 60 4 D Slide the new roll on the spool and put the cap over the end of the roll E Place the spool on the holder so that the paper rolls off the front Push it all the way in F Lower th...

Страница 73: ...e instructions described there What appears What it means What to do x The original or copy paper is jammed somewhere See the following section L The copier needs a technician Call your service repres...

Страница 74: ...te If the paper or original gets stuck in the copier remove both original and pa per A Lift the original table B Very gently pull the original out of the feed out slot Be careful not to tear it C Clos...

Страница 75: ...f the copier and lift the unit B Pull out the copy paper Do not leave any scraps of paper in the copier C Close the unit Press firmly on both sides until it clicks into place The fusing unit can be ve...

Страница 76: ...be tween the original table and the bypass table B Open the fusing unit cover C Slowly pull the paper out If there are scraps left inside open the inner cov er wait for the copier to cool and remove...

Страница 77: ...R CAUTION A Open the Roll feeder B Slowly pull up the edge of the paper C Slide the cutter knob A A A A to cut the edge of the roll paper and then remove the jammed paper B B B B Be careful when repla...

Страница 78: ...clockwise about 1 4 to adjust the paper position F Slowly rotate the paper roll until the edge of the paper is fed into the rub ber part of the roller A A A A While feeding the flap of the paper roll...

Страница 79: ...ON A Open the Roll Feeder B Rotate the paper roll in the direction of the arrow until you can see the edge of the paper C Cut the edge of the paper with the cutter or scissors The fusing unit can be v...

Страница 80: ...wly rotate the paper roll until the edge of the paper is fed into the rub ber part of the roller A A A A While feeding the flap of the paper roll into the rubber part of the roller turn the paper knob...

Страница 81: ...If Jams Occur 69 5 Watch carefully to make sure that the flap of the paper is inserted between feeder and the roller G Close the Roll Feeder...

Страница 82: ...therwise damaged P 8 Are there visible bits of paper or other objects stuck in the machine If there are remove them Are you inserting the paper and original in straight Always feed paper in straight I...

Страница 83: ...s or try changing the copy media setting If creases appear on copies made to transparent film try setting your film sheets sideways Copies Come Out Dog Eared Try setting your copy paper with the other...

Страница 84: ...Plate you should clean the copy and original tables with a damp cloth then wipe them with a dry cloth Clean the exposure glass and the Original Drive Roller with a damp cloth then wipe it with a dry c...

Страница 85: ...an one sheet of paper at a time on the bypass table Center your paper on the copy table using the size marks Then slide the pa per straight into the copier until it stops When copying to a long sheet...

Страница 86: ...ible ozone build up make sure to install this copier in a large well ventilated room ensuring an air turnover of at least 1000 ft3 hour per son 30 m3 When you use this machine for a long time in a con...

Страница 87: ...the machine to the power source described on the inside front cover of this manual Avoid multi wiring Do not damage break or make any modifications to the pow er cord Do not place heavy objects on it...

Страница 88: ...close to the copier and easily accessible at all times Access To Machine Place the copier near a power source and provide clearance as shown 1 Rear more than 60cm 23 7 2 Right more than 60cm 23 7 3 Le...

Страница 89: ...ature of 74 F 23 C First Copy Within 21 seconds A1 L 23 35 Copying Speed 3600mm 141 7 per minute Auto Reset Time 2 minutes can also be turned off or set to 1 3 4 or 5 minutes Reproduction Ratio Fixed...

Страница 90: ...800 841 880 914mm Roll length less than 150mm Note Maximum 914mm 36 Minimum 210mm 8 5 Width 210 257 297 364 420 515 594 660 728 800 841 880 914mm Roll length less than 150mm Note Maximum 914mm 36 Min...

Страница 91: ...avoid 74 G Guide To Components 1 H Handling Toner 10 I If Copies Look Wrong 70 If Indicator Lights Up 61 If Jams Occur 62 If Jams Occur Frequently 70 If Roll Paper Jams 65 IfSheetPaperisJammedatthePa...

Страница 92: ...ing happens but Set Paper or RF Select never appear 70 Specifications 77 T Things To Do Everyday 72 Toner 10 Toner Storage 10 Troubleshooting 61 Turning on the Power 5 U Used Toner 10 User Tools 38 Us...

Страница 93: ...your document management partner Operating Instructions LW 111 LW 111 LW 111 LW 111 Wide Format Copier...

Страница 94: ...0 8261 4000 Germany RICOH DEUTSCHLAND GmbH Mergenthalerallee 38 40 65760 Eschborn Phone 49 0 6196 9060 France RICOH FRANCE S A 383 Avenue du G n ral de Gaulle BP 307 92143 Clamart Cedex Phone 33 0 821...

Страница 95: ...might not be available in some countries For details please contact your local dealer Warning Use of controls or adjustment or performance of procedures other than those specified in this manual migh...

Страница 96: ...Where symbols are used on or near switches they mean an under in accordance with IEC 60417 a a a a means POWER ON c c c c means STAND BY Copyright 2001 Ricoh Co Ltd...

Страница 97: ...s manual the following important symbols are used R WARNING Indicates a potentially hazardous situation which if instructions are not followed could result in death or serious injury R CAUTION Indicat...

Страница 98: ...f the machine has laser systems there is a risk of serious eye damage To avoid hazardous electric shock or laser radiation exposure do not remove any covers or screws other than those specified in thi...

Страница 99: ...Do not use aluminum foil carbon containing paper or other con ductive paper Otherwise a fire might occur Do not eat or swallow toner Keep toner used or unused and toner bottle out of the reach of chi...

Страница 100: ...ne As an ENERGY STAR Partner we have determined that this machine model meets the ENERGY STAR Guidelines for energy efficiency The ENERGY STAR Guidelines intend to establish an international energy sa...

Страница 101: ...instructions under this symbol Be sure to read the instructions all of which are described in the Safety Information section The statements above are notes for your safety Important If this instructi...

Страница 102: ...oner 10 2 Copying Basic Copying Copying to sheets 11 Manual Feed Mode 16 Using the Rear Table 19 Copying onto Roll Paper 21 Synchro Cutting 21 Preset Cutting 24 Variable Cutting 25 3 Copy Settings Cop...

Страница 103: ...et Paper is Jammed at the Paper Exit 65 If Roll Paper Jams 66 If You Cannot See the Roll Paper Jam 68 Others 71 Absolutely Nothing Happens 71 Something Happens but Set Paper or Paper Select Never Appe...

Страница 104: ...viii...

Страница 105: ...the original into the copier 4 Original Table Place your original face up here If you want to copy a stiff original that can t be bent use the rear table see 6 5 Operation Panel P 3 Operation Panel 6...

Страница 106: ...e Makes sure that copies don t fall off as they come out 13 Anti humidity Heater Switch When humidity is high the paper in the paper roll tray may absorb moisture which can effect the image quality of...

Страница 107: ...lengths for the Roll Feeder 4 Cut Select key Turns Synchro Cut or Preset Variable Cut on and off 5 Energy Saver indicator Shows that the machine is in a state of wait Energy Saver Press key 9 6 Troubl...

Страница 108: ...ia key Press to select the type of copy paper you are using The copier will apply more or less heat accordingly The top indicator Translucent paper indicator The bottom indicator Film indicator 17 Eme...

Страница 109: ...e Power To turn the machine on press the main switch Turn on the Main Power A Make sure that the power cord is firmly plugged into the wall out let B Turn on the main switch Turn off the Main Power A...

Страница 110: ...leading edge and the trailing edge R50mm 2 0 or more H20mm 0 8 or less For the curl of the whole paper 30mm 1 2 or more When you copy the following originals set them in the rear table P 19 Using the...

Страница 111: ...the leading edge Originals with clips or staples Originals with wet ink or white out Carbon paper Originals made of materials other than paper or film thermosensitive paper aluminum foil etc Note for...

Страница 112: ...than 5mm 1 4 or falling more than 20mm 3 4 over a 40mm 1 5 radius When you make copies on film take out the copies delivered to the copy exit guide one sheet at a time and place them on a flat surface...

Страница 113: ...nt of paper from the bag Do not take all the paper out of the bag Anti humidity Heater When humidity is high the paper in the paper roll tray may absorb moisture which can effect the image quality of...

Страница 114: ...xposed to heat Do not lay heavy objects on toner bottles Used Toner Toner cannot be re used Put the used toner in the plastic bag and dispose of it according to local reg ulations Do not incinerate us...

Страница 115: ...ion a part of the copy stacker and put the edge of your original or paper on Do not use paper which is cut obliquely When the difference between the right side and the left side of the paper is more t...

Страница 116: ...ch B When the Wait indicator goes off and the Ready and the Set Original indi cator go on the copier enters the ready condition C Select any copy settings you require such as the media type or copy de...

Страница 117: ...l Feeder or Bypass Tray Note If you select two roll feeder select one of the roll If you select the Bypass table center the paper face up on the bypass table and slide the paper straight into the copi...

Страница 118: ...nal face down on the original table Slide the original straight into the copier until the copier pulls it in Note If you want to feed manually use the manual feed mode Press the Start key for more tha...

Страница 119: ...through to the rear table H When the original is being sent back the machine scans the original and starts copying I The copy is delivered at the back of the copier Note You must always pick up copie...

Страница 120: ...lly If the copier is idle for a certain interval after you have used it the machine resets itself to the initial settings Auto Reset If the copier is not used for a long time it will turn itself off A...

Страница 121: ...ndicator which is next to the start key goes on Note If you want to use this setting as a default P 42 Settings You Can Change with User Tools D Select any copy settings you require such as the media...

Страница 122: ...h the original size mark Place the original face down and slide it straight into the copier along the original guides Note Do not force to remove the original once you set it and if you want to change...

Страница 123: ...h Repeated Copying the original is repeatedly fed through and sent back until all copies have been made I Copies are delivered at the rear of the machine Using the Rear Table Set thick originals or or...

Страница 124: ...Pull up the guide to avoid paper misfeeds D Insert the original face down from the rear table E When the machine scans the original and starts copying support the origi nal with your hands at the fro...

Страница 125: ...ying When you want to copy a long original curled original or the thin original less than 0 1mm which can be easily bent down open the guides to keep the original away from the paper entrance R CAUTIO...

Страница 126: ...aper Select Cut key The Paper Select indicator lights up B Press the Cut Select key 1 The Synchro indicator 2 lights up C Press the Paper Select Cut key to turn on the RF Select indicator D Select any...

Страница 127: ...ndicator goes off and the ready and the set original indicator go on G Center your original face down on the original table Slide the original straight into the copier until the copier pulls it in Not...

Страница 128: ...int press the Paper Select Cut key The machine interrupts the op eration in progress and delivers the copy and the original Press the Clear Stop key to remove the original Preset Cutting This function...

Страница 129: ...he value you want D Choose any copy settings you require E Continue from step E E E E P 23 Variable Cutting This function cuts roll paper in a length you specify Note Length can be cut from 280mm to 3...

Страница 130: ...e key to specify the most appropriate length You can change the settings by 1mm 0 1 steps D Choose any copy settings you require E Press the Paper Select Cut key to turn on the Paper Select indicator...

Страница 131: ...per package to confirm it A Press the Copy Media key The Translucent paper or Film indicator lights up The Wait indicator goes on and either the Translucent paper or Film indica tor lights Type of pa...

Страница 132: ...lly A Press the Copy Media key to turn on the Translucent or Film indicator that you want B Hold down the Copy Media key for 3 seconds until beep The indicator show the current fusing temperature The...

Страница 133: ...Media 29 3 E Choose any copy settings you require and then start copying Note The new fusing temperature for the selected paper type is cleared when you press the Clear Modes Energy Saver key or turn...

Страница 134: ...hree right notches correspond to darker densities and the three left notches to lighter densities The brighter notch shows which level is now set If you go lower than the left most notch the Lighter C...

Страница 135: ...Note With this feature the image might be copied at a slant Whether this happens depends on the original size type and condition e g curled wavy In such a case make one copy at a time You cannot use...

Страница 136: ...either the lead ing or trailing edge When you set a leading margin the copy image is shifted to the trailing edge The copy image is shifted to the trailing edge when you make a copy using the bypass...

Страница 137: ...Setting a Leading Trailing Edge Margin 33 3 D Using the original table insert the leading edge of the original first Note If you use the rear table insert the original trailing edge first...

Страница 138: ...rt point a the copier will regard the trailing edge of the original as the end point b If you set the start point within 40mm of the trailing edge of the original the copier will cancel the copying an...

Страница 139: ...aight into the copier until it stops or press the Paper Se lect Cut key to turn on the Paper Select indicator C Set the original D Press the Function Select key when the leading edge of the area to be...

Страница 140: ...edge of the area to be cop ied reaches the edge of the original table cover The P will start blinking again F After the paper has been delivered press the Clear Stop key and remove the original G Hol...

Страница 141: ...tantly B Change the default settings to those you use most frequently Whenever you turn on the machine or press the Clear Modes Energy Saver key these settings will be ready to use A Program key Stori...

Страница 142: ...8 3 Recalling Settings Stored in the Program key A Press the Program key before copying B Enter the number of copies required with the and key C Make a copy B Changing the Default Setting A Turn off t...

Страница 143: ...ing down the Emergency Stop key turn the copier back on The jam and service indicators will blink C Input the settings you want D Turn off the main switch Note The next time you turn the copier on the...

Страница 144: ...ical degree A2 Cut Length allows you to adjust the cut length 25mm 25mm 1 0 1 0 by 1mm or 0 1 A Hold down the Program key for 3 seconds or more A1 blinks on the Copy Counter display B If you wish to a...

Страница 145: ...User Tools 41 3 D Use the and key to change the value E Press the Program key to return to step B B B B F Press the Clear Modes Energy Saver key to exit this mode...

Страница 146: ...2 2 Mode 3 3 Mode 4 4 Mode 5 5 Mode 6 6 Mode 7 Default 2 For details about each mode contact your service representative Fusing Temperature 2 High 02 Selects the fusing temperature for trans lucent p...

Страница 147: ...reset number of seconds before starting the rollers that will pull the paper in This pause gives you a chance to align the paper The time can be set to 0 7 1 2 3 4 or 5 seconds Note 0 2 0sec 1 0 7sec...

Страница 148: ...Leading Edge Increase Decrease Adjustment Preliminary Interval 12 When changing a function setting margin multiple copies or paper length by holding down the or key the setting will change by a prese...

Страница 149: ...riginal This is to prevent the original from dropping onto the floor after scanning The original is fed out when the X key is pressed or when the next original is inserted Note 0 No 1 Original Hold Mo...

Страница 150: ...2 For details about this setting contact your service repre sentative Auto Off Function setting 33 This setting allows you to enable or disable the Auto Off function Note 0 Disable 1 Enable Default 1...

Страница 151: ...e used toner This will damage the machine A Open the upper unit of the copier Do not incinerate used toner toner bottle or toner cartridge Toner dust might ignite when exposed to an open flame Dispose...

Страница 152: ...ight side of the copier and then carefully remove the plastic bottle Note Put the used toner to the plastic bag and dispose of it according to local reg ulations Do not throw away the bottle D Place t...

Страница 153: ...Changing The Used Toner Bottle 49 4 F Close the upper unit...

Страница 154: ...ettings will be cleared Always add toner after the machine instructs you to add toner Do not use used toner This will damage the machine A Lift the original table until it locks in place Do not incine...

Страница 155: ...to the right A lift the left end and re move the cartridge B D Put the old toner cartridge in a plastic bag and dispose of it according to lo cal regulations E Shake the new toner cartridge lightly 5...

Страница 156: ...nd slowly remove it H Push the toner cartridge all the way to the left Then turn the toner cartridge all the way in as shown Note If you can t close the toner cartridge cover there might be problem se...

Страница 157: ...Adding Toner 53 4 The copier will need a few moments to warm up before it is ready to copy...

Страница 158: ...Removing the Roll Paper Holder A Push the paper holder inwards and then pull it upwards to re move it Note The paper holder is attached with magnet and a hook The paper holder is on the right in this...

Страница 159: ...Changing the Roll Paper Size 55 4 Metric ver sion Roll Feeder A0 K A1 KL A2 KL A3 KL A4 K...

Страница 160: ...uld damage the machine A Pull out the Roll Feeder B Hold both sides of the empty paper roll and remove it from the unit Rolls of paper can be heavy so you should be careful when load ing one Be carefu...

Страница 161: ...er from the empty core B B B B D Set the paper holder to the roll core A A A A and then lower the lever B B B B Note Insert the paper roll as far as it will go E Hold both sides of the paper roll and...

Страница 162: ...er Af ter you adjust it put it back to the roll feeder Do not force to remove the paper holder when you need to change the pa per size For how to remove and set the paper holder see Changing the Roll...

Страница 163: ...Insert it straight into the roller Watch carefully to make sure that the flap of the paper is inserted between the feeder and the roller For how to change the Roll 2 refer to the following illustratio...

Страница 164: ...Maintaining Your Copier 60 4 I Close the Roll Feeder...

Страница 165: ...ro priate page and follow the instructions described there What ap pears What it means What to do x The origi nal or copy paper is jammed some where See the fol lowing sec tion L The copier needs a te...

Страница 166: ...Troubleshooting 62 5 E The used tonerbottle is full Empty the used toner bottle P 47...

Страница 167: ...e If the paper or original gets stuck in the copier remove both original and pa per A Lift the original table B Very gently pull the original out of the feed out slot Be careful not to tear it C Close...

Страница 168: ...of the copier and lift the unit B Pull out the copy paper Do not leave any scraps of paper in the copier C Close the unit Press firmly on both sides until it clicks into place The fusing unit can be v...

Страница 169: ...be tween the original table and the bypass table B Open the fusing unit cover C Slowly pull the paper out If there are scraps left inside open the inner cov er wait for the copier to cool and remove t...

Страница 170: ...R CAUTION A Open the Roll Feeder B Slowly pull up the edge of the paper C Slide the cutter knob A A A A to cut the edge of the roll paper and then remove the jammed paper B B B B Be careful when repla...

Страница 171: ...lockwise about 1 4 to adjust the paper position F Slowly rotate the paper roll until the edge of the paper is fed into the rub ber part of the roller A A A A While feeding the flap of the paper roll i...

Страница 172: ...UTION A Open the Roll Feeder B Rotate the paper roll in the direction of the arrow until you can see the edge of the paper C Cut the edge of the paper with the cutter or scissors The fusing unit can b...

Страница 173: ...ly rotate the paper roll until the edge of the paper is fed into the rub ber part of the roller A A A A While feeding the flap of the paper roll into the rubber part of the roller turn the paper knob...

Страница 174: ...Troubleshooting 70 5 Watch carefully to make sure that the flap of the paper is inserted between the feeder and the roller G Close the Roll Feeder...

Страница 175: ...rwise damaged P 8 Are there visible bits of paper or other objects stuck in the machine If there are remove them Are you inserting the paper and original in straight Always feed paper in straight If C...

Страница 176: ...deways or try changing the copy media setting If creases appear on copies made to transparent film try setting your film sheets sideways Copies Come Out Dog eared Try setting your copy paper with the...

Страница 177: ...e You should clean the copy and original tables with a damp cloth and then wipe them with a dry cloth Clean the exposure glass and the original drive roller with a damp cloth and then wipe them with a...

Страница 178: ...ore than one sheet of paper at a time on the bypass table Center your paper on the copy table using the size marks Then slide the pa per straight into the copier until it stops When copying to a long...

Страница 179: ...o avoid possible ozone build up make sure to install this copier in a large well ventilated room ensuring an air turnover of at least 1000 ft3 hour per son 30 m3 When you use this machine for a long t...

Страница 180: ...he power source described on the inside front cover of this manual Avoid multi wiring Do not damage break or make any modifications to the pow er cord Do not place heavy objects on it pull it hard or...

Страница 181: ...let Make sure the power outlet is close to the copier and easily accessible at all times Access To Machine Place the copier near a power source and provide clearance as shown 1 Rear more than 60cm 23...

Страница 182: ...Troubleshooting 78 5...

Страница 183: ...Original moving overafixed fiber optics array Originals Sheet Original Reference Position Center Original Size Maximum 914 W 3 000mm L 36 118 Minimum A4 K 210 W 297mm L 8 5 11 Copy Size Maximum 914 W...

Страница 184: ...inutes Reproduc tion Ratio Fixed 1 to 1 Paper Feed manual feed roll feeder Toner re plenish ment Cartridge system Self diag nostic codes LED indi cators Power Source North America 120V 60Hz 12A Europe...

Страница 185: ...l Size Width 210 257 297 364 420 515 594 660 728 800 841 880 914mm Roll length less than 150mm Note Maximum 914mm 36 Minimum 210mm 8 5 Width 210 257 297 364 420 515 594 660 728 800 841 880 914mm Roll...

Страница 186: ...Specifications 82 6 Dimen sion W D H 1 200mm 720mm 775mm 48 28 3 30 5 1 200m m 720mm 775mm 48 28 3 30 5 Weight 78kg 172lb 86kg 189lb...

Страница 187: ...Options 83 6 Options Copy Tray Type 780...

Страница 188: ...4 E ENERGY STAR Program iv Environments to avoid 75 G Guide to Components 1 H Handling Toner 10 I If Copies Look Wrong 71 If Indicator Lights Up 61 If Jams Occur 63 If Jams Occur Frequently 71 If Roll...

Страница 189: ...ng the Roll Paper Holder 54 Something Happens but Set Paper or Paper Select Never Appear 71 Specifications 79 Synchro Cutting 21 T Toner 10 Toner Storage 10 Troubleshooting 61 Turning on the Power 5 T...

Отзывы: