background image

Placing the Original Document

3 - 4

Copier Functions

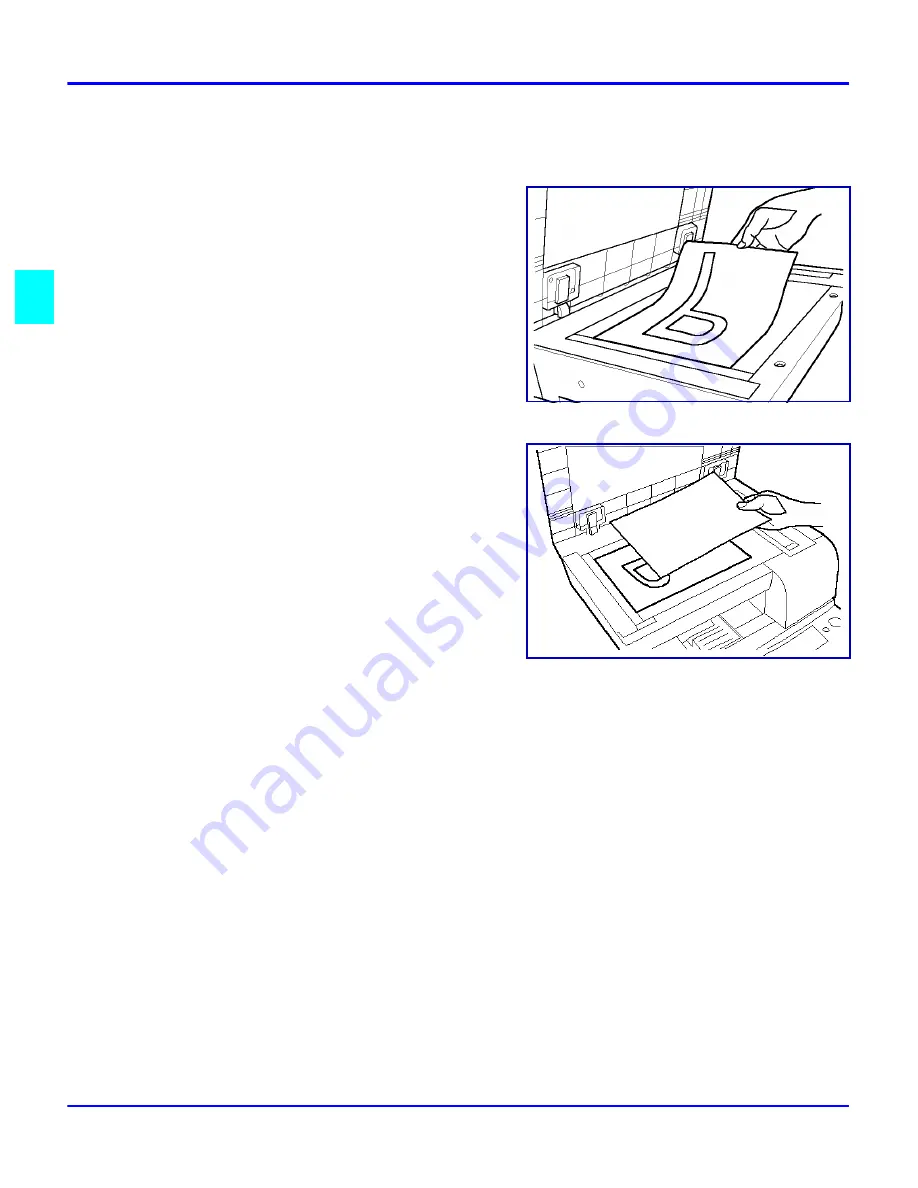
Transparent Documents

When copying OHP transparencies or tracing paper

1

Follow the same procedure as described 
for general documents.

2

Place a blank sheet of paper of the same 
size as the original on top of the original.

3

Close the Original Cover.

Содержание 5415

Страница 1: ...your document management partner Operator Guide Digital Copier 5415 5415 5415 5415...

Страница 2: ...ers here MODEL NUMBER __________________________ SERIAL NUMBER __________________________ To order supplies call To request service call Customer Vision Our commitment to your complete satisfaction La...

Страница 3: ...ocument 3 1 When using the Automatic Document Feeder 3 1 Setting Originals in the Automatic Document Feeder 3 2 Setting Original on the Exposure Glass 3 3 Selecting the Paper Tray 3 5 How to select a...

Страница 4: ...ndicator 6 8 Loading Paper in the Paper Tray 6 8 Loading Paper in the Paper Feed Unit 6 9 Paper Misfeed Indicators 6 11 Clearing Paper Misfeed PC 6 11 Clearing Paper Misfeed J2 J3 6 13 Clearing Paper...

Страница 5: ...Important Safeguards...

Страница 6: ...3 Do not operate the unit if any part of it is damaged or if any part has been dropped until it is checked by a authorized Lanier Service Technician 4 The fusing area is hot Exercise care in this are...

Страница 7: ...Chapter 1 Making Copies...

Страница 8: ...pies Chapter Overview This chapter provides basic instructions for making a copy Included in this chapter are Turning the Copier ON on page 1 1 Placing Original Documents on page 1 2 Making a Copy on...

Страница 9: ...mes to its Ready condition it automatically goes into the Initial Mode 2 To turn the copier off press the switch to the O OFF position Note If you turn off the Main Power switch while the copier is in...

Страница 10: ...es Placing Original Documents Using the Exposure Glass for Copying Place the original document face down on the exposure glass Using the Automatic Document Feeder for Copying optional Place the origin...

Страница 11: ...10 key in combination with the 1 key to enter other values See Selecting Copy Quantity on page 3 6 Copy Darkness Lightness Automatic Press the Auto Exposure key Manual Press the increase or decrease...

Страница 12: ...Making a Copy 1 4 Making Copies Notes...

Страница 13: ...Chapter 2 Component Identification...

Страница 14: ...tification Chapter Overview This chapter provides information on Control Panel on page 2 1 Message Display on page 2 3 External Components on page 2 4 Internal Components on page 2 5 Optional Equipmen...

Страница 15: ...Key Press to cancel a copy operation Press to reset copy quantity to 1 Press to return zoom ratio to 100 Press for three seconds to enable the total check function 3 Paper Select Key Press to select...

Страница 16: ...Manual exposure mode or photo mode 6 Exposure Control Key Darker Press to make the image darker 7 Zoom Key Press to change the zoom ratio Use to select preset zoom ratios 8 Copies Function Key Use to...

Страница 17: ...t Identification 2 3 Message Display Item Description 11 Add Toner Indicator Indicates the toner supply is low Replace the Imagine Cartridge 12 Add Paper Indicator Indicates the selected paper drawer...

Страница 18: ...sent to this tray 2 Paper Tray Holds up to 250 sheet of copy paper 3 Manual Bypass Tray Use to feed non standard paper for copying such as letterhead colored paper and transparencies 4 Control Panel...

Страница 19: ...s lever to raise the top of the copier 2 Original Pad Secures the original for copying 3 Exposure Glass Original is placed face down on the glass for copying 4 Upper half of copier Open when replacing...

Страница 20: ...up in tray 3 Document Feed Tray Extender Pull out to support large documents 4 Document Exit Tray Receives the original document after it is copied Paper Feed Unit item 5 5 Paper Feed Unit Holds up to...

Страница 21: ...Chapter 3 Copier Functions...

Страница 22: ...chapter includes the following information Placing the Original Document on page 3 1 Selecting the Paper Tray on page 3 5 Selecting Copy Quantity on page 3 6 Selecting Copy Darkness on page 3 7 Enlarg...

Страница 23: ...mplications Originals should follow these standards Type of Paper Plain paper 50 110 g m2 Paper Size LT ST A4L A5L Originals that are not compatible with the Automatic Document Feeder Typing paper par...

Страница 24: ...e document so that the side that you wish to copy is facing up Note The maximum number of originals that can be loaded is 50 Note Make sure that the top of the stack does not exceed the mark 3 Adjust...

Страница 25: ...e original with the scale marker 4 Close the Original Cover Note When copying larger documents that are bound together such as the pages of a book do not close the Original Cover of the machine Note D...

Страница 26: ...s Transparent Documents When copying OHP transparencies or tracing paper 1 Follow the same procedure as described for general documents 2 Place a blank sheet of paper of the same size as the original...

Страница 27: ...e Be sure to change the U7 Paper Size Select User s Choice setting whenever a different size of paper is loaded into the Paper Tray See U7 Paper Size Select on page 5 6 The Paper Tray is prioritized w...

Страница 28: ...0 or more copies press the 10 Key one or more times The appropriate number is displayed Each time the 10 Key is pressed the copy quantity is increased by 10 To make 10 copies press the 10 Key one time...

Страница 29: ...posure Mode is designed to provide optimal density ratios for most applications however lighter and darker setting adjustments are possible through the User s Choice Mode The Auto Exposure Mode is the...

Страница 30: ...Press the Exposure Control Keys to select the optimal level Both the Manual Exposure Mode and the Photo Mode allow you to select from nine levels of exposure Indicators appear to indicate the selecte...

Страница 31: ...e specified by pressing the Zoom Key There are two modes to choose from Standard Copy Zoom and Manual Zoom Select Using Preset Ratios With this mode the most often used preset zoom settings can be sel...

Страница 32: ...e Keys Range 50 199 1 Press and hold a or Key to rapidly change the zoom ratio 2 Press the Zoom Key to enter the Copy Zoom Setting Mode 3 Set the zoom ratio using the and Keys To return the setting to...

Страница 33: ...Chapter 4 Copying Methods...

Страница 34: ...Copying Methods Chapter Overview This chapter includes Bypass Copying on page 4 1 Transparency Copying on page 4 7 Function Mode on page 4 8...

Страница 35: ...aper 24 41 75 Ibs 90 163 g m2 OHP transparencies Paper Size for use in Bypass Copying LT ST A4 L A5 L B5 L B6 L Maximum 8 5 x 14 216 mm 356 mm Minimum 15 x 7 25 128 mm 182 mm When the Manual Bypass Tr...

Страница 36: ...Guide Plates to fit the paper Feed the paper one sheet at a time Curl the edges of the paper upwards before setting the paper into the machine 2 Select the Manual Bypass Tray by pressing the Paper Se...

Страница 37: ...Manual Bypass Tray Be sure to adjust the Document Guide Plates to fit the paper Be sure to feed the paper one sheet at a time Curl the edges of the paper upwards before setting the paper into the mach...

Страница 38: ...art Key 5 Press the Key or the Key to display the paper width code See U8 Manual Feed Input Size on page 5 6 Example Paper Width 5 25 5 75 6 Press the Start Key 7 Press the Key or the Key to display t...

Страница 39: ...ing Methods 4 5 The value entered for the paper length must be larger than the entered paper width 8 Press the Start Key 9 Press the Clear Stop Key twice 10 Select the Manual Bypass Tray by pressing t...

Страница 40: ...Bypass Copying 4 6 Copying Methods 11 Press the 10 Key or the 1 Key to display P Note Be sure to set the paper type properly when copying onto OHP transparencies or thick paper 12 Press the Start Key...

Страница 41: ...nsparencies or Tracing Paper 1 Follow the same procedure as described for general documents 2 Place a blank sheet of paper of the same size as the original on top of the original 3 Gently close the Or...

Страница 42: ...des to choose from Non Sort Mode 2in1 Non Sort Mode Sort Mode 2in1 Sort Mode Selecting the Function Modes F1 F2 F3 F4 1 Press the Copies Function Key to enable the Function Mode 2 Press the 1 Key to s...

Страница 43: ...ocument are loaded into the copier F2 2 in 1 Non Sort This mode requires the optional ADF and expansion memory This mode copies two original documents onto one sheet of paper and outputs the results i...

Страница 44: ...4 2 in 1 Sort This mode requires the optional ADF and expansion memory Copies two original documents onto one sheet of paper and automatically outputs them into complete sets Note The Initial Mode s d...

Страница 45: ...etting the Original Documents for 2 in 1 copying F2 2in1 Non Sort Mode The Automatic Document Feeder supports this function This function can also be performed by setting the document directly onto th...

Страница 46: ...Function Mode 4 12 Copying Methods Notes...

Страница 47: ...Chapter 5 User Mode...

Страница 48: ...User Mode Chapter Overview This chapter describes Total Check Function on page 5 1 User s Choice Mode on page 5 3 User s Choice Functions on page 5 4 Selecting User s Choice Settings on page 5 10...

Страница 49: ...e it was first set up Total Count Shows the total number of copies since the machine was installed PM Count Shows the number of copies taken since the last replacement of PM parts Count Displays Total...

Страница 50: ...Key for three seconds The Total Count will be displayed 2 Press the Clear Stop Key to return to the previous status mode Selecting PM Count 1 Press and hold the Clear Stop Key again for three seconds...

Страница 51: ...y used settings of the machine into the Initial Mode Overview of User s Choice Codes and Functions Code Functions Code Functions U1 Auto Panel Reset Function U8 Manual Feed Input Size U2 Sleep Functio...

Страница 52: ...nction Completely disables the Sleep Function Mode Code Setting Default oF Auto Panel Reset Function is not enabled 05 Auto Panel Reset Function is enabled after 30 seconds 1 Auto Panel Reset Function...

Страница 53: ...ual Exposure Level Priority Allows you to select the initial exposure level settings for the Manual Exposure Mode and the Photo Mode Note A higher darker density level indicates a darker exposure a hi...

Страница 54: ...anual Bypass Tray Paper Width Note After entering the Paper Width Setting press the Start Key to enter the Paper Length Setting Code Setting Default 1 Letter L A4 L 2 Legal LG A5 3 Half Letter HL Invo...

Страница 55: ...85 194 mm 20 7 75 8 0 195 204 mm 21 8 0 8 5 205 214 mm 22 8 5 8 75 215 224 mm 23 8 75 9 25 225 234 mm 24 9 25 9 5 235 244 mm 25 9 75 10 0 245 254 mm 26 10 0 10 5 255 264 mm 27 10 5 10 75 265 274 mm 28...

Страница 56: ...the 16MB 32 MB memory board and the Automatic Document Feeder are installed UA Tray Priority for Copier Mode Allows you to select the paper tray that will be prioritized for feeding paper to the machi...

Страница 57: ...n is displayed only when the Printer Controller is installed UC Tray Priority for Printer Mode Allows you to set the prioritized tray for feeding paper into the machine when outputting documents from...

Страница 58: ...trol Key Lighter for three seconds to enter the User s Choice Mode U1 will be displayed 2 The User s Choice Codes will rotate as shown below when the 10 Key and 1 Key are pressed Stop when the desired...

Страница 59: ...ey and the 1 Key 5 Press the Start Key to register the selected setting Repeat steps 2 5 to change additional User s Choice Functions if necessary 6 Press the Clear Stop Key to return to the previous...

Страница 60: ...Selecting User s Choice Settings 5 12 User Mode Notes...

Страница 61: ...Chapter 6 Service and Supplies...

Страница 62: ...Image Quality on page 6 1 Correcting Functional Problems on page 6 3 Display Messages on page 6 4 Toner Empty Indicator on page 6 6 Paper Empty Indicator on page 6 8 Paper Misfeed Indicators on page...

Страница 63: ...e Manual Exposure Mode A darker exposure level for the Manual Exposure Mode has been specified Adjust the exposure setting using the Exposure Control Keys The surface of the Original Glass is dirty Wi...

Страница 64: ...is set to full size 100 Place the original document correctly on the Original Glass The zoom ratio setting does not match the size of the original document Select a suitable zoom ratio setting The co...

Страница 65: ...bled Press the Start Key to disable this mode Nothing happens when the Start Key is pressed Has an Error or Trouble Indicator become lit Follow the procedures provided Has the machine just been turned...

Страница 66: ...er m isfeed using the procedure provided Paper has been m isfed as it was being output from the machine Clear the paper m isfeed using the procedure provided A paper misfeed has occurred at the Automa...

Страница 67: ...M ake sure that the Upper Half of the M achine is securely closed The Automatic Document Feeder is open M ake sure that the Autom atic Document Feeder is securely closed The Paper M isfeed Guide of t...

Страница 68: ...e when this indicator is displayed Replacing the Imaging Cartridge Note Be careful not to touch the areas marked CAUTION HOT with bare hands 1 Pull the Lock Release Lever and fold open the Upper Half...

Страница 69: ...ge The imaging cartridge can easily be installed by aligning the front of the cartridge with the marker provided within the machine 6 Gently swing down and lock the Upper Half of Machine Then close th...

Страница 70: ...will not be operable under these circumstances Follow the procedure provided below to replenish the paper supply when this indicator is displayed Loading Paper in the Paper Tray 1 Remove the Manual By...

Страница 71: ...k 5 Replace the Manual Bypass Tray Note The following indicator will appear in the display after replenishing the paper The copy job is still saved in the machine s memory 6 Press the Start Key to res...

Страница 72: ...rests under the two catches of the Paper Drawer Note The paper should be loaded no higher than the Max Level Indicator on the Edge Guide 3 Gently slide the Paper Drawer back in Note The following ind...

Страница 73: ...urs the machine will stop operating the letter J will flash alternately with a number or the PC indicator will flash Clearing Paper Misfeed PC Paper Tray 1 Remove the Manual Bypass Tray and remove the...

Страница 74: ...f of the Machine Note The following indicator will appear in the display after clearing the paper misfeed The copy job is still saved in the machine s memory Press the Start Key to resume operations P...

Страница 75: ...and close the Upper Half of the Machine Clearing Paper Misfeed J2 J3 Note Be careful not to touch the areas marked CAUTION HOT with bare hands 1 Pull the Lock Release Lever and fold open the Upper Ha...

Страница 76: ...d Indicators 6 14 Service and Supplies 3 Open the Guide Plates 4 Remove the misfed sheet of paper 5 Remove a misfed sheet of paper jammed in the Transport Section by pulling it from the bottom of the...

Страница 77: ...idge with the marker provided within the machine 7 Close the Upper Half of Machine Note The following indicator will appear in the display after clearing the paper misfeed The copy job is still saved...

Страница 78: ...aring Paper Misfeed J8 1 Remove the original document from the Document Feed Tray 2 Open the Paper Misfeed Guide and gently remove the paper misfeed 3 Open the Automatic Document Feeder and gently rem...

Страница 79: ...ment that was removed in step 1 into the Automatic Document Feeder again Note The following indicator will appear in the display after clearing the paper misfeed Load the number of pages that are disp...

Страница 80: ...hine off then on again 2 Should a CXXXX trouble code continue to appear in the display after resetting the machine please contact your technical representative Note When calling your Technical Represe...

Страница 81: ...ce and Supplies 6 19 Care and Maintenance Outer Covers Wipe the exterior surface of the machine clean with a soft cloth Exposure Glass 1 Open the Original Cover 2 Wipe the surface of the Original Glas...

Страница 82: ...ontrol Panel 1 Turn the main power switch OFF 2 Wipe the surface of the Control Panel clean with a soft cloth Original Pad 1 Open the Original Cover 2 Wipe the surface of the Original Pad clean with a...

Страница 83: ...Chapter 7 Specifications...

Страница 84: ...Specifications Chapter Overview This chapter includes Specifications on page 7 1 Agency Certifications on page 7 3 Paper Sizes on page 7 5 Paper Sizes on page 7 5...

Страница 85: ...dia OHP Thick paper 24 43 25 lbs 90 163 g m2 Special paper and media must be fed through the Manual Bypass Tray Paper Sizes Paper Tray Drawer Legal LG Letter LT Half Letter HL A4 L A5 L Manual Bypass...

Страница 86: ...nal Cover Weight 62 lb 28 1 kg Item Description Original Documents Plain Paper 13 29 lbs 50 110 g m2 Original Sizes Legal LG Letter LT Half Page HL A4 L A5 L Capacity Up to 50 sheets Dimensions Width...

Страница 87: ...be required to correct the interference at their own expense Canada RFI This digital apparatus does not exceed the Class A limits for radio noise emissions from digital apparatus as set out in the Rad...

Страница 88: ...ldwide Inc has determined Lanier s 5415 copier meets the Energy Star guidelines for energy efficiency Energy Star guidelines require that all Energy Star copiers have an OFF MODE feature that automati...

Страница 89: ...es 203 x 330mm EUROPE FOLIO 8 25 x 14 inches 210 x 356mm DIN A0 841 x 1189mm A1 594 x 841mm A2 420 x 594mm A3 297 x 420mm A4 210 x 297mm A5 148 x 210mm A6 105 x 148mm B0 1000 x 1414mm B1 707 x 1000mm...

Страница 90: ...rcentages 7 6 Specifications Enlargement and Reduction Percentages Type Inch Version Metric Version Enlargement 400 400 200 200 155 141 129 122 121 115 Full Size 100 100 Reduction 93 93 85 87 78 82 73...

Страница 91: ...Glossary...

Страница 92: ...Chapter Overview Included in this glossary are definitions of commonly used copy terms...

Страница 93: ...heavy stock See also Stack Feed Bypass Tray Casual Operator An operator that uses the copier to make copies but does not have Key Operator responsibilities such as adding Toner or calling for service...

Страница 94: ...ay where an original document is placed to feed into an ADF for automatic feeding and copying Document Guide These Guides are located in the Document Feed Tray When correctly positioned against the si...

Страница 95: ...he factory You can change some of these settings Others can be changed by a Service Technician See also Initial Setting Front Cover The Cover located at the front of the copier designed to allow acces...

Страница 96: ...ed on the exterior of the copier used to control the power to the copier Original Cover On copiers not equipped with a Document Feeder a Cover protects the Exposure Glass and prevents stray light from...

Страница 97: ...hrough the paper path heavier stocks like cover stock feed better Sorter An accessory attached to the output of a copier designed to perform a sorting function The sort function allows you to make mul...

Страница 98: ...it across the Exposure Glass and returns it to the Document Exit Area of the Document Feeder To keep it operating correctly and to prevent the buildup of dirt which can cause dirty copies it must be c...

Страница 99: ...Index...

Страница 100: ...Chapter Overview This chapter provides page references to key items...

Страница 101: ...essage display 2 3 optional equipment 2 6 Copy darkness 3 7 Copy quantity selecting 3 6 Count displays 5 1 Counters 5 1 Cover open message 6 5 D Density ADF 5 7 Disable Sleep Function 5 4 Display indi...

Страница 102: ...rd paper sizes 7 5 Sleep Function 5 4 Sleep function 5 4 Specifications automatic document feeder 7 2 copier 7 1 paper feed unit 7 2 T Toner empty 6 6 Total check function count displays 5 1 reading 5...

Страница 103: ...A COURSE OF DEALING OF USAGE OF TRADE The Express Warranty will not apply to drums cleaning blades fuser cleaning felts toner developer or paper or to defects of damage incurred in transportation or d...

Страница 104: ...Customer Vision _ our commitment to your complete satisfaction Lanier Worldwide Inc 2300 Parklake Drive N E Atlanta GA USA 30345 www lanier com your document management partner T1202 5037...

Отзывы: