Section 1: Assembly & Set-Up
SGC1560, SGC1572, & SGC1584 Claw Grapples380-074M
4/4/23
15
Purge Hydraulic System of Air
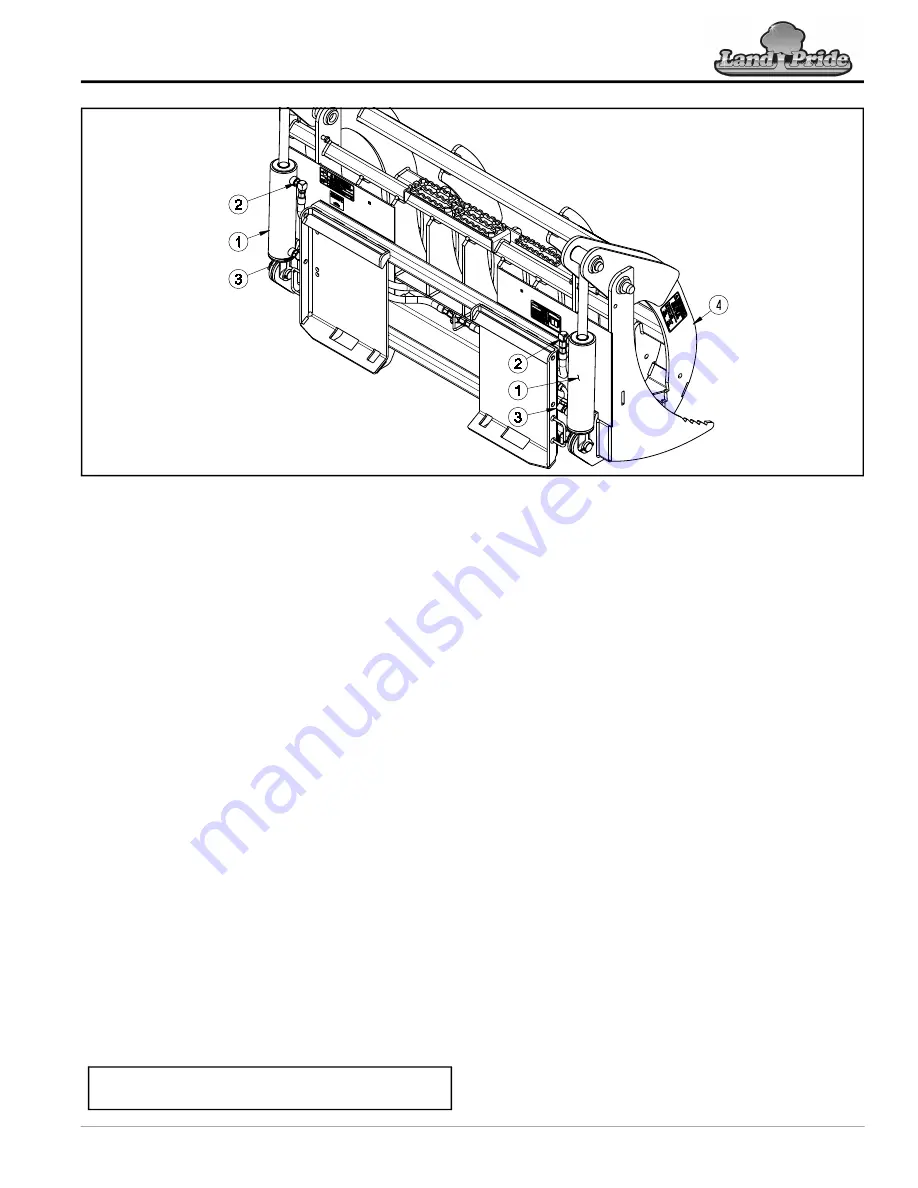
Figure 1-7
78931
Check Equipment Clearances
Refer to Figure 1-7:
It is important to check clearance before putting the
grapple into operation. Make sure hoses are long enough
and won’t become pinched or entangled in the
equipment. Also, make sure the grapple does not come
in contact with the power machine by carefully going
through its full range of motions.
1. Visually inspect hydraulic hoses for possible pinch
points and shortness. Make hose adjustments before
putting equipment into service.
2. Start the power machine and raise grapple
approximately 12" (30 cm) off the ground.
3. If necessary, have someone stand nearby that can
motion for the operator to stop if a problem develops
while completing steps 4-7 below.
4. Fully extend grapple cylinders (#1) to fully close the
grapple jaw (#4).
5. Fully extend and retract loader hitch plate cylinders
while watching for equipment interferences. Make
sure grapple hoses are long enough and do not
become pinched through the full range of the loader
hitch plate motion.
6. Fully retract grapple cylinders (#1) to pivot grapple
jaw (#4) fully open and repeat step 5.
7.
Raise loader arms fully up and repeat steps 4-6.
Purge Hydraulic System
Refer to Figure 1-7:
IMPORTANT:
The grapple hydraulic system may
contain air causing erratic, cylinder movement.
If cylinders (#1) operated erratically while checking
clearances, then purge the hydraulic system as follows:
1. Fully extend hydraulic cylinders (#1) to close jaw (#4)
as shown.
2. Shut power machine down according to
3. Loosen elbows (#2) at the rod end of hydraulic
cylinders (#1).
4. Return to the operator’s seat, fasten seat belt, and
start power machine.
5. Slowly retract hydraulic cylinders (#1) until all
trapped air is purged out through elbow fittings (#2).
6. Shut power machine down according to
7.
Tighten elbow fittings (#2).
8. Fully retract hydraulic cylinders (#1) to fully open
grapple claw (#4).
9. Raise loader arms and tilt top of loader hitch plate
forward until grapple and opened claw are facing the
ground. Slowly lower loader arms until the grapple
and opened claw are resting solidly against the
ground.
10. Repeat Step 2, then loosen elbow fittings (#3) at the
base end of hydraulic cylinders (#1).
11. Repeat Step 4, then slowly extend hydraulic
cylinders (#1) until all trapped air is purged out
through elbow fittings (#3).
12. Repeat Step 6, then tighten elbow fittings (#3).
13. If cylinders still operate erratically, repeat steps 1-12.


