


Introduction Important Safety Information
RTA2562, RTA2570, & RTA3576 Rotary Tillers 311-254M
1/18/21
8
Introduction
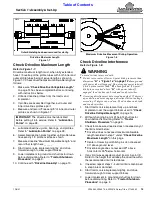
Serial Number
For quick reference and prompt service, record model
and serial number on the inside cover page and again on
the warranty page. Always provide model number and
serial number when ordering parts and in all
correspondences with your Land Pride dealer. For
location of your serial number plate, see Figure 1.
Serial Number Plate Location
Figure 1
Further Assistance
Your dealer wants you to be satisfied with your new
Rotary Tiller. If for any reason you do not understand any
part of this manual or are not satisfied with the service
received, the following actions are suggested:
1. Discuss any problems you have with your implement
with your dealership service personnel so they can
address the problem.
2. If you are still not satisfied, seek out the owner or
general manager of the dealership, explain the
question/problem, and request assistance.
3. For further assistance write to:
Land Pride Service Department
1525 East North Street
P.O. Box 5060
Salina, Ks. 67402-5060
E-mail address
35034
Land Pride welcomes you to the growing family of new
product owners. This Rotary Tiller has been designed
with care and built by skilled workers using quality
materials. Proper assembly, maintenance, and safe
operating practices will help you get years of satisfactory
use from this implement.
Application
The RTA25 and RTA35 Series Rotary Tillers are
designed and built by Land Pride to till the soil for
seedbed or planting preparation. Both models are
adapted for three-point hitch Category 1 mounting. The
RTA25 has a 25-75 hp tractor requirement and the RTA35
has a 35-95 hp requirement. These Land Pride Tillers
have uses and applications in landscaping, nurseries,
gardens, and light commercial use.
See
“Specifications & Capacities”
on page 30 and
“Features & Benefits”
on page 32 for additional
information and performance enhancing options.
Using This Manual
•
This Operator’s Manual is designed to help familiarize
you with safety, assembly, operation, adjustments,
troubleshooting, and maintenance. Read this manual
and follow the recommendations to help ensure safe
and efficient operation.
•
The information contained within this manual was
current at the time of printing. Some parts may change
slightly to assure you of the best performance.
•
To order a new Operator’s or Parts Manual, contact
your authorized dealer. Manuals can also be
downloaded, free-of-charge, from our website at
www.landpride.com
Terminology
“Right” or “Left” as used in this manual is determined by
facing forward in the direction the machine will operate
while in use unless otherwise stated.
Definitions
Owner Assistance
The dealer should complete the Online Warranty
Registration at the time of purchase. This information is
necessary to provide you with quality customer service.
The parts on your Rotary Tiller have been specially
designed by Land Pride and should only be replaced with
genuine Land Pride parts. Contact a Land Pride dealer if
customer service or repair parts are required. Your Land
Pride dealer has trained personnel, repair parts, and
equipment needed to service the implement.
IMPORTANT:
A special point of information related
to the following topic. Land Pride’s intention is this
information must be read & noted before continuing.
NOTE:
A special point of information that the
operator should be aware of before continuing.