Section 1: Assembly & Set-Up
RCFM4014 Rotary Cutter 326-730M
12/11/18
15
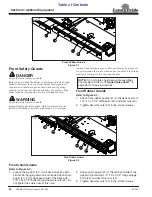
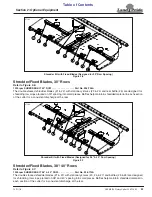
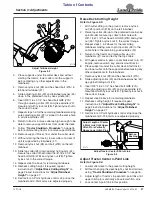
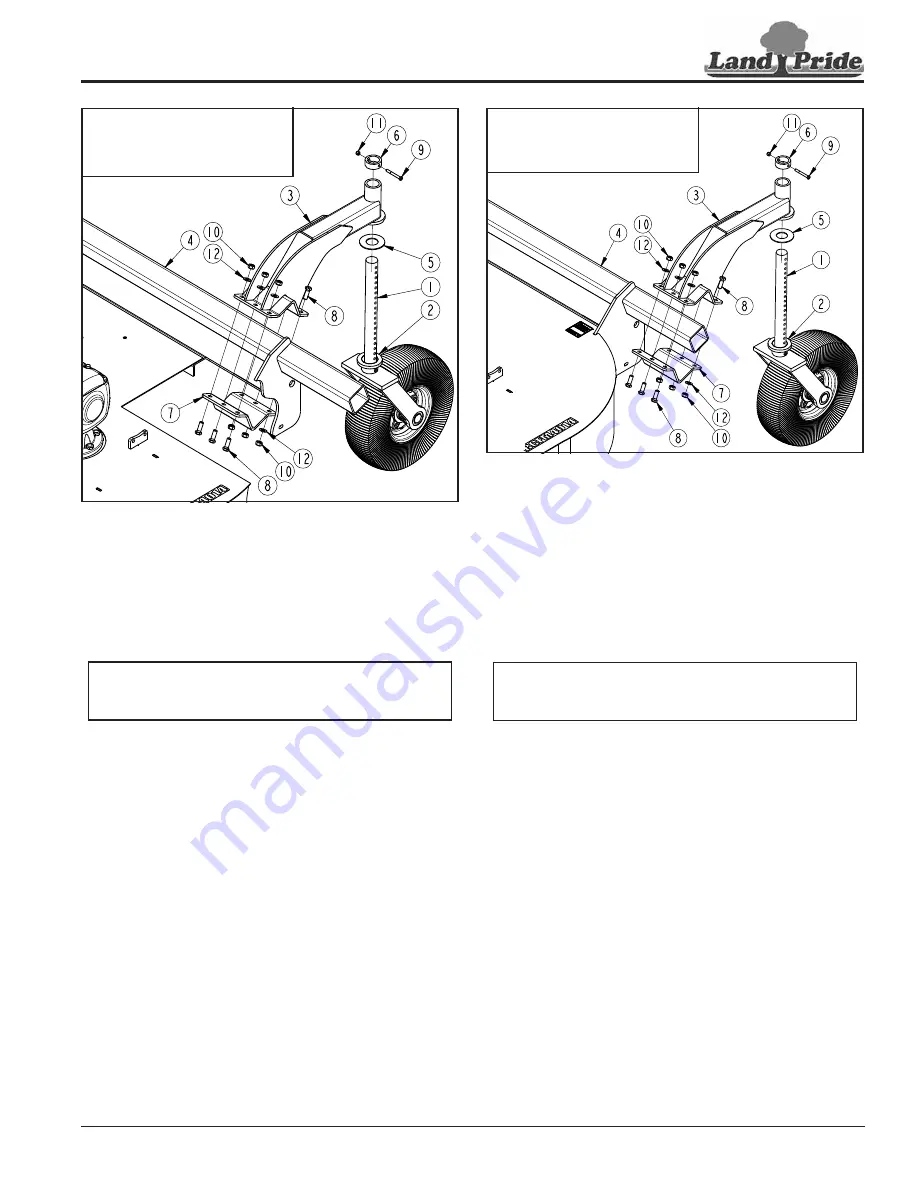
Installation of End Tailwheels for 30" Rows
Figure 1-8
End Tailwheels for 30" Rows
When setting cutter up for 30" rows, the center of the end
tailwheels should be mounted 23 1/2" from each end of
tool bar (#4) or 60" left and right of center.
1.
Attach center of trailing arm (#3) 23 1/2" from left end
of rear tool bar (#4) with 4" tube clamp (#7), 5/8"-11 x
2" GR5 bolts (#8), flat washers (#10), and hex lock
nuts (#10). Make sure center of trailing arm is 23 1/2"
from end of rear tool bar and draw all six nuts up
snug. Do not tighten nuts until step #2.
2. Tighten the center two locknuts (#9) and then the
four corner locknuts (#10) in a crisscross pattern.
3. Repeat step 2 making sure all six nuts are tightened
to the correct torque.
4. Install tailwheel washer (#5) over tailwheel
spindle (#1).
5. Insert tailwheel spindle (#1) into trailing arm (#3).
Push tailwheel up until adjusting collar (#2) is against
the trailing arm (#3).
6. Lower top collar (#6) over tailwheel spindle (#1) until
against the trailing arm (#3).
7.
Secure top collar (#6) with 3/8"-16 x 3 1/4" GR8
bolt (#11) and nylock nut (#9). Tighten nylock nut to
the correct torque.
8. Repeat steps 1-7 for the right-hand side.
37159
IMPORTANT:
below must be followed when
tightening Lock nuts (#10).
IMPORTANT:
Discard hardware mounting tailwheel
to shipping crate. Use bolts, flat washers, and
locknuts in bolt bag to mount tailwheel to cutter axle.
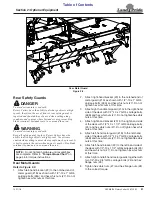
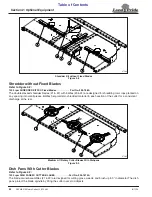
Installation of End Tailwheels for 38" & 40" Rows
Figure 1-9
End Tailwheels for 38" & 40" Rows
When setting cutter up for 38" or 40" rows, the center of
the end tailwheels should be mounted 7 1/2" from each
end of tool bar (#4) for 38" rows and 3 1/2" from each end
of toolbar for 40" rows. Another way to measure it is, 76"
left and right of center for 38" rows and 80" left and right
of center for 40" rows.
1.
Attach center of trailing arm (#3) 7 1/2" for 38" row
spacing or 3 1/2" for 40" row spacing from left end of
rear tool bar (#4) with 4" tube clamp (#7), 5/8"-11 x 2"
GR5 bolts (#8), flat washers (#12), and hex lock
nuts (#10). Make sure center of trailing arm is 7 1/2"
or 3 1/2" from end of rear tool bar and draw all six
nuts up snug. Do not tighten nuts until step #2.
2. Tighten the center two locknuts (#10) and then the
four corner locknuts (#10) in a crisscross pattern.
3. Repeat step 2 making sure all six nuts are tightened
to the correct torque.
4. Install tailwheel washer (#5) over spindle (#1).
5. Insert tailwheel spindle (#1) into trailing arm (#3).
Push tailwheel up until adjusting collar (#2) is against
trailing arm (#3).
6. Lower top collar (#6) over tailwheel spindle (#1) until
against trailing arm (#3).
7.
Secure top collar (#6) with 3/8"-16 x 3 1/4" GR8
bolt (#11) and nylock nut (#9). Tighten nylock nut to
the correct torque.
8. Repeat steps 1-7 for the right-hand side.
37158
IMPORTANT:
below must be followed when
tightening Lock nuts (#10).
IMPORTANT:
Discard hardware mounting tailwheel
to shipping crate. Use bolts, flat washers, and
locknuts in bolt bag to mount tailwheel to cutter axle.


