Section 5: Maintenance & Lubrication
AFM4211 All-Flex Grooming Mower 315-507M
3/8/23
38
Driveline Protection
DANGER
!
To avoid serious injury or death:
•
Do not operate a broken or bent driveline. Such a driveline
will break apart while rotating at high speeds. Always
remove the implement from use until the damaged driveline
•
Always disconnect driveline from the tractor before
servicing the drivetrain and components powered by the
drivetrain. A person can become entangled in the drivetrain
if the tractor is started and the power take-off is engaged.
WARNING
!
To avoid serious injury or death:
A slip clutch that has been in use or has slipped for as little as
only two or three seconds during run-in may be too hot to
touch. Allow a hot clutch to cool before working on it.
The drivetrain and mower is protected from shock loads
with a friction slip clutch on the main driveline. Oxidation
caused by moisture and condensation on the clutch
friction surfaces can seize the inner frictions plates. To
remove oxidation, run the clutches through a “run-in”
cycle prior to initial operation, at the start of each season,
and when the clutch has not be used for approximately
60 days.
Clutch Run-in
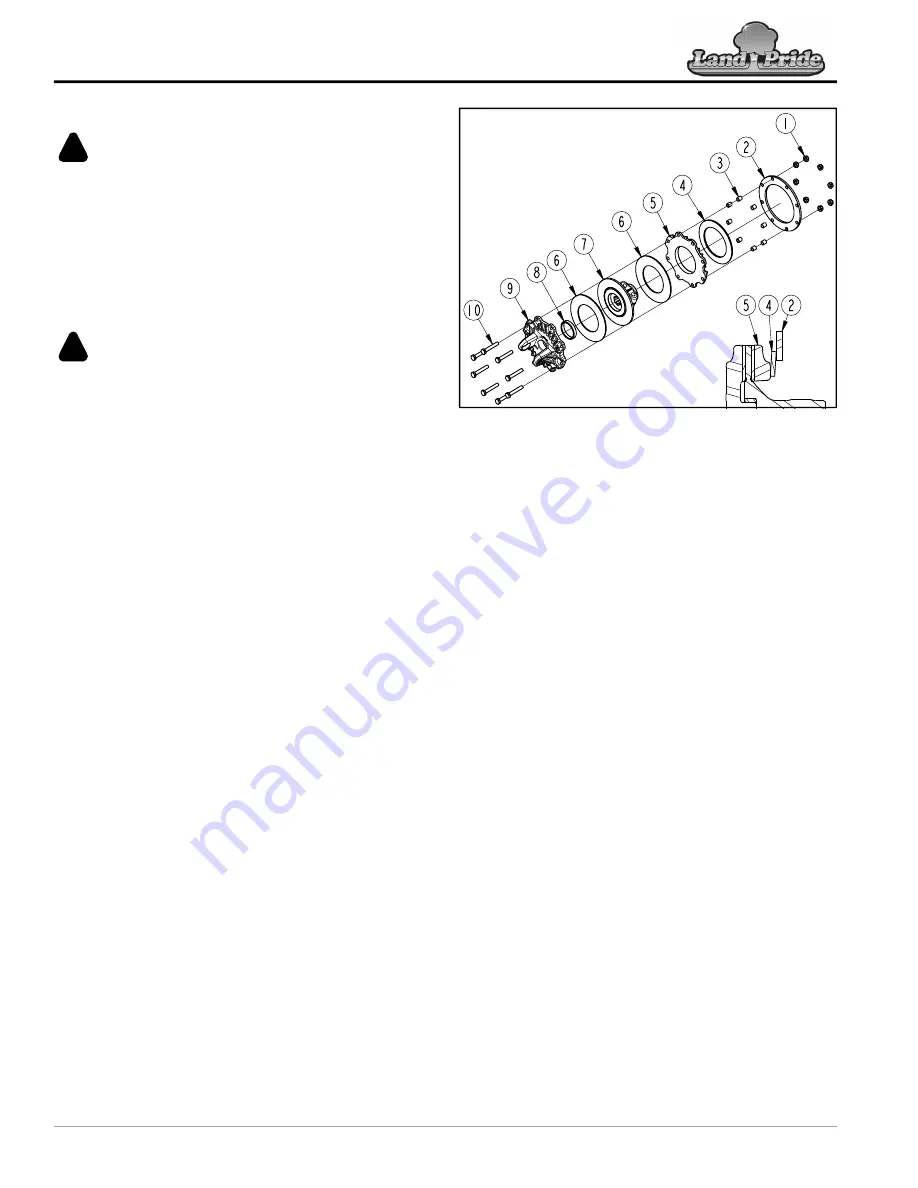
Refer to Figure 5-8:
1. With implement and driveline attached to the tractor,
shut tractor down according to
2. Disconnect driveline from the tractor.
3. Loosen all nuts (#1), draw nuts up snug, and then
tighten nuts one-half turn.
4. Reconnect driveline to the tractor. Refer to
5. Keep all bystanders away from the tractor and
implement.
6. From the tractor seat, start the tractor, and set the
engine speed at half throttle.
7.
Cycle the clutch on and off 5 or 6 times (15 seconds
on and 15 seconds off) or until the clutch visibly
smokes.
8. Shut tractor down according to
9. Disconnect the driveline from the tractor.
10. Tighten all nuts (#1) until spacers (#3) cannot be
rotated by hand and then back-off the nuts until the
spacers will rotate by hand.
11. Reconnect driveline to the tractor. Refer to
Slip Clutch Components
Figure 5-8
Inspect Friction Disc
Refer to Figure 5-8:
Do not touch the clutch while it is hot. Inspect friction
disc (#6) for wear and damage daily. Replace the disc
when they are worn down to nothing or damaged. Refer
to
Replace Friction Disc
Remove Driveline
1. Shut tractor according to
2. Pull back on the driveline lock collar and pull driveline
yoke from the tractor’s power take-off shaft.
3. Collapse the driveline by pushing the tractor end of
the driveline toward the opposite end of the driveline.
4. Remove bolt(s) clamping the slip clutch to the
implement.
5. The drive shaft with clutch is heavy. Grasp clutch
firmly with both hands and slide the clutch off the
implement.
Disassemble Clutch
Refer to Figure 5-8:
1. Place the clutch and universal joint assembly on a
bench with the clutch end accessible.
2. Remove nuts (#1) and bolts (#10). These bolts and
nuts hold the clutch together.
3. Remove compression plate (#2), spacers (#3), disc
spring (#4), pressure plate (#5), friction disc (#6), hub
flange (#7), friction disc (#6), and spacer (#8).
4. Discard friction disc (#6).
76560


