


ENGLISH
First Section - FOR THE USER
WORKING AND USE
The glasswashing machine can wash up to 20÷30 baskets every hour.
The machine protection degree is IP21, therefore it should not be washed with direct high pressure jet water.
The objects to be washed should be correctly arranged for a good washing-up result.
We suggest to descale glasses, from time to time, in order to remove calcareous and/or starchy sediments
by soaking them in suitable solutions suggested by your cleansing agent supplier.
If you need to buy new dishes remember the following: Dishes and cups: preference must be given to china or
non-porous pottery articles, with smooth surface. Glasses: choose a glass suitable to be washed in dish-
washing machines. Surfaces must be smooth and bottoms as flat as possible.
OPERATION BEFORE WORKING
B
EFORE STARTING THE WORKING OPERATION MAKE
SURE THAT
:
- the cock is open;
- the filter and the overflow are in their housings;
- the wash arm and the rinse arm are free to
pivot;
- the rinse aid dispenser containers are loaded.
T
HEN PROCEED AS FOLLOW
:
A
-
Open the door and put into the tank,
possibly over the pump filter, about
30
gr. of non-
lathering detergent in powder.
Every 10 cycles add about
20
gr. of detergent.
If the machine is provided with an automatic
dosing device, check that the detergent is in its
container.
B
-
Place the dishes in the basket minding to
previously remove all solid waste and fat. Do not
overload baskets, dishes must not be placed one
upon the other, water must have the way to run
on each part of the same.
C
-
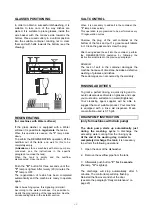
Turn the machine on by using the wall
switch and push the switch
"A"
on the control
panel (DIS.1). The green lamp
"G"
lights up and
the machine loads automatically (with closed
Door).
Once the loading has been completed, the green
lamp
"F"
blinks: it indicates that the machine is
ready to start the washing cycle.
Before starting the cycle, check that the lamp
“E”
is ON: it indicates that the washing water and the
rinsing water have reached the ideal working
temperature.
D
-
Put the basket into the machine.
Close the door and push the button
"B"
.
The lamp
"F"
stays ON without blinking and it
indicates that the cycle has begun.
The cycle will start for 2 minutes, including,
besides the washing, a five seconds stop and the
rinsing of 18 seconds (23 seconds for machines
with Water softener) with clean water at 85°-90°C
will start.
Once the cycle has ended, the lamp
"F"
restarts
blinking.
Note
: The
rinse
starts only when the temperature
of the water is 90°C.
Bear in mind that the opening of the door
interrupts the cycle and therefore the machine at
any moment. Pratically, the opening of the tank
works as an emergency device.
E
-
Take the basket away and repeat the
operation
"D"
.
ACHIEVEMENTS
Any deficiency in the washing process is
apparent when dirty residuals are visible. Halos
might be caused by an insufficient rinsing: in this
case, check that the rinsing jets are clean and
there is a sufficient pressure in the water
distribution network.
In the case that residuals are present, check that:
• the washing jets are clean
• there is detergent
• the positions of the objects in the rack are
correct.