background image


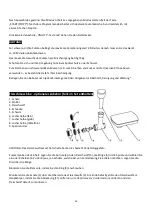
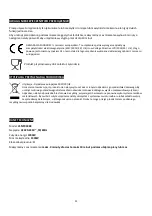
OPTIONAL ACCESSORIES - Meat Grinder: ( if supplied) 

 
1. Metal dish 
2. Crush 
3. Meat grinder 
4. Roler 
5. Blade 
6. Cutter (fine) 
7. Cutter (coarse) 
8. Cutter (middle) 
9. Nut 


Assembling the unit: put the spiral (4) insi der the mincer (3), the blade (5) on the spiral and choose one of the discs  
(6,7 or 8) depending on the kind of chopping you want to obtain. Place disc over the blade.  
Block the elements by srewing the ring (9). 
Assemble the dish (1) over the top of the mincer (3). In the end, attach the meat grinder to the main bodyby 
removing the cover (11) In order to Discovery front gear and fitting the mincer to it. 


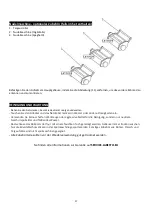
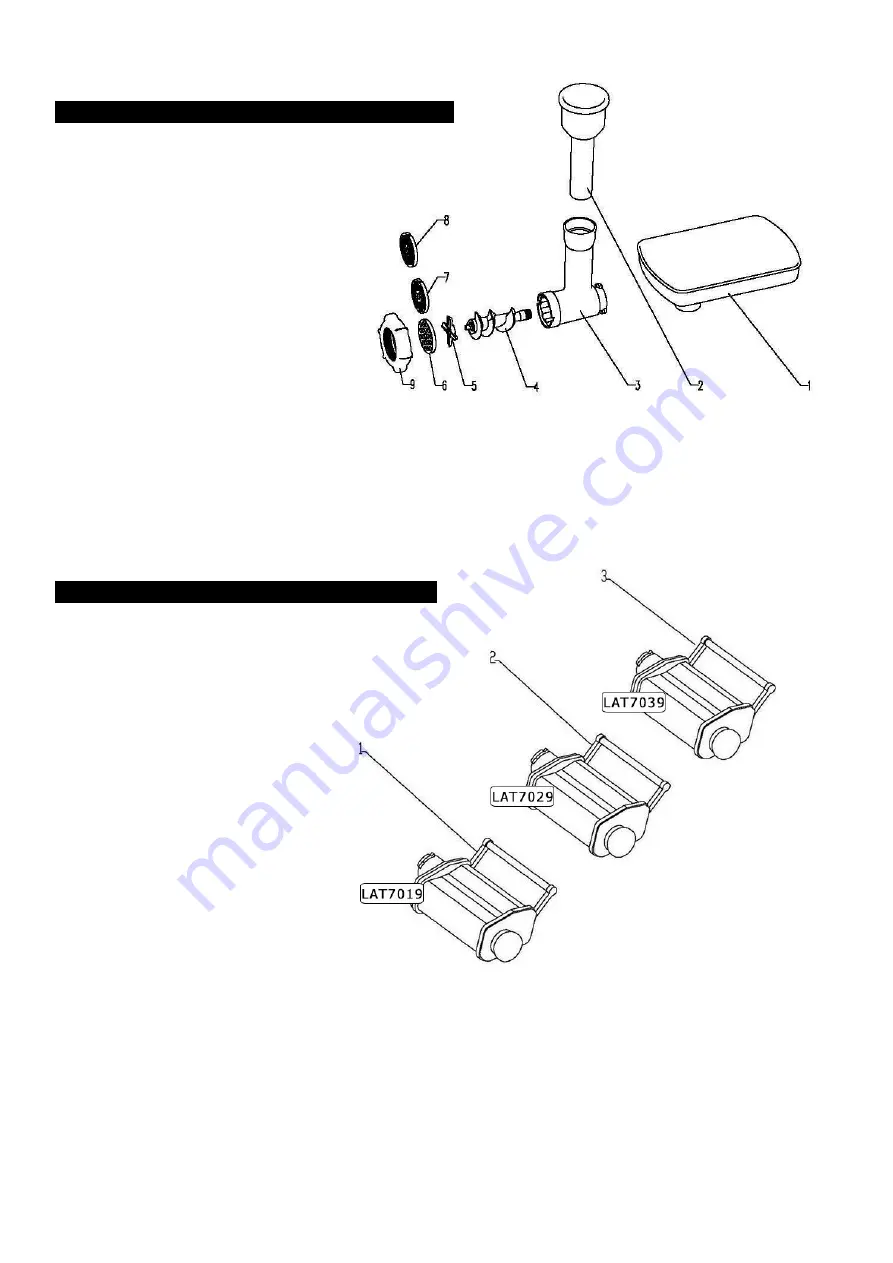
OPTIONAL ACCESSORIES - Pasta Maker (if supplied) 


1


flat pasta maker 

 
2


pasta maker (thin noodle) 

 
3


pasta maker(thick noodle) 


Assemble the attachment to the main body by removing the cover (11) in order to discover the front gear  
and fitting it. 


Содержание SMARTCHEF LSM7009BK

Страница 1: ......

Страница 2: ...0 Content Inhalt Spis tre ci Instruction manual English 1 Bedienungsanleitung Deutsch 10 Instrukcja obs ugi Polski 18...

Страница 3: ...damages caused by failure to follow the manual a negligent use or use not in accordance with the requirements of this manual 1 This appliance can be used by children aged from 8 years and above and p...

Страница 4: ...d before cleaning 11 Ensure that the mains cable is not hung over sharp edges and keep it away from hot objects and open flames 12 Do not immerse the appliance or the mains plug in water or other liqu...

Страница 5: ...bility and low voltage directives and has been constructed in accordance with the latest safety regulations Subject to technical changes without prior notice The product is designed for food contact E...

Страница 6: ...on and the LCD switch will be display with blue light the machine come to standby mode LCD light 2 mins times display 00 00 and speed display 0 2 Push manual auto button first times the appliance will...

Страница 7: ...4 minutes and then allow it to cool down for a further ten minutes Use the splash guard to protect against liquid mixtures Don t use the egg beater for heavy mixtures eg creaming fat and sugar you cou...

Страница 8: ...you want to obtain Place disc over the blade Block the elements by srewing the ring 9 Assemble the dish 1 over the top of the mincer 3 In the end attach the meat grinder to the main bodyby removing t...

Страница 9: ...Total KB 5 mins 2 white bread Flour weight 2 1kg 4 6lb 74oz 1 Pour the milk into the bowl Add the Soft yeast dough 1 05 litre 21 4pts milk beaten eggs and 1 5kg 3 3lb 53oz 300g 10oz sugar flour 450g 1...

Страница 10: ...the apricots and a third of the strawberries max 5 minutes 4 shortcrust pastry 450g 1lb flour sieved with the 1 Put the flour into the bowl Chop the salt fat up roughly and add to the flour 5ml 1tsp...

Страница 11: ...rasive detergents Motor Housing Only a damp rinsing cloth should be used to clean the outside of the housing The components are not suitable for cleaning in a dishwasher If exposed to heat or causticc...

Страница 12: ...er t auch diese Anleitung beif gen Bei Sch den die durch Nichtbeachtung dieser Anweisungen durch den Benutzer verursacht werden erlischt die Garantie Der Hersteller Importeur haftet nicht f r Sch den...

Страница 13: ...UNG in diesem Dokument 8 Das Ger t ist nicht f r die Bedienung durch eine externe Zeitschaltuhr oder eine separate Fernsteuerung vorgesehen 9 Vor dem Einstecken des Steckers in die Netzsteckdose siche...

Страница 14: ...das Ger t selbst zu reparieren Dies kann zu einem elektrischen Schlag f hren 18 Lassen Sie ein laufendes Ger t niemals unbeaufsichtigt 19 Das Ger t ist f r den Hausgebrauch bestimmt und eignet sich n...

Страница 15: ...kt mit Lebensmitteln geeignet UMWELTGERECHTE ENTSORGUNG Entsorgung Europ ische Richtlinie 2012 19 EU Diese Kennzeichnung bedeutet dass das Produkt nicht mit dem Hausm ll entsorgt werden darf Um m glic...

Страница 16: ...ndlich gereinigt werden Mit klarem Wasser absp len und mit einem weichen feinen Tuch trockenwischen Vor dem Ein und Ausbau von Komponenten des Ger tes Sch ssel Aufs tze R hrer m ssen Sie sicherstellen...

Страница 17: ...ehen Bedienung des Bedienfeldes 1 Schlie en Sie das Ger t an das Stromnetz an dr cken Sie die EIN AUS Taste der LCD Bildschirm und die Taste leuchten blau Das Display zeigt die Zeit 00 00 und die Gesc...

Страница 18: ...Reinigen Sie den Roboter nach jedem Einsatz gem den Vorgaben im Abschnitt Reinigung und Wartung Fleischmaschine optionales Zubeh r falls im Set enthalten 1 Schale 2 St el 3 Fleischwolf 4 Schnecke 5 S...

Страница 19: ...el niemals in Wasser oder andere Fl ssigkeiten ein Verwenden Sie keine scharfen Werkzeuge oder aggressive Mittel f r die Reinigung sondern nur neutrale Geschirrsp lmittel und flie endes Wasser Das Geh...

Страница 20: ...osobie nale y jej przekaza r wnie niniejsz instrukcj W przypadku uszkodzenia spowodowanego nieprzestrzeganiem przez u ytkownika niniejszych instrukcji gwarancja straci wa no Producent importer nie pon...

Страница 21: ...zapozna si z rozdzia em CZYSZCZENIE I KONSERWACJA w niniejszym dokumencie 8 Urz dzenie nie jest przeznaczone do obs ugi za pomoc zewn trznego timera lub oddzielnego zdalnego sterowania 9 Przed w o eni...

Страница 22: ...a otwiera obudowy urz dzenia ani samodzielnie naprawia urz dzenia Mo e to spowodowa pora enie pr dem elektrycznym 18 Nigdy nie pozostawia urz dzenia bez nadzoru podczas u ytkowania 19 Urz dzenie jest...

Страница 23: ...z ywno ci UTYLIZACJA PRZYJAZNA DLA RODOWISKA Utylizacja Dyrektywa europejska 2012 19 UE Oznaczenie to wskazuje i produktu nie nale y wyrzuca wraz z innymi odpadami z gospodarstwa domowego By unikn mo...

Страница 24: ...e y wyp uka je czyst wod i wytrze do sucha delikatn ciereczk Przed przyst pieniem do monta u demonta u element w sk adowych urz dzenia misa przystawki mieszad a nale y upewni si e robot jest wy czony...

Страница 25: ...panelu sterowania 4 Pod cz urz dzenie do zasilania sieciowego naci nij przycisk W CZ WY CZ ekran LCD oraz przycisk pod wietl si na niebiesko Na wy wietlaczu pojawi si czas 00 00 oraz pr dko 0 5 Tryb...

Страница 26: ...rozi to jej uszkodzeniem Po ka dym u yciu wyczy robot zgodnie ze zaleceniami podanymi w sekcji Czyszczenie i konserwacja Maszynka do mi sa przystawka opcjonalna je li za czono do zestawu 1 Tacka 2 Pop...

Страница 27: ...tyczk zasilania sieciowego Nigdy nie nale y zanurza robota oraz kabla sieciowego w wodzie ani innej cieczy Do czyszczenia nie nale y u ywa ostrych narz dzi i r cych detergent w a jedynie neutralnego p...

Отзывы: