


Labconco Glassware Washer Service/Technical Manual
17
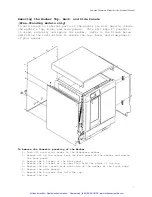
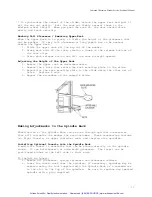
To install a 16-place Pipet Insert (Above Right):
1.
Use the tool supplied with the Spindle Rack or a screwdriver to remove
the six spindles on either the front or rear of the spindle rack.
Remove others if necessary.
2.
Replace the left and right spindles with the two short spindles that
you received with the Pipet Insert.
3.
Replace all other spindles with the plastic plugs that you received
with your washer.
4.
With the support facing the center of the spindle rack, slide the Pipet
Insert over the spindles until it completely seats.
5.
Push pipets into the 16 receptacles and rest them on the support.
NOTE: Lower spindle racks are shipped with 34 long spindles and 2 shorter
spindles. If spindles are removed and then replaced, the shorter spindles
should be located on the front row in the second and third positions from the
right side. This will allow proper function of the detergent dispenser.
Installing Small Spindles
Ten small spindles are included with each Spindle Rack. Since the large
volume of water which flows through the standard spindles may be great enough
to force the glassware off the spindle, small spindles should be used when
small pieces of glassware will be washed.
To install small spindles:
1.
Remove the standard spindle by inserting the tool supplied with the
Spindle Rack or a screwdriver into the slot on the top and turning
counterclockwise.
2.
Replace the standard spindle with a small spindle.
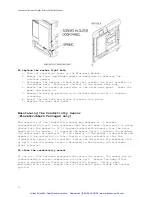
Installation of the Optional Cool Drain Water Kit
An optional Cool Drain Water Kit is available to reduce the water temperature
of the drain water in installations where hot drain water is not permitted.
It may be installed on Under-Counter (UC) or Free-Standing (FS) models. A
supply of cold water must be available. It is recommended that the cold
water temperature is colder than 54°F (12°C). Warmer water temperature will
cause the drain temperature to be higher. The cold water supply must be
capable of a flow rate of 3.5 GPM (13.2 LPM) and a pressure of 20-120 PSI
(138-827 kPa). Hot drain water will be mixed with cold water during drain
operations.
1.
Disconnect power to the washer.
2.
Remove the back panel of the washer if it is a FS model or the service
panel of the UC model as described in
Removing the Washers Paneling.
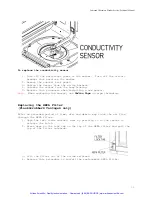
3.
Attach the water valve assembly to the rear flange of the base using
the screws provided.
4.
Connect the wires coming from the water valve assembly to the mating
connector in the wiring harness of the washer.
5.
Connect the cold water supply to the water valve assembly. Do not
allow the tube to kink when the washer is placed into its operational
location. If necessary, replace the straight fitting on the cool water
valve with the supplied elbow.
Artisan Scientific - Quality Instrumentation ... Guaranteed | (888) 88-SOURCE | www.artisan-scientific.com


