Model: 308-2316 www.lacrossetechnology.com/support
Page | 4
WWVB Radio-controlled Time Signal ............................................................................................................................ 18
Care and Maintenance ................................................................................................................................................... 20
Specifications ................................................................................................................................................................. 19
Warranty Information...................................................................................................................................................... 20
FCC Statement .............................................................................................................................................................. 21
Features
Rainfall data (inches or millimeters): 1-hour, 24-hour, week, month and total
Wind chill (°F or °C)
Records min. and max. Wind chill with time and date stamp
Wind speed (mph, m/s, km/h, knots, Beaufort)
Weather forecast tendency arrow
Forecast icons based on changing barometric pressure
Barometric pressure (InHg or hPa) with 0.1hPa resolution
Dew point (°F or °C)
Records min. and max. dew point with time and date stamp
Wireless outdoor and indoor humidity (% RH)
Records min. and max. humidity with time and date stamp
Wireless outdoor and indoor temperature (°F or °C)
Records min. and max. temperature with time and date stamp
12 or 24-hour time display
Perpetual calendar with Radio Controlled Clock (RCC)
Time alarm
High light LED backlight
Wall hanging or free standing
Synchronized instant reception
Low power consumption (over 2 years battery life for transmitter)
Weather alarm modes for:
Temperature
Humidity
Wind chill
Dew point
Rainfall
Wind speed
Air pressure
Storm warning
Setup Instructions Step-by-Step
Batteries:
We recommend using Alkaline batteries for the remote sensors and the weather
station when temperatures are above 32°F (0°C). We recommend using Lithium batteries for the
remote sensors when temperatures are below 32°F (0°C).
Important:
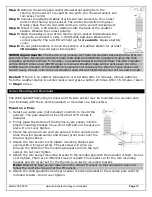
Look carefully at the diagrams on page two during setup.
Step 1:
Place all sensors and the weather station 5-10 feet apart.
Step 2:
Attach the Wind Cups to the wind sensor. Press on firmly. No screw required.
Step 3:
Connect the wind cup assembly to the top end of the shower proof casing. Align the
screw holes, and fasten with long bolt and nut. Do not over tighten.


