background image

46

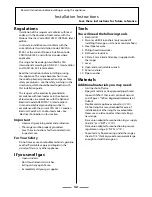
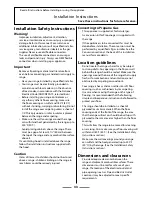
Read all instructions before installing or using this appliance. 

Installation Instructions

Save these instructions for future reference.

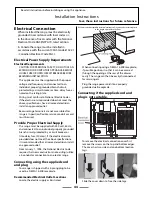
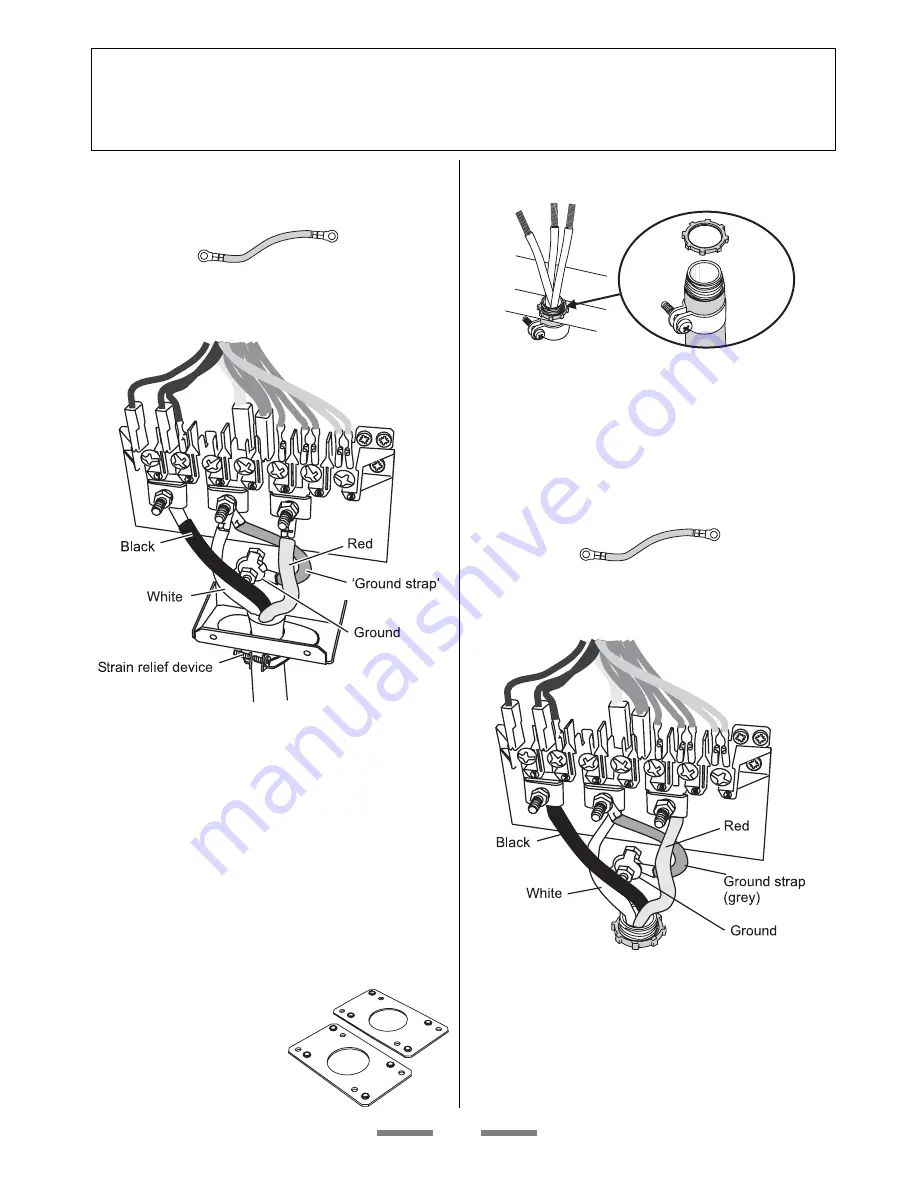
screws. Insert the power cord through the strain 
relief device but do not tighten the device yet.

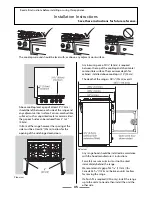
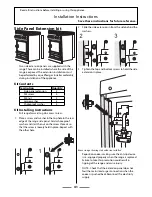
A Ground strap is supplied in the conversion pack.

Ground strap. (grey)

Attach the Ground strap to the ground and center 
terminal of the connector block - see the fi gure.

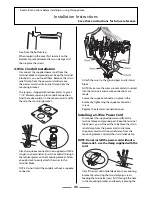
The neutral or ground wire of the power cord must 
be connected to the neutral terminal located in 
the center of the connector block. The power leads 
must be connected to the outside terminals. 

Make sure the connections are tight. Now tighten 
the stain relief device to clamp the power cord.

Re install the electrical connection cover

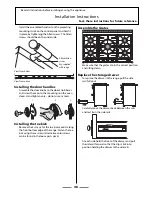
3-Wire Conduit Installation

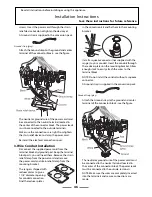
Disconnect the supplied power cord from the 
terminal block and ground post. Keep the terminal 
block parts; you will need them. Remove the strain 
relief clamp from the power cord and remove 
the power cord and strain relief clamp from the 
mounting bracket.

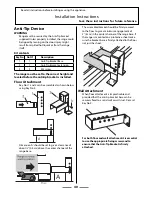
The range is shipped with 
reducer plates to give a 
1 1/8’’ diameter opening 
for conduit connection. 
Find the reducer plates 

in the conversion kit and fi x them to the mounting 
bracket.

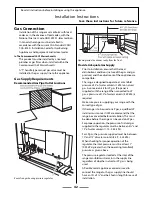
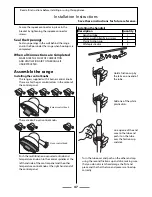
Install a squeeze connector (not supplied with the 
range), to your conduit. Insert the conduit through 
the reducer plates on the mounting bracket. Allow 
enough slack to easily attach the wires to the 
terminal block.

NOTE: Do not install the conduit without a squeeze 
connector.

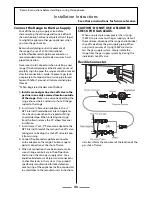
A Ground strap is supplied in the conversion pack.

Ground strap. (grey)

Attach the Ground strap to the ground and center 
terminal of the connector block - see the fi gure.

The neutral or ground wire of the power cord must 
be connected to the neutral terminal located in 
the center of the connector block. The power leads 
must be connected to the outside  terminals.

NOTE: Make sure the wires are completely inserted 
into the terminals and secure connections are 
made.

Содержание CornuFe 44

Страница 1: ...Instructions U107101 03 This book contains many important safety messages Always read and obey all safety messages Installer Leave these instructions with the appliance Important Save the installation instructions for the local electrical inspector s use ...

Страница 2: ...2 ...

Страница 3: ...ll your gas supplier from a neighbor s phone Follow the gas supplier s instructions If you cannot reach your gas supplier call the fire department Installation and service must be performed by a qualified installer service agency or the gas supplier WARNING The anti tip device supplied with this range must be installed when the appliance is installed This will reduce risk of tipping of the applian...

Страница 4: ...Cooktop Burners 12 The Griddle optional extra 13 The Ovens 14 Multi function oven 16 Both ovens 17 Oven racks 18 Oven light 18 Storage 19 Multi function Left hand Oven cooking guide 20 Cooking chart 21 Cleaning your range 22 Troubleshooting 24 Service and Parts 26 Warranty 27 Installation 29 ...

Страница 5: ...njuries and also cause damage to the range Do not allow anyone to climb stand or hang on any part of the range In Case of Fire Do not use water on grease fires Never pick up a flaming pan Turn the controls off Smother a flaming pan on a cooktop burner by covering the pan completely with a well fitting lid or baking tray If available use a multipurpose dry chemical or foam type fire extinguisher If fire i...

Страница 6: ...Never modify or alter the construction of a range by removing leveling legs panels wire covers anti tip brackets screws or any other part of the product Do Not Leave Children Alone Babies toddlers and young children should not be allowed near the range at any time They should never be allowed to sit or stand on any part of the appliance Do not allow children to climb or play around the range The w...

Страница 7: ...mp potholders on hot surfaces may result in burns from steam Never let a potholder touch hot heating elements Do not use a towel or other bulky cloth in place of a glove They might catch fire if they touch a hot surface Use dry oven gloves when applicable using damp gloves might result in steam burns when you touch a hot surface Never operate the range with wet hands Important Safety Notice and War...

Страница 8: ...irements of the authority having jurisdiction Failure to follow these instructions could result in serious injury or property damage The qualified agency performing this work assumes responsibility for the conversion User Servicing Do not repair or replace any part of the appliance unless specifically recommended in the manual All other servicing should be referred to a qualified technician Cooktop b...

Страница 9: ...les are left over adjacent burners they will get hot and may burn NOTE Use of aluminum pans may cause metallic marking of the grates This does not affect the durability of the enamel and may be cleaned off with a metal polish Ovens Use Care When Opening Door Let hot air and steam escape before removing or replacing food Never heat unopened food containers Pressure build up may make container burst a...

Страница 10: ...en touching range to minimize the possibility of burns always be certain that the controls are in the OFF position and that it is cool before attempting to clean the range Clean with caution If a wet sponge or cloth is used to wipe spills on a hot surface be careful to avoid steam burns Some cleansers can produce noxious fumes if applied to a hot surface Clean only parts listed in this guide In th...

Страница 11: ...e care that no water seeps into the appliance Make sure that your kitchen is well ventilated at all times Use extractor fans or hoods when installed The range is designed for cooking foods only and must not be used for any other purpose The oven should NOT be used for heating the kitchen not only does this waste fuel but the control knobs may become overheated When the oven is on DO NOT leave the ...

Страница 12: ... An electric shock could result If when you let go of the control knob the burner goes out the safety device has not held in Turn the control to the off position and wait one minute then try again this time holding in the control knob for slightly longer Adjust the flame height to suit by turning the knob On this range the low position is beyond high not between high and off The LO marks the low posi...

Страница 13: ...f aluminum pans may cause metallic marking of the grates This does not affect the durability of the enamel and may be cleaned off with a metal polish The Griddle optional extra The griddle fits the left hand cooktop grids front to back It is designed for cooking food on directly Don t use pans of any kind on it The griddle surface is non stick and metal cooking utensils e g spatulas will damage the s...

Страница 14: ...is fitted with three extra heating elements two visible in the top of the oven and the third under the oven base Take care to avoid touching the top elements and element deflector when placing or removing items from the oven For more detail on this oven see the section Multi function oven function temperature The Multi function oven has two controls a function selector and a temperature setting knob...

Страница 15: ...for a Convection oven are generally lower than a conventional oven The right hand Convection oven control is at the right hand end of the control panel Turn the oven temperature knob to the temperature you need The oven heating light will glow until the oven has reached the temperature you selected It will then cycle on and off during cooking as the oven maintains the selected temperature ...

Страница 16: ...ickly Convection oven cooking is particularly suitable for multi rack cooking and is a good all round function It may be necessary to reduce the temperature by approximately 20 F 10 C for recipes previously cooked in a conventional oven If you wish to pre heat the oven wait until the indicator light has gone out before inserting the food Convection broiling This function operates the fan while the...

Страница 17: ...oking skills Both ovens Before using for the first time to dispel manufacturing odors turn the ovens to 400 F 204 C and run for one hour To clear the smell make sure the room is well ventilated to the outside air by opening windows for example The wire racks should always be pushed firmly to the back of the oven Bakeware and meat pans should be placed level centrally on the oven s wire racks Keep al...

Страница 18: ...nting upwards To remove a rack pull it forward until the back of the rack is stopped by the rack stop bumps in the oven sides Lift up the front of the rack so the back of the rack will pass under the rack stop and then pull the rack forward To replace the rack line up the rack with a groove in the oven side and push the rack back until the ends hit the rack stop Lift up the front so the rack ends ...

Страница 19: ...age The drawer can be removed completely for cleaning etc To remove the drawer Pull the drawer right out Lift up the ends of the plastic clips one each side to release the catches holding the drawer to the side rails and at the same time pull the drawer forward and away from the side rails For safety s sake push the drawer rails back out of the way Replace the storage drawer To replace the drawer ...

Страница 20: ...y on the oven rack For best results pre heat the oven until the oven indicator light goes out Cooking chart Fan assisted oven mode Food Temperature Oven Rack Position Approximate Cooking Time Cup cake 340 F 171 C 2 4 20 min Scone British 350 F 177 C 2 4 15 min Deep apple pie 350 F 177 C 2 4 45 min interchange after 25 minutes according to size Plate tart 375 F 191 C 2 4 45 min interchange After 25...

Страница 21: ...149 C 20 25mins per lb 20 25mins 400 F 204 C 2 3 375 F 191 C 15 20mins per lb 15 20mins Turkey 325 F 163 C 1 3 300 F 149 C 20 25mins per lb 20 25mins 400 F 204 C 1 3 375 F 191 C 15 20mins per lb 15 20mins Stuffed Poultry Cook at 390 F or at 390 F for 20mins then 320 F for remainder Prepacked fresh or frozen follow packers cooking times Casserole 300 325 F 149 163 C 2 3 300 F 149 C 2 4hrs according ...

Страница 22: ...hwashing liquid detergent and a soft cloth For more difficult cleaning follow the appropriate instruction Check cleaner manufacturers guidelines for compatibility with the material of your range Part Finish How to clean Burner Grates top of Burner Heads Porcelain Enamel Mildly abrasive cleaner such as Bon Ami or Soft Scrub Dishwasher Burner bases Aluminum As above Maintop Top Stainless steel Hot soa...

Страница 23: ... cream cleaners on brushed Stainless Steel surfaces For best results use a liquid detergent cleaner Rinse with cold water and thoroughly dry with a clean soft cloth Ensure all parts are dry before repositioning Griddle optional extra Always clean the griddle after use Allow to cool completely before removing Immerse the griddle plate in hot soapy water Use a soft cloth or for stubborn stains a nyl...

Страница 24: ...ials We do not recommend corrosive or caustic cleaners as these may damage your range The knobs get hot when I use the oven can I avoid this Yes this is caused by heat rising from the oven and heating them up Don t leave the oven door open If there is an installation problem and I don t get my original installer to come back to fix it who pays You do Service organizations will charge for their call...

Страница 25: ... the circuit breaker Make sure the oven is cool Open the oven door and remove the oven racks Unscrew the bulb cover by turning counter clockwise It may be very stiff Taking care to protect your fingers in case the bulb should shatter unscrew the old bulb Screw in the new bulb screw back the bulb cover Turn on the circuit breaker and check that the bulb now lights Cooktop ignition or cooktop burners ...

Страница 26: ... problem with your appliance please refer to the rest of this booklet especially the Troubleshooting section first to check that you are using the appliance correctly If you are still having difficulty contact La Cornue Service Center 15545N 77th Street Scottsdale AZ 85260 USA Phone 877 LACORNUE 7 00 am 5 00 pm M F Arizona time Fax 480 998 0141 Email lacornue adcoservice com Please note If your appli...

Страница 27: ...d when the product is installed in a location with limited or restricted access i e airplane flights ferry charges isolated geographic regions Warranty applies to appliances used in residential application it does not cover their use in commercial installations This warranty is for products purchased and retained in the 50 states of the U S A District of Columbia and Canada Should the appliance be ...

Страница 28: ...28 Using your Range ...

Страница 29: ...ns Save these instructions for future reference Installation This book contains many important safety messages Always read and obey all safety messages Installer Leave these instructions with the appliance Important Save the installation instructions for the local electrical inspector s use ...

Страница 30: ...ll your gas supplier from a neighbor s phone Follow the gas supplier s instructions If you cannot reach your gas supplier call the fire department Installation and service must be performed by a qualified installer service agency or the gas supplier WARNING The anti tip device supplied with this range must be installed when the appliance is installed This will reduce risk of tipping of the applian...

Страница 31: ...n guidelines 33 Dimensions and clearances 33 Moving the Range 36 Checking the parts 37 Anti Tip Device 40 Side Panel Extension kit 41 Gas Connection 42 Electrical Connection 44 Assemble the range 47 Range operational checks 49 How To Move the Range for Servicing 50 Schematic diagram of the Range 52 Technical Data 54 ...

Страница 32: ... Important Observe all governing codes and ordinances The range must be properly grounded Save these instructions for the local electrical inspector s use For Your Safety Do not store or use combustible materials gasoline or other flammable vapors and liquids in the vicinity of this or any other appliance If you smell gas Open windows Don t touch electrical switches Extinguish any open flame Immedia...

Страница 33: ...above a range children climbing on the range to reach items could be seriously injured Converting to Propane Gas This appliance is supplied set for Natural gas A conversion kit for Propane gas is supplied with the range If the appliance is to be converted this must be done before installation The conversion must be performed by a qualified LP gas installer See the Conversion section at the back of ...

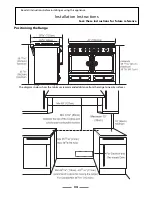
Страница 34: ... before installing or using this appliance Installation Instructions Save these instructions for future reference Positioning the Range The diagrams below show the minimum recommended distance from the range to nearby surfaces ...

Страница 35: ...at the side must be at least 8 20cm to allow for the opening of the side hinged oven doors Plan view A minimum space of 31 80cm is required between the top of the cooktop and a horizontal combustible surface The maximum depth for cabinets installed above cooktops is 13 33cm The depth of the range is 28 72cm overall Side view Any range hood should be installed in accordance with the hood manufactur...

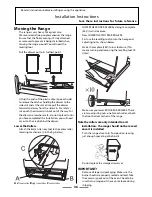
Страница 36: ...e drawer Lower the Rollers Attach the 8mm Allen key tool to the center roller lowering mechanism C in the fig below A left rear roller B right rear roller C center roller LOWER THE FRONT ROLLER by doing 14 complete 360 turns clockwise Now LOWER THE TWO REAR ROLLERS First use the levelling tool to turn the hexagonal adjusting nut as shown below Make 10 complete 360 turns clockwise This means turning...

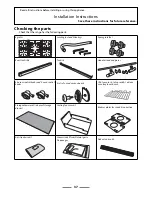
Страница 37: ...g tool and Allen keys Spare grate feet Rear Flue Grille Toe kick Hand rail and end pieces 5 burner control knobs and 3 oven control knobs 2 sets of oven door knob parts 1 flat oven rack 1 drop rack 1 deluxe oven tray in each oven Storage drawer mat in base of storage drawer Cooling fan cover kit Reducer plates for conduit connection Anti tip device kit Conversion kit from Natural gas to Propane gas...

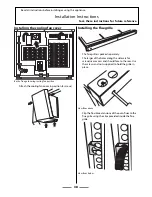
Страница 38: ...on Attach the cooling fan cover in position 4 screws Installing the flue grille The flue grille is packed separately The larger of the holes along the sides are for screwdriver access and should face to the rear Use the screws and nuts supplied to hold the grille in place View from above Clip the flexible extensions of the oven flues to the flue grille using the clips provided inside the flue grille Vi...

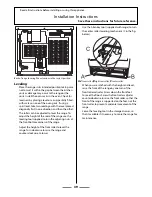
Страница 39: ...t of the rear of the range use the leveling tool supplied to turn the adjusting nuts at the front bottom corners of the range Adjust the height of the front roller to level the range Turn clockwise to raise the range and counter clockwise to lower Use the Allen key tool supplied with range to turn the center roller lowering mechanism C in the fig below A left rear roller B right rear roller C cente...

Страница 40: ...stalled Floor Attachment Key No s 1 and 2 can be assembled as shown below using Key No 3 Dimension A should be set to give a clearance of about 0 6 cm above the center channel of the range base The assembled bracket should be firmly secured to the floor to give a minimum engagement of 2 5 cm in the center channel of the range base If the range is mounted on a protective sheet make sure the bracket b...

Страница 41: ...rd to gain access to rear 1 Place a screw and washer in the top hole in the rear edge of the range side panel Add a shakeproof washer and start the nut on the screw threads so that the screw is loosely held in place Repeat with the other hole 2 Slide the side extension in from the side behind the washers 3 Tighten the top and bottom screws to hold the side extension in place Rear or range showing ...

Страница 42: ...ment of the appliance are compatible The range is designed to operate at a manifold pressure of 4 of water column 1 kPa on natural gas A conversion kit for LP gas Propane is supplied with the range When converted to LP gas a pressure of 10 of water column 2 49 kPa is required Make sure you are supplying your range with the correct type of gas If the range is to be used on LP gas a qualified LP inst...

Страница 43: ... to the NPT internal thread elbow at inlet of regulator Use a backup wrench on the regulator fitting to avoid damage When installing the range from the front remove the 90 elbow for easier installation C Install male or 3 4 flare union adapter to the NPT internal thread of the manual shut off valve taking care to backup the shut off valve to keep it from turning D Connect flexible metal appliance conne...

Страница 44: ...ord must be used Provide Proper Electrical Supply This range must be supplied with 240 volt 60 Hz and connected to an individual properly grounded branch circuit protected by a circuit breaker or time delay fuse 30 amp If the electrical service provided does not meet the above specifications it is recommended that a licensed electrician install an approved outlet From January 1 1996 the National El...

Страница 45: ...tes on the mounting bracket Allow enough slack to easily attach the wires to the terminal block NOTE Do not install the conduit without a squeeze connector Attach the wires to the ground post and terminal block NOTE Make sure the wires are completely inserted into the terminals and secure connections are made Secure the squeeze connector in place in the bracket by tightening the squeeze connector ...

Страница 46: ... parts you will need them Remove the strain relief clamp from the power cord and remove the power cord and strain relief clamp from the mounting bracket The range is shipped with reducer plates to give a 1 1 8 diameter opening for conduit connection Find the reducer plates in the conversion kit and fix them to the mounting bracket Install a squeeze connector not supplied with the range to your cond...

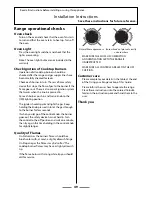
Страница 47: ...ontrol panel Burner control knob There are also 3 oven control knobs Oven control knob Push the multifunction oven selector knob and temperature knob on to the control spindles at the left hand side of the control panel and the other temperature control knob at the right hand end of the control panel Installing the handrail Description Quantity Hand rail tube 1 End cap with Allen fixing screw 2 Pla...

Страница 48: ... the mountings on the oven doors Hand tighten only do not use any tools Installing the toe kick Remove the 3 screws for the toe kick mounts along the front bottom edge of the range Fasten the toe kick using these screws alternative color screws can be found in the loose parts pack Assemble the Grates Make sure that the grates are in the correct position and sitting down Replace the storage drawer ...

Страница 49: ...t the gas Keep holding the knob pressed in to let the gas through to the burner for few seconds If when you let go of the control knob the burner goes out the safety device has not held in Turn the control to the off position and wait one minute then try again this time holding in the control knob for slightly longer Quality of Flames On Natural Gas the burners flames should be a bluish color with a...

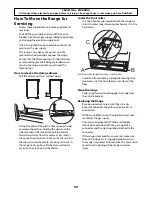
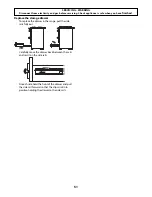
Страница 50: ...afety s sake push the drawer rails back out of the way Put the drawer somewhere safe do not put it back in the range until you have finished you will need access to the area behind the drawer Lower the front roller Use the Allen key tool supplied with the range to turn the center roller lowering mechanism C in the fig below A left rear roller B right rear roller C center roller Lower the front rolle...

Страница 51: ...d Replace the storage drawer To replace the drawer in the range pull the side rails fully out Carefully move the drawer back between the rails and rest it on the side rails At each side hold the front of the drawer and pull the side rail forward so that the clips click into position holding the drawer to the side rails ...

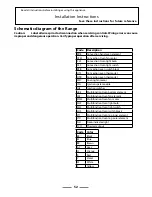
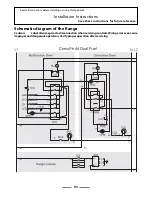
Страница 52: ...en light bulb CLS Convection Oven light switch RSB Convection oven switch block OTL Convection oven thermostat OTR Convection oven thermostat FMC Cooling fan motor ISG Ignition spark module IGS Ignition switches LBE Multifunction Oven bottom element LFE Multifunction Oven fan element MFM Multifunction Oven fan motor MVL Multifunction Oven light bulb MLS Multifunction Oven light switch LOS Multifun...

Страница 53: ...Installation Instructions Save these instructions for future reference Schematic diagram of the Range Caution Label all wires prior to disconnection when servicing controls Wiring errors can cause improper and dangerous operation Verify proper operation after servicing ...

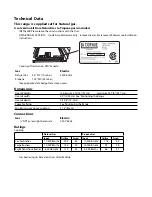
Страница 54: ...adge for test pressures Dimensions Overall height minimum 35 13 16 91 cm maximum 36 7 8 93 7 cm Overall width 43 109 2cm See Positioning the Range Overall depth 28 5 8 72 5cm Space for fixing See Positioning the Range Minimum space above cooktop 31 5 80cm Connections Gas Electric NPT at rear right hand side 240 V 60 Hz Ratings Cooktop Natural Gas Propane Gas Input Orifice Screw Input Orifice Screw ...

Страница 55: ...ion Oven Right hand Convection Oven Fan element 2500W 2500W Top element 1200W Browning Element 1150W Bottom element 1000W Maximum total electrical load at 240V 5100 W approximate total including oven lights oven fan etc 21 amps ...

Страница 56: ...081205 ...

Отзывы: