background image


REV5 


For any questions please contact us at toll free (877) 482-2040 Mon-Fri 8 a.m. to 4:30 p.m.                       31 


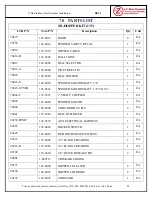
135lb Stainless Steel Spreader Installation 

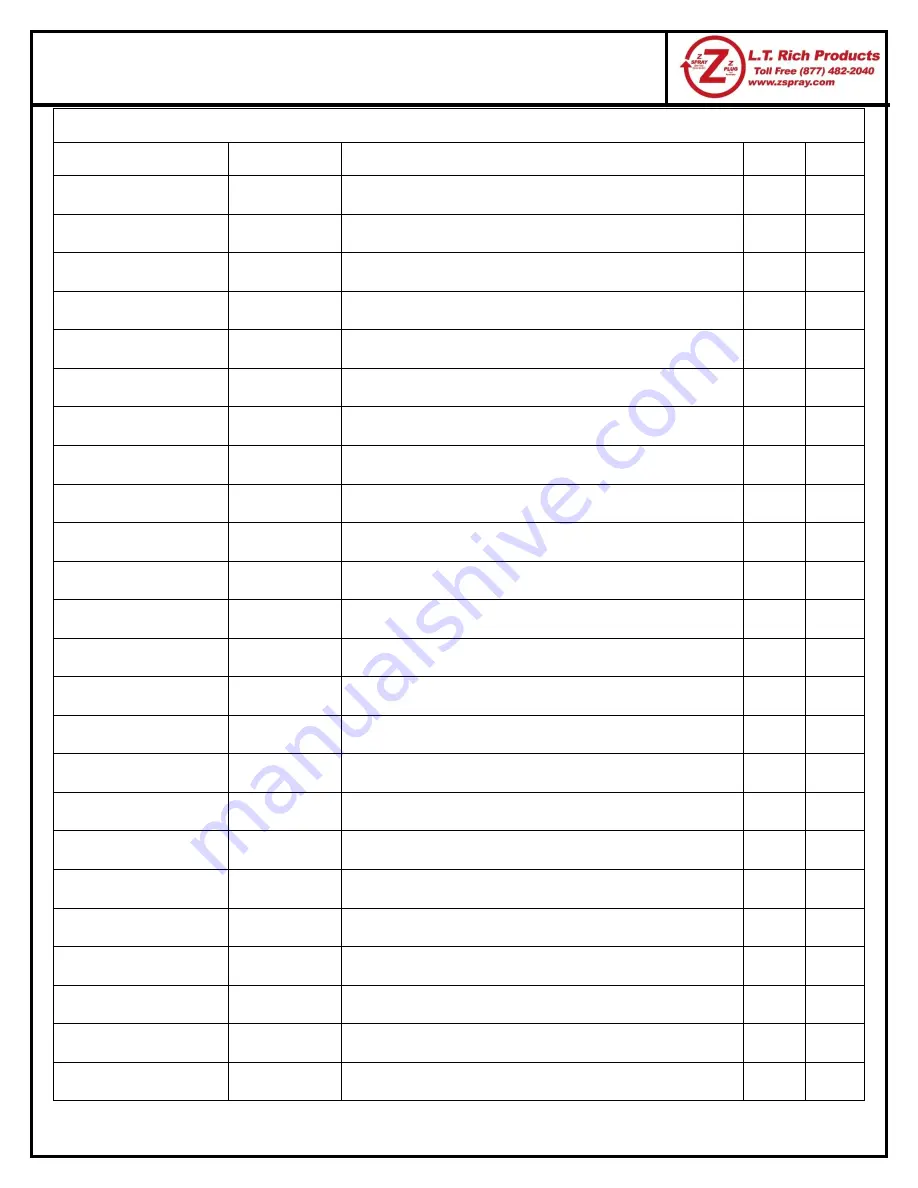
SR-HOPPER KIT (135) 

LTR P/N 

Toro P/N 

Description 

Qty 

Unit 

SC1-0500-SS 

142-1450 

1/2” SPLIT SHAFT COLLAR 

EA 

SET-1420X14 

142-1492 

SCREW, SET - 1/4-20 x 1/4 

EA 

SHCS-14-20X12 

142-1545 

SCREW, CAP, SOCKET HEAD - 14-20 x 1/2 

EA 

SM10193 TSSR 

143-0545 

HOPPER MOUNTING LATCH 

EA 

SM10202 

143-0223 

BUMPER BACKPLATE 

EA 

SM10317 TSSR 

143-0314 

REAR SHELL 

EA 

SM10318 

143-0315 

FRONT SHELL 

EA 

SM10319 TSSR 3 

143-0535 

RIGHT SHELL 

EA 

SM10319 TSSR 3-L 

143-0536 

LEFT SHELL 

EA 

SM10320 

143-0317 

SHELL LID 

EA 

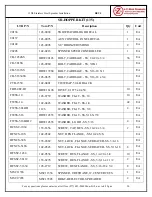
SM10321 

143-0318 

VIBRATOR MOUNTING BRACKET 

EA 

SM10322 

143-0319 

VIBRATOR HEAT SHIELD 

EA 

SM10323 TSSR 

143-0544 

BUMPER 

EA 

SM10324 TSSR 

143-0546 

BOTTOM RATE CONTROLLER 

EA 

SM10325 

143-0322 

SPINNER MOTOR MOUNTING BRACKET 

EA 

SM10326-W 

143-0534 

RIGHT FRAME UPRIGHT 

EA 

SM10326-WL 

143-0533 

LEFT FRAME UPRIGHT 

EA 

SM10327 

143-0324 

UPRIGHT SUPPORT BRACKET 

EA 

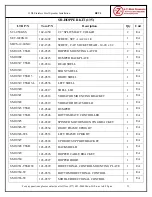
SM10328 TSSR 

143-0325 

BACKSHIELD 

EA 

SM10329 

143-0326 

HOPPER CABLE BRACKET 

EA 

SM10330 

143-0327 

HOPPER DOOR 

EA 

SM10331-TSSR W 

143-0329 

DIRECTIONAL CONTROL MOUNTING PLATE 

EA 

SM10334-W 

143-0333 

BOTTOM DIRECTIONAL CONTROL 

EA 

SM10336-W 

143-0337 

MIDDLE DIRECTIONAL CONTROL 

EA 

Содержание 135LB

Страница 1: ...2018 AES L T RICH PRODUCTS 11 2 2018 OWNER S MANUAL FOR 135LB STAINLESS STEEL SPREADER SNOWRATOR ...

Страница 2: ... 2 2 OVERVIEW 3 2 3 SAFETY 3 2 4 MAINTENANCE 4 2 5 RELATED DOCUMENTS 4 3 0 INSTALLATION 5 3 1 TOOLS EQUIPMENT 6 4 0 INSTALLATION 7 4 1 FERTILIZER BOXES 7 4 2 SPREADER 11 4 3 SPEED CONTROL UNIT 14 4 4 AUX CONTROL PANEL 15 4 5 TEST 17 5 0 OPERATION 18 5 1 OPERATIONAL CONTROLS 18 5 2 SPREAD PATTERN ADJUSTMENT CONTROLS 20 5 3 SPREAD PATTERN SET UP 24 6 0 TROUBLESHOOTING 26 7 0 PARTS LIST 29 8 0 AUX EL...

Страница 3: ... 516 HDW14535 WASHER 5 16 4 EA HFNCS 10S 142 0542 SERRATED FLANGE LOCK NUT 10 32 4 EA HFNCS 38S 135 2882 HEX FLANGE NUT 3 8 4 EA N A N A RED ROCKER SWITCH ASSEMBLY 1 EA N A N A AUX CONTROL PANEL ASSEMBLY 1 EA N A N A 135LB STAINLESS STEEL SPREADER 1 EA SC1 0500 SS 142 1450 1 2 SPLIT SHAFT COLLAR 2 EA SM10193 TSSR 143 0090 HOPPER MOUNTING LATCH 2 EA SM10401 143 0366 LEFT FERTILIZER BOX PLATFORM 1 E...

Страница 4: ...but the Snowrator and 135lb Stainless Steel Spreader may vary slightly due to ongoing engineering changes L T Rich Products Inc reserves the right to implement engineering and design changes to the Snowrator as may be necessary without prior notification 2 2 OVERVIEW The 135lb Stainless Steel Spreader is an optional attachment that can be mounted to the Snowrator and used to spread salt granular p...

Страница 5: ... is in use 2 3 4 Operation Always scan the environment to ensure the product being spread does not come into contact with other people and animals Do not spread within 25 feet of people or animals Follow all guidelines provided in the Snowrator Owner s Manual 2 4 MAINTENANCE Follow all safety guidelines when performing maintenance on the 135lb Stainless Steel Spreader In order to ensure the 135lb ...

Страница 6: ... is for a standard machine only The hose and electrical harness routing may be different depending on the attachments that may already be installed on your machine A SNOWRATOR machine is shown for all assembly photos For any questions please contact us at toll free 877 482 204 Mon Fri 8 a m to 4 30 p m 3 0 INSTALLATION WARNING Before Working on This Machine Switch Engine to OFF ...

Страница 7: ... Installation 3 1 TOOLS EQUIPMENT ITEM QTY DESCRIPTION PHOTO 1 1 DRILL 2 1 DRILL BIT 3 8 3 1 RATCHET 4 1 SOCKET 13 16 5 1 EXTENSION SOCKET 1 1 2 6 6 WRENCH 3 8 1 2 5 16 7 16 9 16 13 16 7 1 ALLEN WRENCH 1 8 8 1 SCREWDRIVER PHILLIPS NO 2 9 1 UTILITY KNIFE 10 1 JACK 1 TON ITEM QTY DESCRIPTION PHOTO 1 1 GLOVES 2 1 SAFETY GOGGLES ...

Страница 8: ...ATION 4 1 FERTILIZER BOXES 4 1 1 Remove Rear Tires Raise the machine using a Jack and Jack Stands not shown Remove both Rear Tires 4 1 2 Remove Rear Light Bracket Remove the two Bolts connecting the Rear Light Bracket to the Frame Lay Rear Light Bracket gently on the Frame not shown Tools Ratchet with 13 16 Socket B B Tools Ratchet with 1 2 Socket A ...

Страница 9: ...eel Spreader Installation Fertilizer Boxes Cont 4 1 3 Remove Battery Box Remove battery cover by unhooking strap Detach the Negative black and Positive red Wires from battery Remove bolts that attach the Battery Box Bracket to the Frame Remove Battery Box Bracket from Frame Tools Ratchet with 1 2 Socket D C 3c A B ...

Страница 10: ... Fert Box Platform with Bolts Fasten with 2 3 8 Flange Nuts 4 1 5 Attach the Battery Box Bracket Replace 5 16 x Bolts in Battery Box Bracket with 5 16 x 1 Bolts Align Fert Box Platform to Fender and Battery Box Bracket Tighten all 4 Bolts to Foot Plate Bracket and Fender Re Connect the Red Battery Cable not shown DO NOT CONNECT NEGATIVE BLACK BATTERY CABLE UNTIL READY TO TEST Tools Ratchet with 9 ...

Страница 11: ...form Insert 2 3 8 x 1 Bolt into Footplate Bracket Line up Slot in Fert Box Platform with Bolts Fasten with 2 3 8 Flange Nuts 4 1 7 Attach Rear Light Bracket Insert 2 5 16 x 1 Bolt into Rear Light Bracket Align Fert Box Platform to Fender and Rear Light Bracket Tighten all 4 Bolts to Foot Plate Bracket and Fender Tools Ratchet with 9 16 Socket A B C Hand Tighten A B C Tools Wrench 1 2 Wrench 9 16 ...

Страница 12: ... This section requires TWO people in order to install it safely Always use safe lifting techniques Take care not to pinch fingers or drop the spreader during installation 4 2 1 Mount 135lb Stainless Steel Spreader Drill out the quick release pin hole on the Mounting Plate of Snowrator With one person on each side lift the 135lb Stainless Steel Spreader by the Back Shield and the rear of the Hopper...

Страница 13: ...tion Mount Spreader Cont Rest the rear of base on the Mounting plate with the front at a slightly elevated angle Slide the Hopper Hinge Rods down into the rear Mounting Plate hooks Set the front of base down so the Hopper Latch Rods are in the front Mounting Plate Hook Attach Latches to the Hopper Latch Mounting Rods C D D E E E F F F ...

Страница 14: ...1 2 Split Shaft Collar Align 1 2 Split Shaft Collar so it is flush with the outer edge of the Hopper Latch Rod and tighten Insert a 3 8 Bolt through Hopper Latch Base and Mounting Plate on both sides of the Hopper Base Set the Hopper Cable Vibrator Connector and Spinner Motor Connector off to the side Not shown These will be connected in the next section Tools Allen Wrench 1 8 G G H I I ...

Страница 15: ... reveal Cut location Cut into Main Control Panel using utility knife and use a Die Grinder with cut off wheel to cut tabs Insert Speed Control Unit in the Main Control Panel Cutout Insert 4 10 32 x 1 2 Phillips Screws in Mounting Holes on Speed Control Unit Fasten to Main Control Panel with 4 10 32 Flange Nuts Tools Utility Knife A B b C D b E Under Control Panel Tools Ratchet with 11 32 Socket Ph...

Страница 16: ... Connector labeled SPINNER 2 Attach the connector labeled MOTOR to the Spinner Motor Connector 4 4 AUX CONTROL PANEL 4 4 1 Aux Control Panel Mechanical Insert 1 5 16 x 3 4 Carriage Bolt in the top Aux Control Panel mounting location Position the Aux Control Panel on the bolt Fasten with 2 5 16 Washers and 1 Hand Knob Insert 1 5 16 x 3 4 Carriage Bolt in the bottom Aux Control Panel mounting locati...

Страница 17: ...rical Switch Connector 1 Connect the Switch Connector on the Electrical Harness to the connector on the back of the Vibrator Switch Power and Ground 1 Attach the Vibrator Power Ground Connector to the Power Ground Harness Connector labeled VIBRATOR Vibrator Switch Connector 1 Connect the Vibrator Switch Connector from the Aux Electrical Harness to the Vibrator Motor A All Black D Green Trim ...

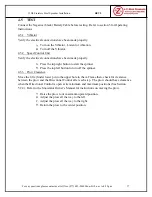
Страница 18: ... been made properly Press the top right button to start the spinner Press the top left button to turn off the spinner 4 5 3 Plow Clearance Move the lift cylinder lower pin to the upper hole in the A Frame then check for clearance between the plow and the Directional Control after each step The plow should have clearance when the Directional Control is open at its minimum and maximum positions See ...

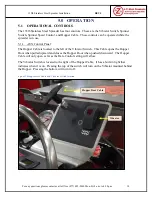
Страница 19: ... 1 AUX Control Panel The Hopper Cable is located to the left of the Vibrator Switch This Cable opens the Hopper Door when pulled upward and closes the Hopper Door when pushed downward The Hopper Cable will only open as far as the Rate Control setting will allow The Vibrator Switch is located to the right of the Hopper Cable It has a built in light that indicates when it is on Pressing the top of t...

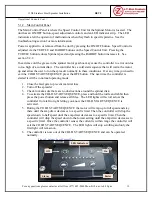
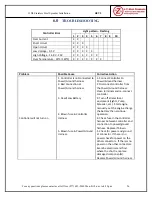
Страница 20: ...ions If at any time you need to exit the COLD START SEQUENCE press the OFF button The next time the controller is started it will be in normal operating mode 1 Close the feed gate to prevent material loss 2 Turn off the spreader 3 Check to make sure there are no obstructions around the spinner disk 4 To activate the COLD START SEQUENCE press and hold the turtle and rabbit then press the power butt...

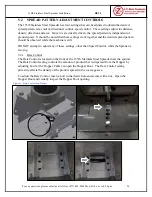
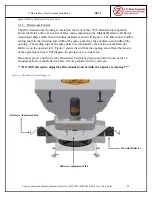
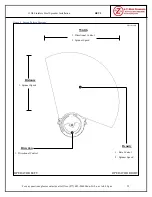
Страница 21: ...ether and the desired spread pattern should be observed while the machine is still DO NOT attempt to adjust any of these settings other than Speed Control while the Spinner is moving 5 2 1 Rate Control The Rate Control is located on the front of the 135lb Stainless Steel Spreader near the spinner The Rate Control setting controls the amount of product that is dispersed from the Hopper by adjusting...

Страница 22: ...e spread pattern by controlling how fast the Spinner rotates This control also affects the density of the spread pattern At the lowest speed the product will be spread closer to the front of the machine with thicker coverage As the Spinner speed increases the product will be spread farther from the front of the machine with thinner coverage The spreader is capable of distances of 6 25 feet Figure ...

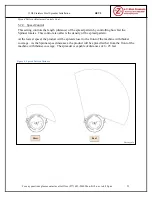
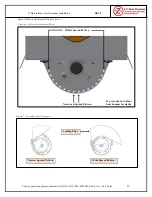
Страница 23: ...rols the direction and width of the spray pattern by the orientation and width of the opening The leading edge of the spray pattern is controlled by the position of the Material Deflector on the operator left Figure 7 shows the width of the opening also affects the density of the spread pattern as it will disperse the product over a wider area Disconnect power and then set the Directional Control ...

Страница 24: ...5lb Stainless Steel Spreader Installation Spread Pattern Adjustment Controls Cont Narrow Spread Pattern Wide Spread Pattern Leading Edge Figure 7 Spread Pattern Example Figure 6 Deflector Adjustment Holes Top view shown without front bumper for clarity Narrowest Spread Pattern Widest Spread Pattern ...

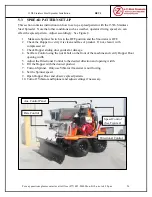
Страница 25: ...Snowrator is OFF 2 Check the Hopper to verify it is clean and free of product If not clean it with compressed air 3 Check Hopper sliding door guides for damage 4 Set Rate Control using the nut bolt on the front of the machine and verify Hopper Door opening width 5 Adjust the Directional Control to the desired direction and opening width 6 Fill the Hopper with the desired product 7 Turn on Spinner ...

Страница 26: ... a m to 4 30 p m 25 135lb Stainless Steel Spreader Installation OPERATOR RIGHT OPERATOR LEFT Not to scale Width 1 Directional Control 2 Spinner Speed Distance 1 Spinner Speed Direction 1 Directional Control Density 1 Rate Control 2 Spinner Speed Figure 8 Spread Pattern Diagram ...

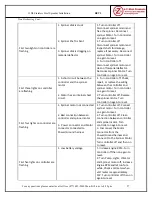
Страница 27: ...rness 3 Dead Low Battery 4 Blown fuse in Controller Harness 5 Blown fuse in Power Ground Harness 1 Connect Controller to Power Ground harness 2 Disconnect controller from the Power Ground harness Clean terminals and re connect controller 3 Turn off all electrical equipment Lights Pump Spreader etc Start engine manually Let the engine charge the battery then continue operation 4 Check fuse in the c...

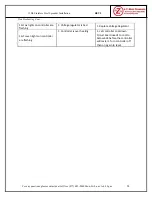
Страница 28: ...t 1 Turn controller off Check repair or replace the wiring between the controller and spinner motor Turn controller on again to reset 2 Turn controller off Replace the spinner motor Turn controller on again to reset First four lights on controller are flashing 1 Spinner motor not connected 2 Bad connection between controller and spinner motor 3 Power connector and Motor connector connected to Powe...

Страница 29: ... Troubleshooting Cont First six lights on controller are flashing 1 Voltage regulator is bad 1 Replace Voltage Regulator First seven lights on controller are flashing 1 Controller is over heating 1 Let controller cool down Circuit board needs to cool to below 60C before the controller will restart Turn controller off then on again to reset ...

Страница 30: ...LDER 1 EA 70023 S 143 0029 SPINNER MOTOR SHAFT 3 8 1 EA 70023 S TSSR 143 0543 SPINNER MOTOR SHAFT 3 8 TO 3 4 1 EA 70024 C 135 5937 1 SHAFT COUPLER 1 EA 70028 143 0030 SPINNER MOTOR 1 EA 70040 126 0990 SLIDE DOOR GUIDE 4 EA 70041 135 5965 DIAL FOLLOWER 1 EA 80239 PUMP 143 0539 AUX ELECTRICAL HARNESS 1 EA 80243 143 0045 ROCKER SWITCH 1 EA 80245 143 0047 RED ROCKER SWITCH LENS 1 EA 80316 135 9003 3 8...

Страница 31: ...E WRAP 50 LB BLACK EA FBF64LF IR HDW16196 RIVET 0 1875 x 0 450 10 EA FWSS 10 126 0759 WASHER FLAT SS 10 10 EA FWSS 14 142 0443 WASHER FLAT SS 1 4 42 EA FWSS 38LOD 1126 WASHER FLAT SS 3 8 2 EA FWSS 516 HDW14535 WASHER FLAT SS 5 16 X 7 8 EA FWSS 516LOD2 HDW14535 WASHER LG OD SS 5 16 4 EA HCSSC 1034 135 6356 SCREW CAP HEX SS 10 24 x 3 4 2 EA HFNCS 10S 142 0542 NUT HEX FLANGE SS 10 24 S S EA HFNCS 38S...

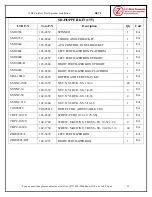
Страница 32: ...535 RIGHT SHELL 1 EA SM10319 TSSR 3 L 143 0536 LEFT SHELL 1 EA SM10320 143 0317 SHELL LID 1 EA SM10321 143 0318 VIBRATOR MOUNTING BRACKET 1 EA SM10322 143 0319 VIBRATOR HEAT SHIELD 1 EA SM10323 TSSR 143 0544 BUMPER 1 EA SM10324 TSSR 143 0546 BOTTOM RATE CONTROLLER 1 EA SM10325 143 0322 SPINNER MOTOR MOUNTING BRACKET 1 EA SM10326 W 143 0534 RIGHT FRAME UPRIGHT 1 EA SM10326 WL 143 0533 LEFT FRAME UP...

Страница 33: ... 0368 RIGHT FERTILIZER BOX UPRIGHT 1 EA SM10403 143 0369 RIGHT FERTILIZER BOX PLATFORM 1 EA SRA 10010 143 0399 HOPPER AND FERT TRAY KIT 1 EA SSNNC 1024 142 1655 NUT NYLOCK SS 10 24 42 EA SSNNC 14 142 1657 NUT NYLOCK SS 1 4 20 2 EA SSNNC 38 142 1659 NUT NYLOCK SS 3 8 16 4 EA SSNNC 516 142 1660 NUT NYLOCK SS 5 16 18 1 EA TGS05812 TGS05812 DEFLECTOR ADJUSTABLE TGS EA TRCP 1012S 143 0542 SCREW PTH 10 ...

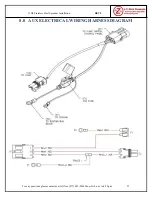
Страница 34: ...REV5 For any questions please contact us at toll free 877 482 2040 Mon Fri 8 a m to 4 30 p m 33 135lb Stainless Steel Spreader Installation 8 0 AUX ELECTRICAL WIRING HARNESS DIAGRAM ...

Отзывы: