background image

Operation

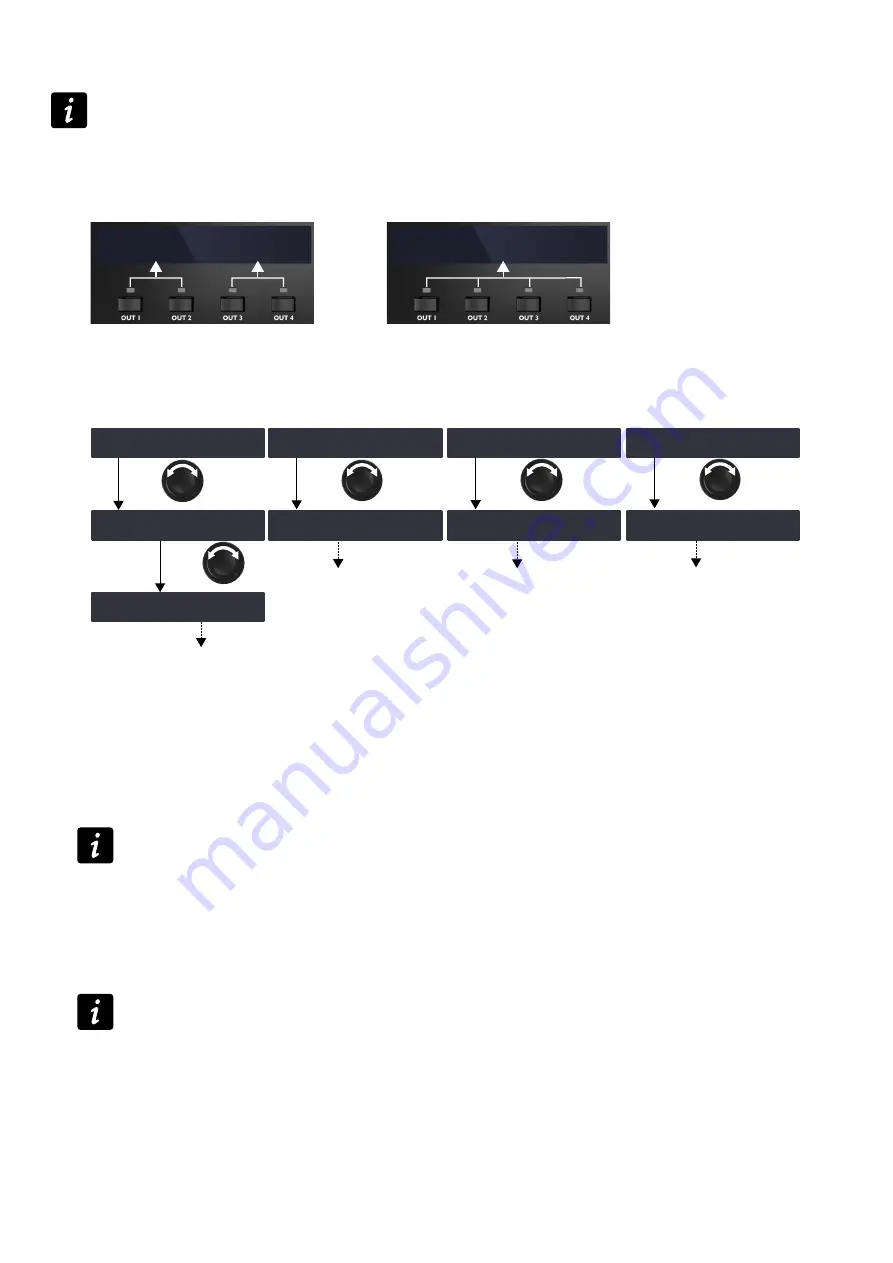
The parameters of the currently loaded preset can be set individually for each output channel or channel set.

Channel set

In certain presets, some channels are interdependent and form a channel set.
Within a channel set the preset parameters are common to all channels.
On the amplied controller's screen, channel sets are indicated by brackets above the corresponding output

channel keys.


‾GAIN(dB)     ‼※
[  0.0 ][  1.5 ]


‾GAIN(dB)     ‼※
[      0.0     ]

Two  2-channel sets (LF/HF  - LF/HF)

One  4-channel sets (LF/LF/MF/HF)

Setting the preset parameters

‾GAIN (dB)            ‼※
  0.0   0.0   0.0   0.0

‽DELAY (ms)           ‼※
  0.00  0.00  0.00  0.00

‽POLARITY             ‼※
   +     +     +     +

‽INPUT SELECTION      ‼※ 
   A     A     B     B

OUT1+ 

‾GAIN (dB)            ‼※
  0.1   0.0   0.0   0.0

OUT1+

‽DELAY (ms)           ‼※
  0.01  0.00  0.00  0.00

OUT1+

‽POLARITY             ‼※
   -     +     +     +

OUT1+

‽INPUT SELECTION      ‼※ 
   C     A     B     B

OUT2+ 

‾GAIN (dB)            ‼※
  0.1   0.1   0.0   0.0

Procedure

1.

From the main menu, select 

PRESET PARAMETERS

.

2.

Turn the encoder wheel to select a preset parameter (

GAIN (dB)

DELAY (ms)

POLARITY

 or 

INPUT

SELECTION

).

3.

Press and hold the output key of an output channel or one of the output keys of a channel set to select it.

4.

Turn the encoder wheel to select the value.

Gain and delay value setting

Turn the encoder wheel for ne resolution (last digit).
Press and turn the encoder wheel for coarse resolution (second to last digit).

5.

Release the output key.

6.

Repeat steps 3 to 5 for each output channel or channel set.

7.

Repeat steps 2 to 5 for each preset parameters.
Preset parameter modications apply immediately.

Saving preset parameters

Preset parameter modications are not automatically saved and are lost if the preset is reloaded.
Refer to 

STORE PRESET

 (p.40).

LA12X user manual (en) version 2.0

 42

Содержание LA12X

Страница 1: ...LA12X user manual en...

Страница 2: ...nual en version 2 0 Distribution date October 3 2016 2016 L Acoustics All rights reserved No part of this publication may be reproduced or transmitted in any form or by any means without the express w...

Страница 3: ...i er section 14 Speaker outputs 14 Speaker protection 14 Monitoring and control 14 User interface 14 L NET remote control network 14 Installation 15 Mounting 15 Ventilation 17 Connecting to AC mains 1...

Страница 4: ...tion input mode and group information 36 Using the main menu 37 LOAD PRESET 38 STORE PRESET 40 DELETE PRESET 41 PRESET PARAMETERS 41 CLEAR GROUP PARAMS 43 INPUT SETTINGS 44 MONITORING INFO 48 OPTIONS...

Страница 5: ...Latency 70 Remote control and monitoring 70 Physical data 70 Approvals 71 5...

Страница 6: ...the power cord from being walked on or pinched particularly at plugs convenience receptacles and the point where they exit from the apparatus 11 Only use attachments accessories speci ed by the manufa...

Страница 7: ...stallation by an instructed person or the use of ready made leads or cords Never attempt to touch any exposed speaker wiring while the product is operating rst disconnect the connector from the produc...

Страница 8: ...for shipping the product unless it is mounted in a rack with the front and rear panels xed to the rack as described in this manual Symbols The following symbols are used in this document This symbol...

Страница 9: ...ce and ef cient loudspeaker ampli cation digital signal processing and comprehensive system protection in a single ergonomic package The onboard preset library allows for rapid system optimization wit...

Страница 10: ...ampli ed controller with DSP preset library and networking capabilities LA RAK II touring rack containing three LA12X LA POWER II for power distribution and LA PANEL II for audio and network distribu...

Страница 11: ...OUT2 MAINS 100 240V 50 60 Hz 1900 W OUTPUT PWR PER CH IMP 2 00 W 4 2 OUT1 1 1 2 2 OUT3 1 1 OUT4 2 2 CLASS II WIRING OUT1 OUT2 OUT3 OUT4 A B C D E F G H 6 1 status LED 2 LED meters 10 powerCON power s...

Страница 12: ...tively connected to the input ports with failsafe relay in case of mains absence They allow transmitting the input signals to daisy chained ampli ed controllers Each AES EBU link port is ESD protected...

Страница 13: ...lters generates perfectly linearized phase curves and signi cantly improved impulse responses The 4 x 4 matrix architecture offers exibility for various system con gurations A delay of up to 1000 ms c...

Страница 14: ...ng functionalities via the LED display signals presence and level and the LCD screen system parameters instant access to navigation and parameters control using the encoder wheel and the six keys See...

Страница 15: ...LA12X L NET MENU ESC OK INPUTS A D OUT 1 OUT 2 OUT 3 OUT 4 POWER Risk of damaging the ampli ed controller during transport During transport or while on tour the ampli ed controller should be rear supp...

Страница 16: ...Installation Refer to the LA RAK II user manual LA12X user manual en version 2 0 16...

Страница 17: ...of the mains supply Only connect the product to an AC power outlet rated 100 240 V 50 60 Hz with the following current values 100 120 V 30 A 200 240 V 16 A WARNING The product is of CLASS 1 constructi...

Страница 18: ...he removable power cord is tted at one end with a 32 A powerCON connector The other end and the wires color code depends on the cord type as follows type plug live neutral ground CE CN CEE 7 7 16 A 25...

Страница 19: ...6 A 10 W 0 6 A 10 W Current values given for mains rated at 230 V Multiply by 2 3 for 100 V 1 9 for 120 V 1 15 for 200 V Output power references A third of the maximum output power corresponds to the...

Страница 20: ...etwork and be remotely controlled by LA Network Manager LA12X audio and network connection panels 1 2 3 Speaker panel The two 4 point SpeakON connectors and the 8 point CA COM connector on the rear pa...

Страница 21: ...be different Connections to the IN connectors are referenced in the table Refer also to section INPUT MODE p 44 Input mode AB IN A IN A B IN B Analog analog audio source 1 channel analog audio source...

Страница 22: ...ons AES EBU input mode Digital audio source speci cations Standard AES EBU AES3 Sampling frequency 44 1 48 88 2 96 176 4 or 192 kHz Word length 16 18 20 or 24 bits The AES EBU inputs are transformer b...

Страница 23: ...to AC hum and radio interference Unbalanced lines may add noise especially over long cable runs In a daisy chain layout the male XLR link connectors LINK A to LINK D feed the input signals to the nex...

Страница 24: ...le between two AES EBU interfaces In case an ampli ed controller shuts down the failsafe relay makes a passive connection between the AES EBU IN ports and the LINK ports to maintain continuity However...

Страница 25: ...ues in LA Network Manager To connect LA12X to L NET in a daisy chain star or hybrid topology use the etherCON connectors on the L NET panel Refer to the LA Network Manager video tutorial for network s...

Страница 26: ...O DO3WFILL CA COM DO DO3WFILL 2WAY OUT3 4 SUB1 OUT1 SUB2 OUT2 CA COM DO DO3WFILL 2WAY OUT3 4 SUB1 OUT1 SUB2 OUT2 SP SP SP Connecting 2 way passive enclosures 2 way passive enclosure on speakON output...

Страница 27: ...nclosure on CA COM output DO CA COM DO DO Connecting subwoofers Cardioid con guration Connect the reversed subwoofer s to OUT 1 to use the cardioid preset Subwoofer on speakON output SP SP Y1 OUT1 OUT...

Страница 28: ...stallation Subwoofer on CA COM output DO DOSUB LA8 CA COM DO DOSUB LA8 SP1 OUT1 SP2 OUT2 SP3 OUT3 SP4 OUT4 CA COM DO SP DOSUB LA8 SP1 OUT1 SP2 OUT2 SP3 OUT3 SP4 OUT4 LA12X user manual en version 2 0 2...

Страница 29: ...WST enclosures per LA12X Loudspeaker enclosure Maximum number of connections per output Maximum number of enclosures per controller Kiva 3 12 Kara 3 6 K2 3 3 K1 2 2 K1 SB 1 4 Maximum number of subwoof...

Страница 30: ...ion Main screen description p 33 Powering off Press the POWER key for one second The LCD screen and LEDs turn off The POWER LED is lit in red to indicate that the controller is not disconnected from m...

Страница 31: ...ne second Interpreting the front panel LEDs STATUS The STATUS LED on the front panel displays the state of the ampli ed controller green when the LA12X operates normally red during rmware update or wh...

Страница 32: ...en the output voltage reaches 5 10 or 20 dB below the maximum level SIGNAL green a signal is detected and the output voltage reaches 0 1 V LOAD green a load is connected and the output module delivers...

Страница 33: ...n placed above the corresponding output key written in the xx_y form where xx indicates the type of transducer section or enclosure to be connected to the output channel LF low frequency transducer se...

Страница 34: ...ultaneously the ESC and OK keys until Display Locked is displayed To unlock press and hold simultaneously the ESC and OK keys until Display Unlocked is displayed System Message Display Locked Muting U...

Страница 35: ...on Example with OUT3 displaying OUT3 and OUT4 IN B GAIN OUT dB B 1 5 1 5 2 Turn the encoder wheel to modify the gain values Turn the encoder wheel to modify gain by steps of 0 1 dB or Press and turn s...

Страница 36: ...output channel The rst line of the LCD screen 3 indicates the input mode and status of input channel pairs AB and CD Brackets indicate Channel Sets refer to PRESET PARAMETERS p 41 The second line of...

Страница 37: ...clockwise or counterclockwise to display the other pages indicates the page is the last in the menu Turn the encoder wheel counterclockwise to display the other pages Horizontal arrows on the right in...

Страница 38: ...MONITORING INFO display real time measured values RMS output voltage output temperature in percentage of the maximum values and mains voltage min max and average display rmware and preset library ver...

Страница 39: ...refer to section STORE PRESET p 40 3 Press the OK key to load the selected preset The ampli ed controller displays ARE YOU SURE 4 Press the OK key or the encoder wheel to validate or press the ESC key...

Страница 40: ...ler is turned off STORE USER PRESET 001 002 MY K2 100 LF_A LF_A MF_A HF_A ENTER PRESET NAME 002 MY K2 OVERWRITE 002 MY K2 OK OK STORE PRESET DELETE PRESET ENTER PRESET NAME 002 K2 70 OK _ _ OK ENTER P...

Страница 41: ...preset is the currently loaded preset It is not possible to delete the currently loaded preset Press the ESC key to cancel The ampli ed controller displays ARE YOU SURE 4 Press the OK key or the enco...

Страница 42: ...PUT SELECTION C A B B OUT2 GAIN dB 0 1 0 1 0 0 0 0 Procedure 1 From the main menu select PRESET PARAMETERS 2 Turn the encoder wheel to select a preset parameter GAIN dB DELAY ms POLARITY or INPUT SELE...

Страница 43: ...ers are not preset dependent and remain active when a different preset is loaded Therefore L Acoustics recommends to clear group parameters when an ampli ed controller is used in standalone mode after...

Страница 44: ...rent between input channel A and input channel B or between input channel C and input channel D Selecting the input mode INPUT MODE AB ANALOG INPUT MODE CD ANALOG OK OK INPUT MODE AB ANALOG OK INPUT M...

Страница 45: ...channel pair CD FALLBACK CD and the status of the signal on channel pair AB is displayed Refer to section FALLBACK MODE p 46 The LOCK status is re acquired after at least 500 ms of stability INVALID i...

Страница 46: ...e on input pair AB but sound is automatically recovered when the signal returns to a normal state Enabling the fallback mode FALLBACK MODE OFF OK FALLBACK MODE OFF OK FALLBACK MODE ON Procedure Precau...

Страница 47: ...n 0 dBfs for an input signal of 22 dBu These examples illustrate the most common cases analog audio source calibration AES EBU gain 18 dBu for 0 dBfs 4 dB 24 dBu for 0 dBfs 2 dB 22 dBu for 0 dBfs or i...

Страница 48: ...mpli ed controller s hardware version the ENCLOSURE CHECK function MONITORING INFO SPK HANDLING 12 10 13 11 OUT CH TEMP 52 53 50 48 FIRMWARE V1 7 2 PRESET LIBRARY V5 6 ENCLOSURE CHECK PRESS OK TO STAR...

Страница 49: ...V To reset the measurement press the OK key Refer to Error messages p 60 for information on the power supply related messages ETHERNET LINKS ETHERNET LINKS displays the current status of the link of e...

Страница 50: ...nternational identi cation serial number It is set by the manufacturer and cannot be modi ed In illustration MONITORING INFO p 48 the MAC address is 00 1B 92 01 90 3A HARDWARE INFO HARDWARE INFO displ...

Страница 51: ...tion protocol based on TCP IPv4 called L COM The IP addresses on the units are class C addresses and must be set manually The default subnet for L NET is 192 168 1 0 IP address setting Each unit must...

Страница 52: ...d controllers Subnet mask is automatically de ned in rmware according to the network class induced by the Subnet pre x class A class B class C 6 If needed set another byte rst second or third number a...

Страница 53: ...ress the OK key or the encoder wheel to validate LED BACKLIGHT MODE The brightness of the LED and the LCD screen backlight can be modi ed to adapt to a very bright or very dark environment OK OK LED B...

Страница 54: ...ed controller retains its IP address 1 From the main menu select OPTIONS 2 Press the OK key or the encoder wheel to validate 3 Turn the encoder wheel to select RESET TO FACTORY DEFAULT SETTINGS 4 Pres...

Страница 55: ...STORE PRESET PIN code protected DELETE PRESET locked PRESET PARAMETERS all parameters PIN code protected CLEAR GROUP PARAMS PIN code protected NETWORK ADDRESS PIN code protected RESET TO FACTORY DEFA...

Страница 56: ...Release the OUT2 key 4 Repeat step 1 to 3 with the OUT2 OUT3 and OUT4 key 5 Press the OK key or the encoder wheel to validate If the controller returns to the ENTER PIN screen the entered PIN code is...

Страница 57: ...ion exposes to hazardous situations Troubleshooting and diagnosis p 58 This section contains the diagnosis tables and procedures to identify the issues and how to address them Exploded view p 66 This...

Страница 58: ...urn on and switch the ampli ed controller to the operating mode other causes contact L Acoustics grey screen LCD screen lit but nothing displayed possible cause diagnosis procedure condensing humidity...

Страница 59: ...ampli ed controller IP address as indicated in the LA Network Manager video tutorial L NET cable is not plugged or incorrectly plugged plug and secure CAT5e U FTP cables into the L NET connectors on t...

Страница 60: ...roller should be connected to a more stable mains power source and or mains power source should be checked by a quali ed electrician If using an electrical generator check the sizing refer to Planning...

Страница 61: ...the SMPS 15 V supply is out of range The ampli ed controller cannot operate System Message SMPS 15V error Displayed if the SMPS 15 V supply is out of range The ampli ed controller cannot operate Syst...

Страница 62: ...0 5 second Rail under volt on ch Channel muted Displayed if rail voltage is below 110 V at an output channel The channel is muted for 0 5 second Rail overvolt on ch Channel muted Displayed if rail vo...

Страница 63: ...controller remains operational but temperature should be monitored System Message SMPS under temp error Displayed if SMPS temperature reaches 20 C and lower The SMPS initiates a fast restart Module hi...

Страница 64: ...the ampli ed controller analog input connector for analog audio source AES EBU input connector for AES EBU audio source audio source cable is damaged replace the XLR cable incorrect settings on the au...

Страница 65: ...preset selection select a preset in accordance with the loudspeaker system connected to the outputs audio source cable incorrectly plugged unplug the XLR cable and plug it again on the audio source an...

Страница 66: ...R LABRACKET side bracket G03285 front handle G03255 encoder wheel knob KR LA4XBOUT KR LA4XMOU grill and foam filter KR LA4XGRI Glossary CE Europe CHK check procedure CN China D R disassembly reassembl...

Страница 67: ...factor 400 1 kHz and below 8 output delay 0 ms to 1000 ms mains input power and current draw all channels driven maximum output power 4 x 1400 W RMS at 8 4 x 2600 W RMS at 4 4 x 3300 W RMS at 2 7 1 3...

Страница 68: ...utput connectors 2 x 4 point speakON 1 x 8 point CA COM L NET connectors 2 x 1 Gb s Ethernet etherCON Input Signal distribution connectors input 4 Neutrik female XLR3 IEC 60268 12 ESD protected link 4...

Страница 69: ...r SRC sampling frequency 96 kHz SRC referenced to the ampli ed controller internal clock word length 24 bits dynamic range 140 dB distortion THD N 120 dBfs bandpass ripple 0 05 dB 20 Hz 40 kHz 96 kHz...

Страница 70: ...ent solutions SNMP Extron Crestron Extron is a registered trademark of Extron Electronics Crestron is a trademark or registered trademark of Crestron Electronics Inc in the United States other countri...

Страница 71: ...Approvals Approvals 71 LA12X user manual en version 2 0...

Страница 72: ......

Отзывы: