


Phone Basics
5
12
2 3
6
User Manual
4
5
6
/1.7
Inserting an accessory into
the incorrect jack may damage the
phone.
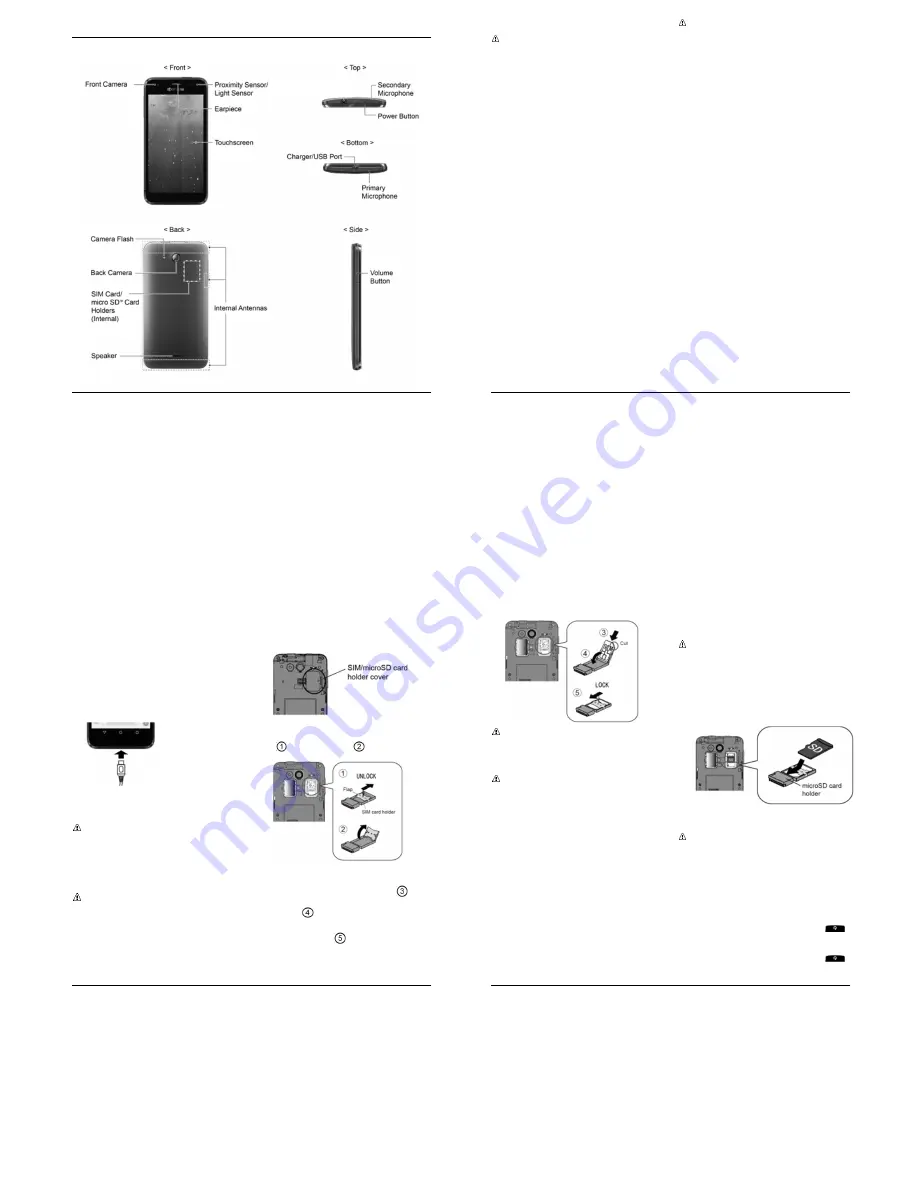
●
5
%
takes pictures and
records videos while facing the screen,
and allows you to video conference.
●
%
(
89 )
(
detects how close an object is to the
surface of the screen. This is typically
used to detect when your face is
pressed up against the screen, such as
during a phone call.
●
displays all the
information needed to operate your
phone. Use finger gestures to navigate
and interact with items on the screen.
●
(
#
-
suppresses
background noise improving audio
quality for the other party during voice
calls except in speakerphone mode.
●
3
lets you turn the phone
on/off, turn the screen on/off, or switch
your phone to silent mode, vibration
mode, or airplane mode. Press and hold
for more than 10 seconds to restart the
phone.
●
) 8 (
allows you to
connect the micro6USB cable (included)
to charge the battery or to transfer files
to and from a computer.
●
%
-
transmits your
voice and ambient sound during voice
calls, voice recordings and videos.
.
:
Do not cover the microphones
during a call as it may compromise the
hearing quality.
●
%
5
helps illuminate subjects
in low6light environments when taking a
picture or recording a video.
●
;
%
lets you take pictures and
videos.
●
(/
# , #
(Internal) holds the
nano SIM card.
●
%
(
# , #
(Internal) holds
an optional microSD card to provide
external memory.
●
(-
;
lets you hear the different
ringtones and sounds. The speaker also
lets you hear the caller’s voice in
speakerphone mode.
●
/
6
facilitate reception
and transmission. To maximize
performance, do not obstruct while
using the phone.
●
&
%
allows you to adjust the
ringtone or media volume when you are
not on a call, or adjust the voice volume
during a call.
Phone Basics
7
+
<
#
You need to insert a SIM card into your
phone and charge the battery to begin
setting up your phone.
)
Plug the smaller end of the micro6USB
cable into the phone’s
charger/USB
port.
Plug the other end of the USB cable into
the charger and then plug the charger
into an electrical outlet.
.
:
Your phone’s battery should have
enough charge for the phone to turn on
and find a signal, set up voicemail, and
make a call. You should fully charge the
battery as soon as possible.
/
(/
#
"
):
Use only a nano SIM card in
this phone.
Insert your fingernail into the slit at the
bottom of the back cover and lift the
cover up gently
Open the SIM/microSD card holder
cover, located on the upper right side of
the phone.
Slide the flap of the SIM card holder in
the direction of the arrow to unlock it
(
) and lift the flap (
).
!
Insert the nano SIM card into the flap of
the SIM card holder, making sure the
cut6off corner is at the top right (
) and
then lower the flap of the SIM card
holder (
).
Slide the flap in the direction of the
arrow to lock it (
).
8
User Manual
.
:
Make sure you insert your nano
SIM card in the correct orientation.
$
Close the SIM/microSD card holder
cover and replace the back cover.
"
):
To ensure that your phone is
waterproof, make sure the SIM/microSD
card holder cover is properly sealed.
1-
: /
(
#
.
:
The microSD card is optional.
Remove the back cover and open the
SIM/microSD card holder cover
Insert the microSD card into the
microSD card holder with the gold
contacts facing down. Gently push the
card in until it snaps into place.
Close the SIM/microSD card holder
cover and replace the back cover.
"
):
To ensure that your phone is
waterproof, make sure the SIM/microSD
card holder cover is properly sealed.
1
#
1
1
► Press and hold the
3
.
1
► Press and hold the
3
and tap
3
>
14
.


