background image

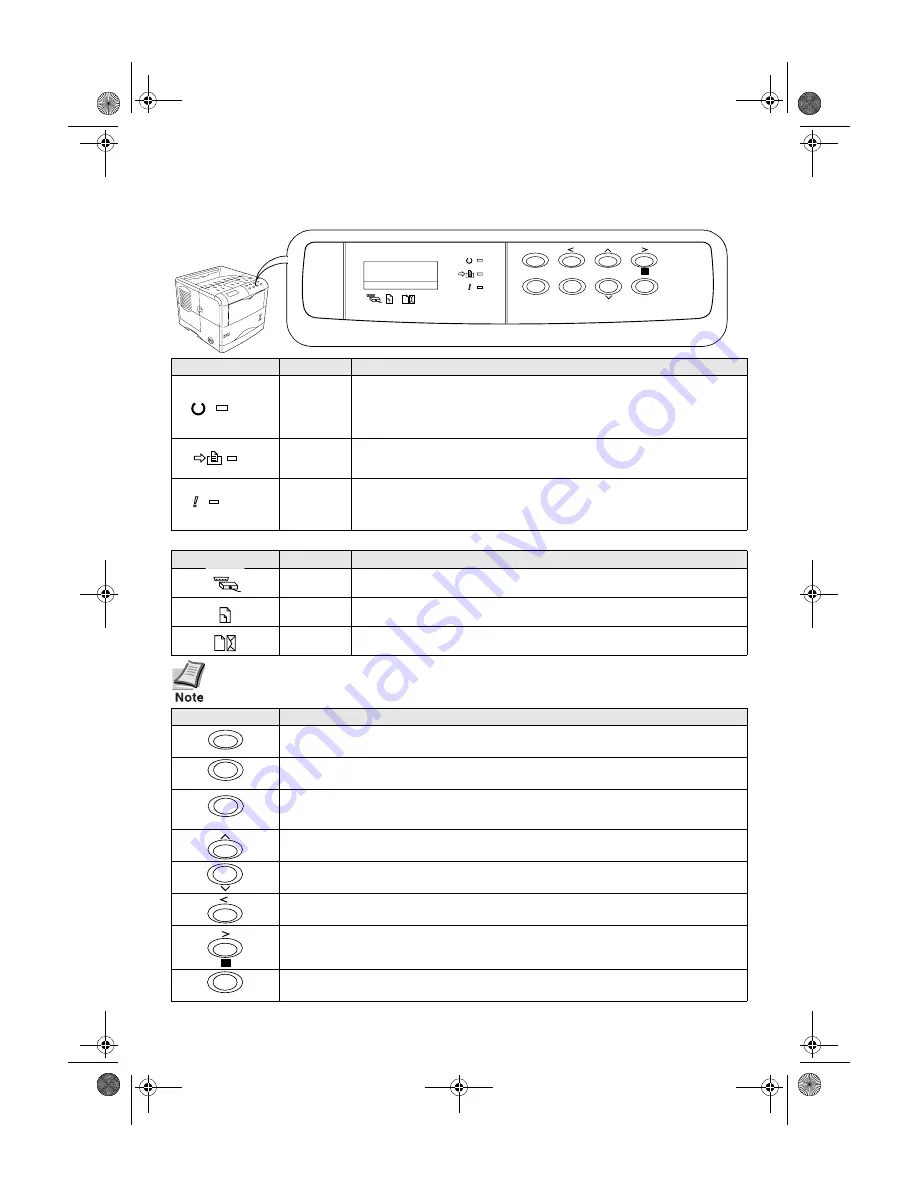
Operator Panel

For more details on operating procedures, see the 

Operation Guide

 contained as a PDF file 

in the CD-ROM supplied with the printer.       

If the number of pages to be printed is set to 2 or more, when printing starts, the lower line of 
the message display shows the 

number of printed pages/set number of pages 

to be printed.

Printed in Japan

5+AX 0801EC/KW

  Indicator

Name

Description

Ready 

indicator

Flashing

: Indicates when an error occurs that you can clear by yourself.

Lit

: Indicates that the printer is on-line. Printing is possible.

Off

: Indicates that the printer is off-line. Data can be received but will not be 

printed. Also indicates when printing is automatically stopped due to occur-

rence of an error.

Data 

indicator

Flashing

: Indicates data transfer is taking place.

Lit

: Indicates either that data is being processed, or that data is being written 

to the memory card.

Attention 

indicator

Flashing

: Indicates when the printer needs maintenance attention or the 

printer is warming up (

Please wait

). 

Lit

: Indicates when a problem or an error occurs that you can clear by yourself. 

(For example, paper jam occurs.)

Message Display

Name

Description

Interface 

indicator

The interface indicator shows which of the printer’s interfaces is currently 

active. The default is no selection (

---

).

Paper size 

indicator

Indicates the paper size of the current paper cassette. The default is A4 (

A4

size.

Paper type 

indicator

Indicates the paper type of the current paper cassette. The default is 

PLAIN

.

  Key

Function

• Switches the printer on-line and off-line.

• Prints and feed out one page.

• Abandons a printing job, resets numeric values, or cancels a setting procedure.

• Used to stop the sounding of the alarm buzzer indicating the occurrence of an error.
• When pressed during mode selection, terminates the setting and returns to the 

Ready

 con-

dition.

• Used to select the emulation, font, character code set; to read an memory card and others.
Lets you access the desired item or enter numeric values. In some of the control procedures, 

the < and > keys are used to enter or exit the sub items.

Enables access to the desired item or entering of numeric values. In some of the control pro-

cedures, the < and > keys are used to enter or exit the sub items.

Used as the < key in the mode selection function.

• Used as the > key in the mode selection function.

• Displays online help messages on the message display when paper jam errors occur.

Finalizes numeric values and other selections.

GO

CANCEL

MENU

ENTER

READY

ATTENTION

INTERFACE SIZE

TYPE

DATA

?

Operator Panel

READY

DATA

ATTENTION

INTERFACE

SIZE

TYPE

GO

CANCEL

MENU

?

ENTER

IFS18+EE.book  Page 29  Thursday, August 9, 2001  3:38 PM

Содержание Ecosys FS-1800+

Страница 1: ...Installation Guide Cover fm Page 1 Thursday August 9 2001 3 37 PM ...

Страница 2: ...irmware contents of its read only memory This manual any copyrightable subject matter sold or provided with or in connection with the sale of the page printer are protected by copyright All rights are reserved Copying or other reproduction of all or part of this manual any copyrightable subject matter without the prior written consent of Kyocera Corporation is prohib ited Any copies made of all or...

Страница 3: ...f shipped components below List of Shipped Components STEP 1 Printer D C A B E Printer Power Cord E Installation Guide this booklet and other printed matter B Kyocera Mita Digital Library CD ROM B Waste Toner Bottle D Toner Container C Plastic Bag for Developer Unit A IFS18 EE book Page 1 Thursday August 9 2001 3 38 PM ...

Страница 4: ...r building entrances Sudden temperature or humidity changes Sources of high temperature for example near stoves or radiators Excessive dust Vibration Unstable surfaces and surfaces that are not level Ammonia or other harmful fumes If you are planning to fumigate the room or make liberal use of insecticide remove the printer first Excessive sunlight or humidity Lack of ventilation Low air pressure ...

Страница 5: ...ter top cover all the way 2 Take the toner container from the bag 3 With the label side down thoroughly shake the toner container in the direc tion of the arrow ten times or more to loosen and mix the toner inside 4 Carefully remove the protective seal 5 Install the toner container into the printer STEP 3 Top Cover Toner Container 10 times or more Protective Seal IFS18 EE book Page 3 Thursday Augu...

Страница 6: ...USH HERE Whenthetonercontainerfitsintoplace it will lock with a clicking sound 7 Close the top cover To remove the toner container Pull the lock lever green colored to the right and gently lift the toner con tainer Lock Lever IFS18 EE book Page 4 Thursday August 9 2001 3 38 PM ...

Страница 7: ...st be installed in the printer 1 Open the cap of the waste toner bottle 2 Openthesidecoverontheleftsideofthe printer 3 Insert the waste toner bottle as shown in the figure The bottle will be locked when it fits into place STEP 4 Cap Waste Toner Bottle Side Cover IFS18 EE book Page 5 Thursday August 9 2001 3 38 PM ...

Страница 8: ...ly inserted close the side cover To remove the Waste Toner Bottle While holding the waste toner bottle press the lock lever and then gently remove the waste toner bottle Lock Lever IFS18 EE book Page 6 Thursday August 9 2001 3 38 PM ...

Страница 9: ...ndthecom puter spowerswitchesand unplugtheprinter spowerplugfromthepower outlet Failure to do so may result in electrical shock A standard Centronics parallel interface connector and serial RS 232C interface connector IOIOI are located on the rear of the printer STEP 5 Printer Rear Parallel Interface Network Option Network Interface Card 3 3 V DC Serial Interface Power Supply Connector for option ...

Страница 10: ...g the other end of the printer cable into the computer s parallel interface connector Serial Interface Connection 1 Plug one end of the printer cable not included into the serial interface con nector on the rear of the printer The printer will work best if it is installed near the computer Theconnectingcableshouldbe shielded and not be longer than 3 meters 10 feet 2 Securely tighten the screws on ...

Страница 11: ... of the power cord plus extension should be 5 meters 17 feet or less Power Requirements To Connect the Power Cord Be sure the printer s power switch is turned off Only use the power cord supplied with the printer 1 Plug the power cord into the power cord connector on the rear of the printer 2 Connect the other end of the power cord into a power outlet Be sure to connect to a 3 wire grounded power ...

Страница 12: ...fer to the Operation Guide PDF file provided on the Kyocera Mita Digital Library CD ROM Standard size paper settings are indicated as fixed positions in the cas sette A paper cassette PC 60LG that can accommodate A5 to A4 Letter and Legal size paper is optionally available The following paper weights can be used with the printer The edges of paper are sharp When loading paper be careful not to cut...

Страница 13: ...o CUSTOMthepapersizemust be set into the printer on the operator panel See the Opera tion Guide PDF file provided on the Kyocera Mita Digital Library CD ROM 4 Adjust the position of the paper guides located on the left and right sides of the paper cassette Pull the release lever on the left side guide and slide to the desired paper size Paper Size Dial Paper Size Window Release Lever Paper Guides ...

Страница 14: ...adjust the paper guides and paper stop per to the size of the paper Adjust them so that theyare in light contact with the paper 6 Make sure that the edges of the paper are aligned Slide the paper into the paper cassette Do not load more paper than will fit under the load limits on the paper guides The paper cassette will hold approximately 500 sheets of paper with a 80 g m 21 lb basis weight or wi...

Страница 15: ...the printer Push it straight in as far as it will go There is a paper gauge on the right side of the front of the paper cassette to indicate the remaining paper supply When paper is exhausted the pointer will go down to the level of empty Clip Clip Paper Gauge IFS18 EE book Page 13 Thursday August 9 2001 3 38 PM ...

Страница 16: ...sizes are attached to the MP tray For stan dard paper sizes slide the guides to the position marked correspondingly 4 Align the paper with the paper guides and insert as far as it will go Donotloadmorepaperthanwill fit under the load limits on the inside of the MP tray MP Tray A4 LTR B5 A5 Paper Guides Load Limit IFS18 EE book Page 14 Thursday August 9 2001 3 38 PM ...

Страница 17: ...envelope on the printer and check that printing quality is satisfactory before purchasing To avoid trouble we recommend that envelopes be delivered face up using the option face up output tray Refer to next page Sometypesofenvelopesarenotsuitable for printing For details on suitable types of envelopes see the Operation Guidecontainedas a PDF file inthe CD ROM supplied with the printer Correct Corr...

Страница 18: ...be stacked with the printed side facing up reverse order or when you are printing on envelopes postcards transparencies or thick paper This face up output tray is a separate option Legal Size A4 Size Letter Size Paper Stopper Face up Output Tray IFS18 EE book Page 16 Thursday August 9 2001 3 38 PM ...

Страница 19: ...operunit needs to be filled with toner During this period the message display shows Please wait Adding toner 2 Wait until the READY indicator is also lit and the message display indi cates Ready The printer is ready to print Selecting a Message Language The default message language is English To change the message language to another follow the procedure described below If required your dealer can...

Страница 20: ... page indicating factory settings 1 Press the MENU key on the operator panel 2 Press the or key repeatedly until the message display shows Print Status Page 3 Press the ENTER key twice The mes sage display indicates Processing during printing of the status page then returns to Ready If the status page prints correctly printer setup is complete For details on usingthe printer refer to theOperation ...

Страница 21: ...aper pull it gently so as not to tear it Torn pieces of paper are difficult to remove and may be easily overlooked deterring the jam recovery Jam at the Rear Cover 1 While pulling the paper feed unit release lever pull out the paper feed unit 2 Open the rear cover and remove the jammed paper as shown in the figure Paper Feed Unit Paper Feed Unit Release Lever Rear Cover IFS18 EE book Page 19 Thurs...

Страница 22: ...ed unit 2 If paper is jammed before the registration roller remove it as shown in A If paper is jammed under the registration roller remove it as shown in B Registration Roller Registration Roller Paper Feed Unit Paper Feed Unit Release Lever A B IFS18 EE book Page 20 Thursday August 9 2001 3 38 PM ...

Страница 23: ...ovided for ventilation to ensure reliable operation of the productand to protectitfromoverheating these openingsmustnot be blocked orcovered The openingsshould never be blocked by placing the product on a bed sofa rug or other similar surface This product should never be placed near or over a radiator or heat register This product should not be placed in a built in installation unless proper venti...

Страница 24: ...that are covered by the operating instructions since improper adjustment of other con trols may result in damage and will often require extensive work by a qualified technician to restore the product to normal operation E If the product has been dropped or the cabinet has been damaged ISO 7779 Maschinenlärminformationsverordnung 3 GSGV 18 01 1991 Der höchste Schalldruckpegel beträgt 70 dB A oder w...

Страница 25: ...ufacturer and its merchandising companies retain the following technical documentation in anticipa tion of the inspection that may be conducted by the authorities concerned User s instruction that conforms to the applicable specifications Technical drawings Descriptions of the procedures that guarantee the conformity Other technical information Kyocera Mita Australia Pty Ltd 6 10 Talavera Road Nor...

Страница 26: ...tainer waste toner bottle and developer unit The procedure for removing these is as follows 1 Remove the toner container and waste toner bottle from the printer Put the toner container into theplasticbag inwhichitwassuppliedto preventspillingof toner Closethe cap of the wastetoner bottle tightly 2 Disconnect the connector of the developer unit from the printer and while pulling the developer unit ...

Страница 27: ...sing the printer for extended periods of time For details on the sleep timer function and printer power consumption refer to the CD ROM instruction manual provided with the printer Initial settings of the sleep timer function and power saved using the sleep timer function ENERGY STAR program guideline Group for Energy Efficient Appliances GEEA The goal of GEEA is efficient use of energy This produ...

Страница 28: ...forms duplex printing for short edge and long edge binding Attaches to the bot tom of the printer 6 Paper Feeder PF 60 Holds approximately 500 sheets of A5 to A4 Letter and Legal size paper Up to three paper feeders can be attached to the bottom of the printer unit Other Options Paper Cassette PC 60LG Holds A5 to A4 Letter and Legal size paper Memory DIMM CompactFlash card Microdrive Hard Disk Uni...

Страница 29: ...ts other than those granted you under this license The term Programs means the original and all whole or partial copies of it including modified copies or por tions merged into other programs IBM retains title to the Programs IBM owns or has licensed from the owner copyrights in the Programs 1 License Under this license you may use the Programs only with the device on which they are installed and ...

Страница 30: ...gardless of form more than two years after the cause of action arose If you acquired the Pro gram in the United States this license is governed by the laws of the State of New York If you acquired the Program in Canada this license is governed by the laws of the Province of Ontario Otherwise this license is governed by the laws of the country in which you acquired the Program Important note on the...

Страница 31: ...rinter s interfaces is currently active The default is no selection Paper size indicator Indicates the paper size of the current paper cassette The default is A4 A4 size Paper type indicator Indicates the paper type of the current paper cassette The default is PLAIN Key Function Switches the printer on line and off line Prints and feed out one page Abandons a printing job resets numeric values or ...

Отзывы: