


8 Kwiksol Instruction, Installation & Warranty Manual
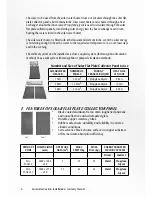
• For a flat roof, a flat roof frame is available from Kwikot.
• Careful inspection must be carried out to ensure that the
roof can support the weight of the entire solar installation
once it is filled with water.
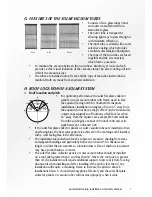
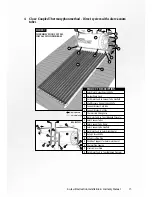
2. Determining the roof mounting location - Close Coupled and
Split Systems
•
Once the installation position has been determined outside on the roof for a
close coupled system, measure down the roof from the right side front edge of
the front foot of the solar water heater a distance of 2030mm and make a mark
on the roof tile. This position will be the bottom of the edge of the solar flat plate
collector panel/s mounting rail or the bottom edge of the frame for the solar
vacuum tubes. This procedure is not relevant for a split system.
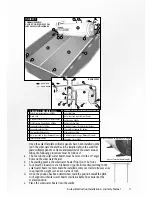
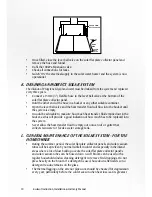
• A Pitch Roof Support with Panel Hooks is available from
Kwikot. The hook is fed under the roof tiles and hooked
around a strip of the roof brandering.
• Once the first hook is secure, place the bottom of solar
flat plate collector panel into the bracket and centre it
on the bracket. Repeat the process if a second solar flat
plate collector panel is to be used, using the second hook.
This procedure is not relevant for the fame for the solar
vacuum tubes.
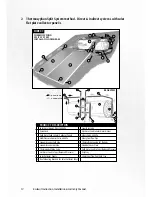
•
Where two solar flat plate collector panels are to be installed, proceed as follows
for both a close coupled and split systems:
a. Place the first solar flat plate collector panel in the mounting bracket at the left most
far end.
b. Loosely fit the two collector panel connectors to the two copper tube spigots on the
left side of the second solar flat plate collector panel.
c. Place the second solar flat plate collector panel on the second roof mounting bracket
and slide the two solar flat plate collector panels towards each other, until the two
copper tube spigots can be connected.
d. Tighten the compression nuts of the connector fittings taking care not to twist the
copper tubes of the solar flat plate collector panels. Use the correct size spanner and
ensure that the center nut is held steady whilst the compression nuts are tightened.
e. Move the two solar flat plate collector panels so that they centrally located on the
two roof mounting brackets installed beforehand.
•
For a close coupled system, fit the pitch roof support above the solar flat plate
collector panel/s or frame for the solar vacuum tubes, which will hold the solar
water in place on the roof.
•
Remove any labels on the glass of the solar flat plate collector panel/s, as not
doing so with affect the performance of the panel/s.
Содержание Kwiksol
Страница 1: ...INSTRUCTION INSTALLATION WARRANTY MANUAL...
Страница 26: ...26 Kwiksol Instruction Installation Warranty Manual POSTAGE STAMP KWIKOT PTY LTD PO BOX 389 Benoni 1500...
Страница 27: ...Kwiksol Instruction Installation Warranty Manual 27...
Страница 28: ...28 Kwiksol Instruction Installation Warranty Manual 11 2016...