background image

   Lockout Tagout Procedure

1-9

RT-2 Operation and Service Manual

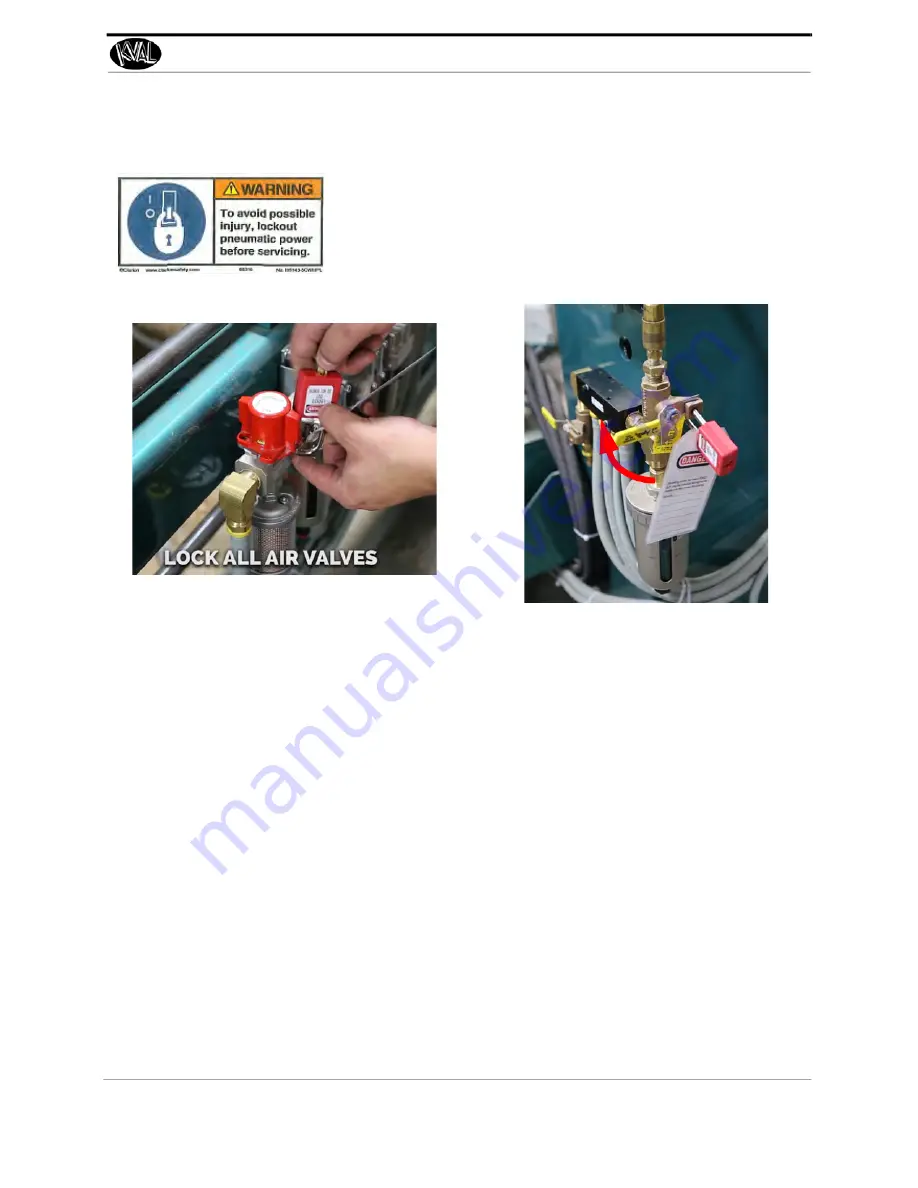
Lockout Tagout Air Supply

Start Maintenance

7. 

Once the locks and tags are in place and all personnel are clear, attempt to operate 

the machine to ensure equipment will not operate. 

8. 

 Maintenance or repairs may started. 

Post Maintenance Steps

9. 

After maintenance is completed, the person performing the work must ensure all 

tools, spare parts, test equipment, etc., are completely removed and that all guards 

and safety devices are installed.

10. 

Before removing the locks and tags, the person who attached them shall inspect the 

equipment to ensure that the machine will not be put in an unsafe condition when 

re-energized.

11. 

The lock and tag can now be removed (only by the person(s) who placed them), 

and the machine can be re-energized.

12. 

The tags must be destroyed and the locks and keys returned to the lockout center. 

6. 

Turn all air valves to the OFF position and place a pad

-

lock through the hole (see illustration below).

NOTE:

 Place your tag on the padlock, as per the 

tagout guidelines.

Содержание RT-2

Страница 1: ...Innovation Quality Honesty Operation and Service Manual Published July 2 2021 RT 2 Auto Feed Table RT 2 Operation and Service Manual ...

Страница 2: ...of Microsoft Corporation KvalCAM is a registered trademark of Kvalinc All other products are trademarks or registered trademarks of their respective holders all rights reserved Reference to these products is not intended to imply affiliation with or sponsorship of Kval Incorporated Contacting KVAL Customer Service For further information about this manual or other Kval Incorpo rated products conta...

Страница 3: ...ur user experience with our product that is the manual the machinery the software etc What was easy or difficult to use or to learn If you could change something about the design what would it be Please email your comments and suggestions for improve ment to userexperience kvalinc com NOTE This is not a customer support email link For that please refer to the Customer Service contact information a...

Страница 4: ...ir Supply 1 9 Start Maintenance 1 9 Post Maintenance Steps 1 9 Zero Energy to Start Up 1 10 Getting Help from KVAL 1 12 On Line Help 1 13 Safety Sign Off Sheet 1 15 A Note to the Operator 1 15 Chapter 2 Operation and Lubrication of the RT 2 About the RT 2 2 2 Tour of the RT 2 Transfer Table 2 2 The Normal Process of a RT 2 2 3 About the RT 2 as an Inspection Table 2 4 Typical Controls for a Inspec...

Страница 5: ...delines Procedures describing Lockout Tagout page 1 7 Zero Energy to Start Up Procedure to power up your machine for the first time page 1 10 Getting Help from KVAL This section describes the method to con tact the KVAL Service Center for help The section includes how to get information from the specification plate tor provide to KVAL service center hours and return procedures page 1 12 Safety Sig...

Страница 6: ... of a package delivered with the machine line Integration Package includes the following Operation Manual includes the following Chapter Title Description 1 Introduction Safety Information 2 About the RT 2 Descriptions of RT 2 operation Description of the lubrication schedule ...

Страница 7: ...maged or illegible There are three types of warning labels or decals DANGER means if the danger is not avoided it will cause death or serious injury WARNING means if the warning is not heeded it can cause death or serious injury CAUTION means if the precaution is not taken it may cause minor or moderate injury Safety Guidelines In addition to the caution and warning labels affixed to this machine ...

Страница 8: ...down Never perform any maintenance unless machine is at zero state Never clean the machine while it is running Never walk away from the machine while it is running When the Machine is ON The compressed air system connected to this machine should have a three way air valve for shut off and pressure relief All cylinders on machine are under high pressure and can be very dangerous when activated Befo...

Страница 9: ...cated at different locations Before performing any repairs or mainte nance lockout and tagout must be installed at all locations All maintenance and repairs to electrical circuitry should only be per formed by a qualified electrician Still has power in OFF position Electrical Prior to performing any maintenance repairs cleaning or when clearing jammed debris you must disconnect tag out or lock out...

Страница 10: ...ent If you believe any part or operation of this machine is in violation of any health or safety regulation STOP pro duction It is your responsibility to immediately protect your employees against any such hazard Additional detailed safety guidelines are included in the operating instructions of this manual KVAL will be pleased to review with you any questions you may have regarding the safe opera...

Страница 11: ...k and tag on each disconnect Only each operator may remove their own lock and tag Important When many people are all working on the same machine you will need a multiple lockout device such as the one shown here Follow the P R O P E R lockout rule of thumb P Process shutdown R Recognize energy type electrical pneumatic mechanical etc O OFF Shut off all power sources and isolating devices P Place l...

Страница 12: ...s air supply and pressure spring tension weight shifts etc 2 Inform all affected personnel of the eminent shutdown and the duration of the shutdown 3 Obtain locks keys and tags from your employer s lockout center 4 Turn off machine See Chapter 2 for power down and power up procedures 5 Turn the disconnect switches on ALL electrical and frequency panels to the OFF position Then push the red tab to ...

Страница 13: ...c are completely removed and that all guards and safety devices are installed 10 Before removing the locks and tags the person who attached them shall inspect the equipment to ensure that the machine will not be put in an unsafe condition when re energized 11 The lock and tag can now be removed only by the person s who placed them and the machine can be re energized 12 The tags must be destroyed a...

Страница 14: ...lock and tag This will ensure that all oper ators are in a safe place when the equipment is started Perform Visual Checks If the equipment is too large to see all around it station personnel around the area and sound the personnel alarm before starting the equipment If your operation is more complex your company s comprehensive safety procedure may involve additional steps You will need to ask you...

Страница 15: ...Manual work environment safe for you and your fellow workers Be sure to follow the P R O P E R lockout tagout procedures and that those around you do also Close the Cage Gate Verify all cage gates are securely closed Ensure all safety protocols are in effect ...

Страница 16: ...nd air print number 2 Contact our customer support team In the U S and Canada call 800 553 5825 or fax 707 762 0485 Outside the U S and Canada call 707 762 7367 or fax 707 762 0485 Email address is service kvalinc com Hours 6 00 AM to 4 00 PM Pacific Standard Time Monday through Thursday 6 30 AM to 1 30 PM Pacific Standard Time Friday What is the extent of the failure reason for return What are th...

Страница 17: ...Kval customer support for a Return Material Authorization RMA When you call Have the packing slip or invoice numbers available Have the documented reason for return available 4 Send the merchandise back to Kval Make sure the item s you are returning are securely packaged and well protected from shipping damage Include the packing slip or invoice numbers Include the documented reason for return Inc...

Страница 18: ...ollow my company s safety procedures I have read and understand these guidelines Machine Safety Concerns I have been given a tour of the machine and understand all the safety labels E Stops and the actions to take in case of an emergency I will make sure all guards are in place before operation I will turn off the compressed air before loading hardware staples screws etc I will turn off the electr...

Страница 19: ...e About the RT 2 Description of an RT 2 table as a transfer table page 2 2 About the RT 2 as an Inspection Table Description of an RT 2 table as an inspection table page 2 4 Lubrication Schedule A time table to schedule lubrication Types of grease to use in lubrication page 2 6 Lubrication Requirements Information about lubrication practices page 2 7 Lubrication Points RT 2 Location of lubrication...

Страница 20: ...e used in any machine line The RT 2 can also be setup as an Inspection Table and can be paired with an AR HQ2 FIGURE 2 1 RT 2 in a 990 Series Machine Line Tour of the RT 2 Transfer Table The door is path is controlled by the sensors on the table The sensor circuitry and power are tied into a previous machine s Electrical Box as a node FIGURE 2 2 RT 2 Table Part Identification Sensors Sensors may v...

Страница 21: ...2 A door is fed in from previous machine The door has infeed sensors to trigger a Door into the table machine state The sensors on the table send door information to PLC of a previous machine to be processed The door has outfeed sensors to trigger a Door out of table machine state ...

Страница 22: ...he table does not stop the door for inspection and is fed through to the next machine Inspect Every th Door The table will pause the door at every th door for inspec tion Repeat the actions as in inspection for every door Pause All The table will pause at every door The red Status Light will blink and the Light Curtain will be disabled The operator can inspect the door After is inspection is compl...

Страница 23: ...able will pause the door ant the interval selected The Light Curtain will dis able The Status Light will blink Enter the work area and inspect the door After inspection leave the work area Press the Continue Cycle Button to re enable the Light Curtain and continue process No pausing for inspection the door will feed through as nor mal Status Light Continue Cycle Some machines may have a Call Door ...

Страница 24: ...Pillow Block Bearing Flange Block Bearing Ball Screw Every 80 Hours of Machine Operation Idler Shafts Pulley Monthly Tapered Bearing One Pump 4 Times a Year Air Line Lubricator One drop of oil every 2 or 3 cycles Check the lines every week to two weeks Note Some CNC Machines drop every 5 10 cycles Either lubricant listed below is approved to use KVAL P N SYSLUBG Chevron AW Hydraulic Oil 32 G C lub...

Страница 25: ...he Zerk fitting is basically a valve that opens under pressure to allow lubricant to pass through a channel and be forced into the voids of the bearing When the pressure stops the ball returns to its closed position The ball excludes dirt and functions as a check valve to prevent grease escaping back out of the fitting The ball is almost flush with the surface of the fitting so that it can be wipe...

Страница 26: ...d align the bearing Flanges are also used with bearings on external housings used to mount a bearing unit A mounted bearing unit acts as a system to position the bearing securely for reliable operation FIGURE 2 4 Flange Bearings Greasing Flange Bear ing Bearing Housings Approximatively 1 Gram one pump from grease gun of Dura Lith Grease KVAL P N Lube EP 2 Every 250 hours of operation Lip ...

Страница 27: ...e For recom mended greasing schedule see Lubrication Schedule on page 2 6 Note Some bearings may be difficult to get access to Use an extender to reach tight areas 1 Perform Lockout Tagout 2 Identify zerk fittings and apply EP 2 grease See Figure 2 5 3 After lubrication is completed reverse Lockout Tagout FIGURE 2 5 RT 2 Lubrication Points Feed Shaft Assem bly X2 ...

Страница 28: ...partment Kval Incorporated 825 Petaluma Boulevard South Petaluma CA 94952 Contacting KVAL Phone and Fax In the U S and Canada call 800 553 5825 or fax 707 762 0485 Outside the U S and Canada call 707 762 7367 or fax 707 762 0485 Email service kvalinc com http www kvalinc com ...

Отзывы: