

5. IP Address Assignment
To make it accessible on the network, the Network Camera must be assigned an IP address.
Note:
•
A network DHCP server is optional.
•
The Network Camera has the default IP address 192.168.0.123.
•
If IP assignment fails, check that there is no firewall blocking its operation and check that the Network
Camera and your computer's IP are located on the same subnet.
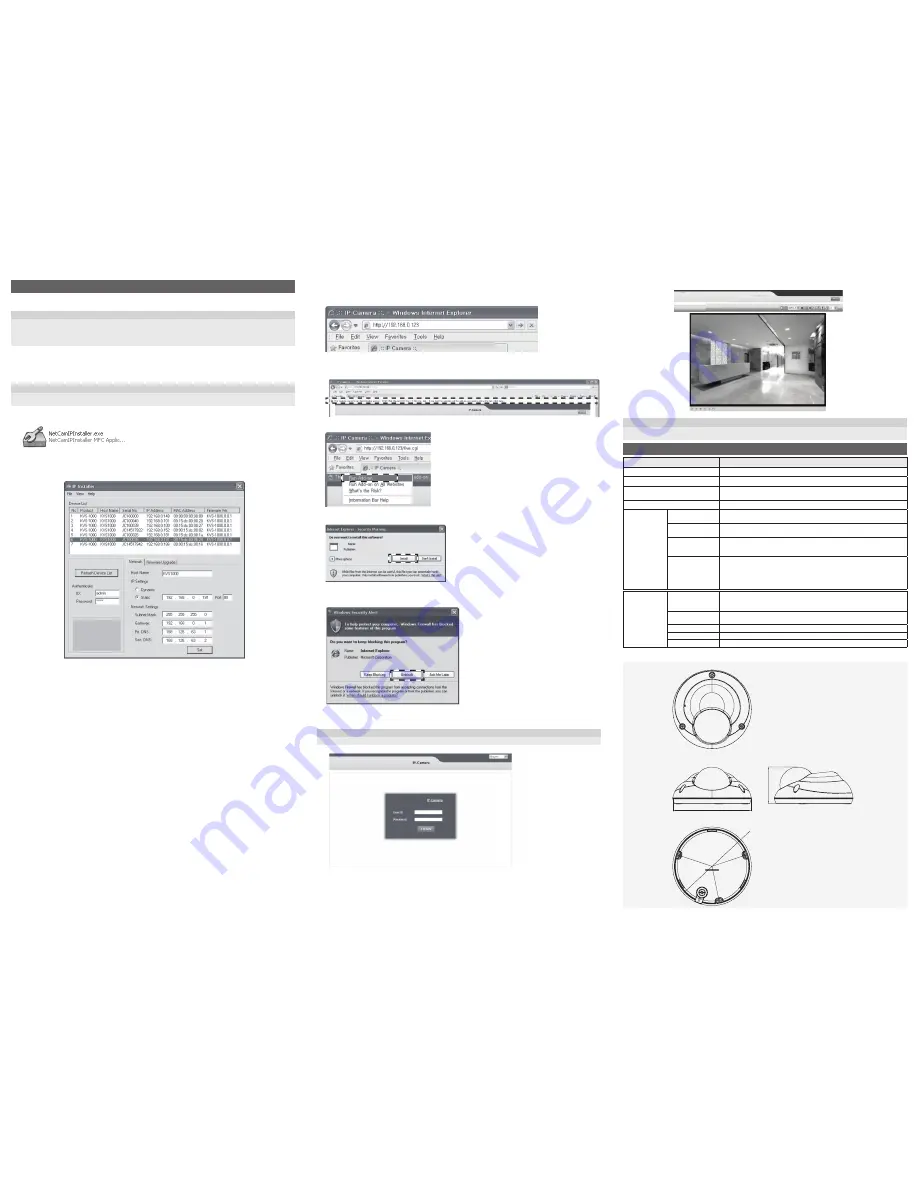
Assign an IP address using IP Installer
The IP installer automatically searchs for and displays network devices on your network.
The application can also be used to manually assign a static IP address.
Note:
The computer running the IP installer must be on the same network segment (physical subnet) as the Network
Camera.
1. Check that the Network Camera is connected to the network and that power has been supplied.
2. Start NetCAM installer.
3. When the Network Camera is displayed as shown above, select the unit that needs to be assigned
an IP.
A. Refresh Device List – Rescan local network to find the Network Camera.
B. Authenticate – Enter the administrator ID and password.
* Default User ID and Password is [ID: admin, Password: admin]
C. Host Name – Enter the Host Name of the Network Camera.
D. IP Settings
i. Dynamic – Assign a dynamic IP address automatically from the DHCP server on your network.
ii. Static – Assign a static IP address manually.
iii. Port – Enter the HTTP port the Network Camera will use. The default setting is 80.
Alternatively, any port in the range 1024-65535 may be used, but check first with your
system administrator before changing the default setting.
E. Network Settings
i. Subnet Mask – Specify the mask for the subnet the Network Camera is located on.
ii. Gateway – Specify the IP address of the default router (gateway) used for connecting devices
attached to different networks and network segments.
iii. Pri. DNS – Enter the IP address of the primary DNS server. This server provides the
translation of host names to IP addresses on your network.
iv. Sec. DNS – Specify the IP address of the secondary DNS server. This will be used if the
primary DNS server is unavailable.
4. Click the “Set” button to save the configuration.
Accessing the Network Camera
1. Start your browser(when you first run ActiveX to install, run “IE as Administrator” on Windows or Vista).
2. Enter the IP address or host name of the Network Camera in the Address field of your browser.
3. If you are accessing the Network Camera for the first time, you will see the following warning
message as shown below.
4. Click the warning message and select “Install ActiveX Control…”.
5. Click “Install” to install the KT&C Web Viewer.
6. If a Windows Security Alert pop-up appears, click “Unblock”.
7. After installing the Web View ActiveX Control, a Login page will be displayed.
Enter the user ID and password.
Note:
Default User ID and Password is [ID: admin, Password: admin]
8. The video image displays in your browser.
Note:
To view streaming video in Microsoft Internet Explorer, you must set your browser to allow the “Web Viewer” to be
installed on your computer. This ActiveX component is installed the first time a video stream is accessed.
6. Product Specifications
ITEM
DESCRIPTION
Image Device
2.1 Mega Pixel 1/3” SONY Progressive CMOS
Lens(Unit: mm)
Board Lens
Minimum Illumination
Standard type : 0.1 Lux at 30 IRE, F1.4
LED type : 0 Lux at 30 IRE, F1.4
IR LED
15 ea
Video
Video Codec
H.264 Main Profile
Motion JPEG
Resolutions
(H.264/MJPEG)
H.264 : MAX 192 Analog Output @ 30fps
MJPEG : MAX 1280x720 @30fps
Video Streaming
Simultaneous Motion JPEG and H.264
Controllable frame rate and bandwidth
Constant and variable bit rate (H.264)
Image Settings
Brightness, Contrast, Saturation, Sharpness, White Balance,
Exposure Control, Back Light Compensation
Compression levels : 100 (Motion JPEG)
Viewer Magnification : 0.5x, 1x, 1.5x, 2x
Overlay capabilities : time, date, text, privacy mask
General
Power
LED type: DC12V(±10%), Max. 320mA
Standard Type: DC12V(±10%), Max. 210mA
Power over Ethernet Class 3 (IEEE 802.3af)
Operating
Conditions
Temperature: - 10°C ~ +50°C (14°F ~ 122°F)
Humidity 20-80% RH (non-condensing)
Dimension(mm) Ø120 x 55
IP Rating
Weather Proof
Weight
Approx. 350 g
Ø120
55
Ø106
Dimensions
(Unit:mm)


