7. Functional checks
This section describes some functional checks which
can be performed without using any special
equipment. It
must
be noted that these checks are
very preliminary and do
not
check the total
functionality of the primary head or the signal
converter.
7.1 Primary head functional checks
7.1.1 Vortex sensor
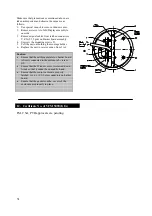
To perform preliminary testing of the vortex piezo
sensor, the signal cable of the piezo sensor should be
disconnected from the signal converter electronics.
To do this :
always switch-OFF power source
before commencing work!
1.
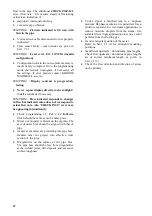
Use the special wrench to remove the cover
from the electronic compartment. Ensure that
screw threads of electronic compartment cover
are well greased at all times!
A
Power
supply
board
D
D
A
CPU board
Z
Y
X
Preamplifier
board
Flat cable
to Display
board
2. Remove
screws
A
and fold display board to side.
3. Remove the piezo cable from the preamplifier
board at location
Z
by its connector (and not by
pulling cable itself!)
4. Do the following tests.
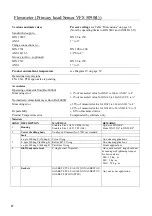
Capacitance between centre pin and each outer pin.
ANSI
DN
3/8” S to 1”
10S to 25
1.5”, 2”
40, 50
3” & above
80 & above
C(nF) 0.8 to 1.5
2.0 to 3.4
2.7 to 4.5
Resistance
between centre pin and each outer pin >
200 M ohm. Also resistance between each sensor
wire pin and earth should be > 200 M ohm.
Part C Function Checks and Trouble Shooting hints
5.
Re-assemble converter in the reverse order
7.1.2 Temperature Sensor
PT-1000 temperature sensor can be checked by
measuring its resistance.
Always switch-OFF power source before
commencing work!
Follow the steps 1, 2 same as in the above Section.
7.1.1
3.
Remove the temperature sensor cable at location
Y
of the preamplifier board. Pull cable by its
end connector and
not
by cable itself!
4.
Resistance
between the 2 pins should be within
1K [0
0
C] - 1.193k [50
0
C] depending on the
ambient temperature. For other temperatures
resistance values as per DIN43760.
5.
Re-assemble converter in the reverse order.
7.2 Signal converter functional checks.
7.2.1 Self
diagnostics
On power-ON VFC 090 itself carries out diagnostic
checks wherein the instrument checks its functional
elements as far as possible. Diagnostic failure result
in fatal errors and are indication of a hardware fault
within electronics. Usually it is necessary to replace
electronics in such cases.
Meanings of diagnostic error messages are given
below for information purpose.
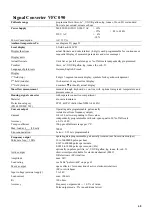
Error message
Meaning
INTL.ERR20
RAM (read/write memory) failed
INTL.ERR21
EPROM (program memory) failure
INTL.ERR22
GA (Gate Array) failure
INTL.ERR23
Interrupt function failure
INTL.ERR24
LCD (display) controller failure
INTL.ERR25
Timer channel #0 failure
INTL.ERR26
Timer channel #1 failure
INTL.ERR27
Timer channel #2 failure
INTL.ERR28
A/D converter #1 failure
INTL.ERR29
A/D converter #2 failure
INTL.ERR30
NOVRAM(nonvolatile mem.)failure
INTL.ERR31
EEPROM failure
INTL.ERR32
UART (Communication controller)
failure
INTL.ERR33
KEYS (3 Keys on display board)
problem
47
Содержание VFM 5090
Страница 1: ...4 2001 Vortex flowmeter Installation and operating Instructions VFM 5090 I ...
Страница 6: ...Sandwich Version Flanged Version 3 ...
Страница 55: ......
Страница 56: ...13 Nameplates of VFM 5090 I Ex 51 52 ...
Страница 66: ...DIMENSION DETAILS 62 ...


