


OPERATION
5
25
OPTISYS CL 1100
www.krohne.com
03/2016 - 4002492302 - MA OPTISYS CL 1100 R03 en
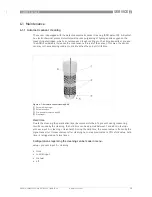
Step 2: Configure/adjust the temperature sensor for measurement
Set the value and press
^
^
^
^
to confirm the entered value. The temperature sensor has been
adjusted.
If necessary, enter the temperature correction in Kelvin so that the signal converter shows the
same temperature as the reference thermometer.
Step 2a: probe Pt100
probe Pt100
probe Pt100
probe Pt100 or Pt1000:
Pt1000:
Pt1000:
Pt1000:
Read the currently measured temperature of the Pt100 / Pt1000 temperature sensor from the
measurement screen and write it down.
Measure the temperature with a reference thermometer and check if it deviates from the temperature
measured by the Pt100 / Pt1000.
Press >>>> for more than 2.5 seconds, then release the button. You are now on the main menu level.
Press
or
until the main menu setup
setup
setup
setup is highlighted.
MAIN MENU
A quick setup
B test
> C setup
> C setup
> C setup
> C setup
D service
Press >>>> to enter the chosen menu.
You are on the first submenu level. In the upper line of the display "SETUP"
and "C1" appears, beneath the submenu process input A
process input A
process input A
process input A is highlighted.
Press >
>>> to enter the chosen menu process input A
process input A
process input A
process input A.
Press
or
until the main menu temperature
temperature
temperature
temperature is highlighted.
Press >
>>> to enter the chosen menu. The submenu probe Pt100 / 1000
probe Pt100 / 1000
probe Pt100 / 1000
probe Pt100 / 1000 is
highlighted.
Press
or
until the submenu correction
correction
correction
correction is highlighted.
Press >
>>> to enter the chosen menu.
INFORMATION!
A separate temperature sensor has to be connected to "Pos.A" and configurated on process
input A.


