background image

• Do not carry the machine by the ca-

ble.

• The mains receptacles in the work-

ing area must be protected by a re-
sidual current circuit breaker (RC).

• For the attachment of identification

markings on the machine, do not
drill into the housing. The protective
insulation would be shorted. Use
stickers.

• When the drill unexpectedly jams,

the machine kicks back. Therefore,
always take a secure stance and
hold the machine firmly with both
hands.

Putting into Operation

Check before putting into operation
that the mains voltage agrees with
the voltage specified on the name-
plate of the machine.

Switching On/Off

Press or release the On/Off switch 6.
The On/Off switch can be locked on
with the locking button 7. To release,
briefly press and release the On/Off
switch 6.

Drilling - Impact drilling

For drilling, place the selector 4 in the

 position.

For impact drilling, set to 

. The

switch-over can best be performed at
a standstill. Only after the On/Off
switch 6 is actuated and the machine
starts does the gear box shift to the
selected mode.
Note: Left rotation when impact drill-
ing damages the drill.
When hammer drilling, use exclu-
sively drills with hard metal in-
serts and SDS-Plus shafts.
 The
use of commercially available ma-
sonry drills with cylindrical shafts by
means of the adapter 9 and the nor-
mal drill chuck in conjunction with the
pneumatic impact mechanism is not
possible.

Speed control

With the On/Off 
switch 6, two speed 
steps can be se-
lected.

For hole starting, press the On/Off
switch 6 lightly (hole starting step).
For full drilling performance, press in
the On/Off switch 6 completely.

Rotational direction switching

Operate the rota-
tional direction 
switch 8 only when 
the machine is at a 
standstill!

Take hold of the rotational direction
switch 8 on both sides.
Right rotation:
Set the rotational direction switch 8
to “R”.
Left rotation:
Set the rotational direction switch 8
to “L”.
Important!  Press the rotational di-
rection switch 8 in each case to the
stop on the housing, i. e. until it can
be felt to engage.

If the rotational direction switch 8
is set between the positions “R”
and “L”, the machine cannot be
switched on.

Inserting/Removing Tools

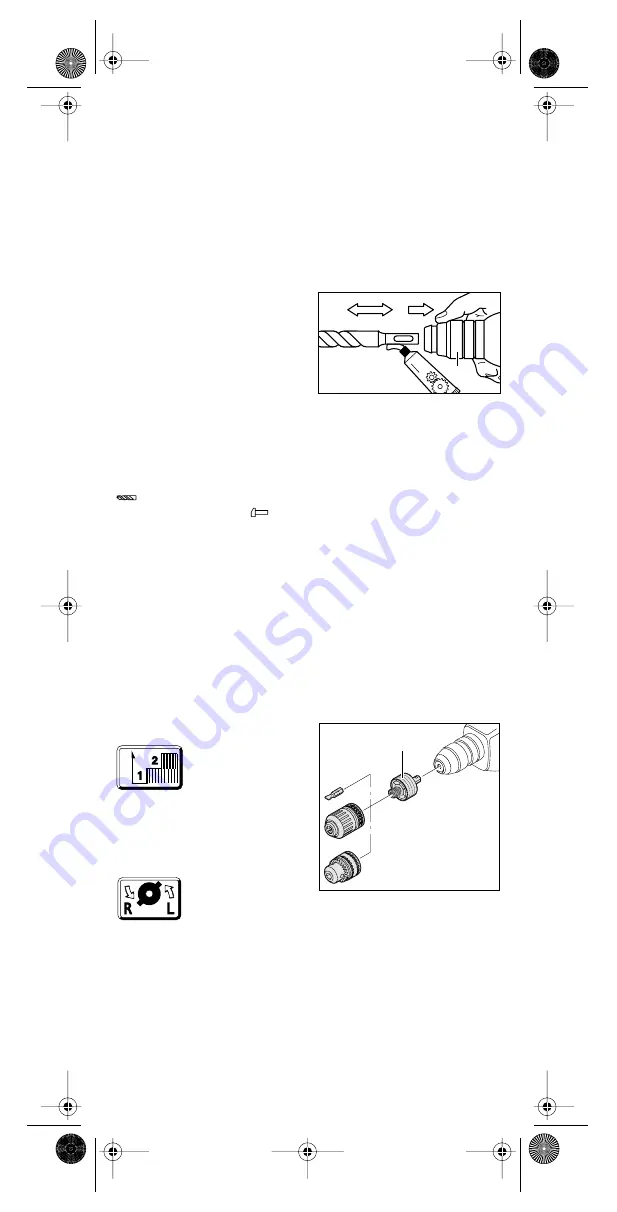
The tool holder 1 clamps the drilling
tools without using a tool key.

Inserting Tools

• Before any work on the machine

itself, pull the mains plug!

Clean and lightly grease the tool
shaft.

Pull back the unlocking collar 3. In-
sert the tool while turning into the tool
holder until it latches. Release the
unlocking collar. Check whether the
tool is firmly seated.
Take care that the dust protection
cap 2 is not damaged.
Replace damaged dust protection
caps!

Removing Tools

Slide the unlocking collar 3 to the
rear and pull out the tool.

Drill Chuck (Accessory)

For drilling work in metal, wood and
plastic with drills that have normal
shafts, a drill chuck (13 mm max.
chuck opening) is available. The drill
chuck is mounted on the adapter 9
(accessory) for screwdriver bits.  All
common drill chucks with
1/2" x 20 UNF 

internal 

threads

(13 mm max. chuck opening) can be
used.

Mounting the chuck

• Before any work on the machine

itself, pull the mains plug!

Clean the threads of the drill chuck
(accessory) and the adapter 9 (ac-
cessory).

Screw the drill chuck onto the 
adapter and tighten firmly (approx. 
30 Nm). Clamp in a vise for tighten-
ing the adapter, for example. Clamp 
an Allen key in the drill chuck and use 
it to tighten the chuck. Then lock the 
adapter in the tool holder the same 
as a drill.

SPEED

Fett

 3

 9

PK 450 HM - D +GB+F  Seite 5  Donnerstag, 24. Januar 2002  9:03 09

Содержание PK 450 HM

Страница 1: ...umatik Bohrhammer Pneumatic Drill Hammer Perforateur pneumatique PK 450 HM Bedienungsanleitung Operating Instructions Mode d emploi 30805 0304 HD PK 450 HM D GB F Seite 1 Donnerstag 24 Januar 2002 9 03 09 ...

Страница 2: ... tragen Kein asbesthaltiges Material bear beiten Gerät nicht am Kabel tragen Steckdosen im Außenbereich müs sen über Fehlerstromschutzschal ter FI abgesichert sein Um die Maschine zu kennzeichnen darf das Gehäuse nicht angebohrt werden Die Schutzisolation wird überbrückt Verwenden Sie Klebe schilder Wenn der Bohrer unerwartet fest klemmt reagiert die Maschine ruck artig Nehmen Sie deshalb immer ei...

Страница 3: ...häuse durchdrücken d h bis er spürbar einrastet Steht der Drehrichtungsumschal ter 8 zwischen Pos R und L kann die Maschine nicht einge schaltet werden Werkzeug entnehmen einsetzen Die Werkzeugaufnahme 1 spannt Bohrwerkzeuge ohne Werkzeug schlüssel Werkzeug einsetzen Ziehen Sie vor allen Arbeiten am Gerät den Netzstecker Reinigen Sie den Werkzeugschaft und fetten Sie ihn leicht Ziehen Sie die Entr...

Страница 4: ...nden Recycling Durch Ihre modu lare Bauweise können Kress Ma schinen sehr einfach in ihre wiederverwertbaren Grundwerk stoffe zerlegt werden Geben Sie Ihre ausgesonderte Kress Maschine beim Handel ab oder schicken Sie sie direkt an Kress Änderungen vorbehalten 1 Tool holder 2 Dust protection cap 3 Unlocking collar 4 Drilling Impact drilling selector 5 Ventilation slots 6 On Off switch 7 Locking bu...

Страница 5: ...direction switch 8 only when the machine is at a standstill Take hold of the rotational direction switch 8 on both sides Right rotation Set the rotational direction switch 8 to R Left rotation Set the rotational direction switch 8 to L Important Press the rotational di rection switch 8 in each case to the stop on the housing i e until it can be felt to engage If the rotational direction switch 8 i...

Страница 6: ...rch nicht autorisierte Reparaturstellen führen zum Erlöschen der Garan tie Dem Verschleiß unterworfene Teile sind von Garantieleistungen ausge schlossen 4 Garantieansprüche können nur bei unverzüglicher Meldung von Mängeln auch bei Transportschäden anerkannt werden Durch Ausführung von Ga rantieleistungen wird die Garantiezeit nicht verlängert 5 Bei Störungen bitte Gerät mit ausgefüllter Garantiek...

Страница 7: ...ise électrique Ne jamais travailler avec un cordon d alimentation endommagé Garantie Karte Guarantee card Bon de Garantie Bitte sofort ausfüllen und aufbewahren Please fill in immediately and keep in safe place Veuillez remplir aussitôt et conserver Käufer Purchaser Acheteur Verkauft durch Dealers name Vendeur Kaufdatum Date purchased Date d achat Serie No Serial No No de serie Typ Type Type PK 45...

Страница 8: ...iliser des forets à pierre à queue cylindri que comme on les trouve dans le commerce avec l adaptateur 9 et le mandrin de perçage habituel en tra vaillant avec le mécanisme de frappe pneumatique Réglage de la vitesse de rotation A l aide de l interrup teur Marche Arrêt 6 il est possi ble de choisir entre deux vitesses de ro tation différentes Pour démarrer le perçage appuyer légèrement sur l inter...

Страница 9: ...qu après avoir mis les lunet tes de sécurité et la protection acousti que Ne pas exercer de pression exagé rée Cela ne contribue pas à amélio rer les performances de la machine Avant la mise en service contrôler si le commutateur 4 est bien encli queté dans la position Perçage dans du carrelage Le perçage d un carreau de faïence doit s effectuer à petite vitesse N ac tiver le mécanisme de frappe q...

Страница 10: ... 32 0 14 25 74 75 e mail info present be France S A R L INDUBA 4 Rue du Viaduc B P 87 F 01130 Les Neyrolles Téléphone 33 0 4 74 75 01 33 Téléfax 33 0 4 74 75 23 62 e mail induba online fr Sverige AB Novum Mörsaregatan 8 S 25466 Helsingborg Phone 46 0 42 15 10 30 Telefax 46 0 42 16 16 66 e mail mail abnovum se Norge Ifö Electric AS P O B 336 Alnabru Brobekkveien 115 B N 0614 Oslo Phone 47 23 37 81 ...

Отзывы: