14
OPERATING INSTRUCTIONS
Document: DOK-029
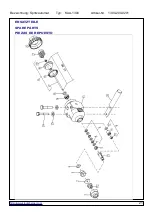
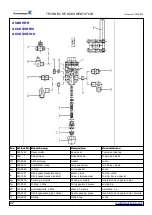
Remove the gasket (4)
Unscrew the screw (5) or the needle guide (11) (take
care not to damage the slot for the screwdriver!)
Pull out the packing (6) or gaskets (10 and 12) (use
a wire hook to pull out the packing consisting of 3
gaskets and 3 collars. Take care not to damage an
y
threads!)
Shaft ring gaskets
Unscrew the end cap (22)
Remove the spring (21)
Pull out the piston, cmpl. (16)
Pull the gasket (18) off the shaft ring (19)
Unscrew the threaded ring (14) (take care not to
damage the slot for the screwdriver!)
Pull out the gasket (15) - e.g. using a wire hook
Valve spring
The automatic spray gun type KAA-1300 can be operat-
ed using different material pressures up to max. 25
MPa (250 bar). Perfect sealing between valve needle
(17) and valve seat screw (3) is only assured using the
suitable valve spring (21). The available valve springs
are colour-coded; blue up to 10 MPa (100 bar); yellow
up to 20 MPa (200 bar), and black up to 25 MPa (250
bar). To change the valve spring:
Unscrew the end cap (22)
Replace the spring (21) with a different one
Screw the end cap (22) back on
i
Assembly is performed in the reverse order. Lightly
lubricate the moving parts using a suitable grease,
e.g. article no. 7026-500 from Krautzberger GmbH
(supplied in 250 g cans). Clean soiled parts, and replace
parts which no longer function properly. Ensure correct
seat of gaskets!
i
Always change the valve seat screw (3) and the valve
needle (17) together! Following assembly of the parts
(17) to (20), the piston, cmpl. (16) must not be longer
or shorter than 69 mm overall! Occasionally check the
moving parts for free range of motion and lubricate with
grease if necessary!
CLEANING, MAINTENANCE, MATERI-
AL CHANGE
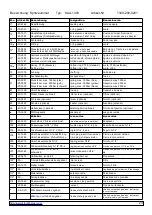
Wearing parts such as material nozzle (112), valve seat
screw (3) and valve needle (17), gaskets (2, 4, 7, 10, 12,
15 and 18) and collars (8) as well as fastening elements
(screws through the boreholes (B)) should be checked
at appropriate intervals and replaced if necessary (e.g. if
the valve needle does not close sufficiently or if there is
uncontrolled discharge of coating substance or air, or
displacement of the automatic spray gun on the fasten-
ing device). Tighten loose fastening screws!
(!) DANGER
DURING MAINTENANCE AND REPAIR WORK AND
WHEN CHANGING THE NOZZLE, FIRST CLOSE THE
MATERIAL FEED AND THEN THE CONTROL AIR SUP-
PLY. ALWAYS WAIT UNTIL THE PRESSURE HAS DIS-
SIPATED!. SEE HAZARD AND WARNING NOTES!
i
The automatic spray gun is never to be dismantled
into its individual parts except when this is necessary
for repair or maintenance purposes. When cleaning
and during material change, the gun should be rinsed
through thoroughly using a detergent recommended by
the supplier of the coating substance until it is dischar-
ged clear.
i
If the automatic spray gun is to be dismounted when
work has been completed, ensure that no residues of
toxic, flammable or explosive material or detergent
remain in the automatic spray gun (avoidance of hazard
during storage or transport).
i
The automatic spray gun should never be completely
immersed in detergent! This could destroy the gas-
kets and rinse out the lubricant.
i
During lengthy breaks in operation, the automatic
spray gun should be stored in a suitable place in a
cleaned condition.
i
Do not clean material and air nozzles using hard,
sharp-edged objects!
(For cleaning of the nozzles, we
recommend our brush set.
A cloth soaked in deter-
gent is recommended for external cleaning.
i
Vertical relative to the compressed air connection is a
duct (K) through the automatic spray gun in which
material may collect in the event of even minor leaks.
Check this duct from time to time. If material is dischar-
ged, clean the duct and replace the wearing parts (gas-
kets, collars, valve needle etc.).
DISPOSAL
Following dismantling of the automatic spray gun type
KAA-1300, the metal parts can be sorted and forwarded
to a recycling process; the non-metal parts should be dis-
posed of as special waste.
TECHNICAL DATA
Operating pressures / Operating tempera-
ture
Max. material pressure: .......................25 MPa (250 bar)
Max. material temperature: .....................................50°C
Min. control air pressure: .......................0.4 MPa (4 bar)
Max. control air pressure: ......................0.8 MPa (8 bar)

