background image

Kramer Electronics Ltd. 


VP-444 

– Using Embedded Web Pages 

19 


2.  Type the IP number of the device in the Address bar of your browser. For example, the 

default IP number: 


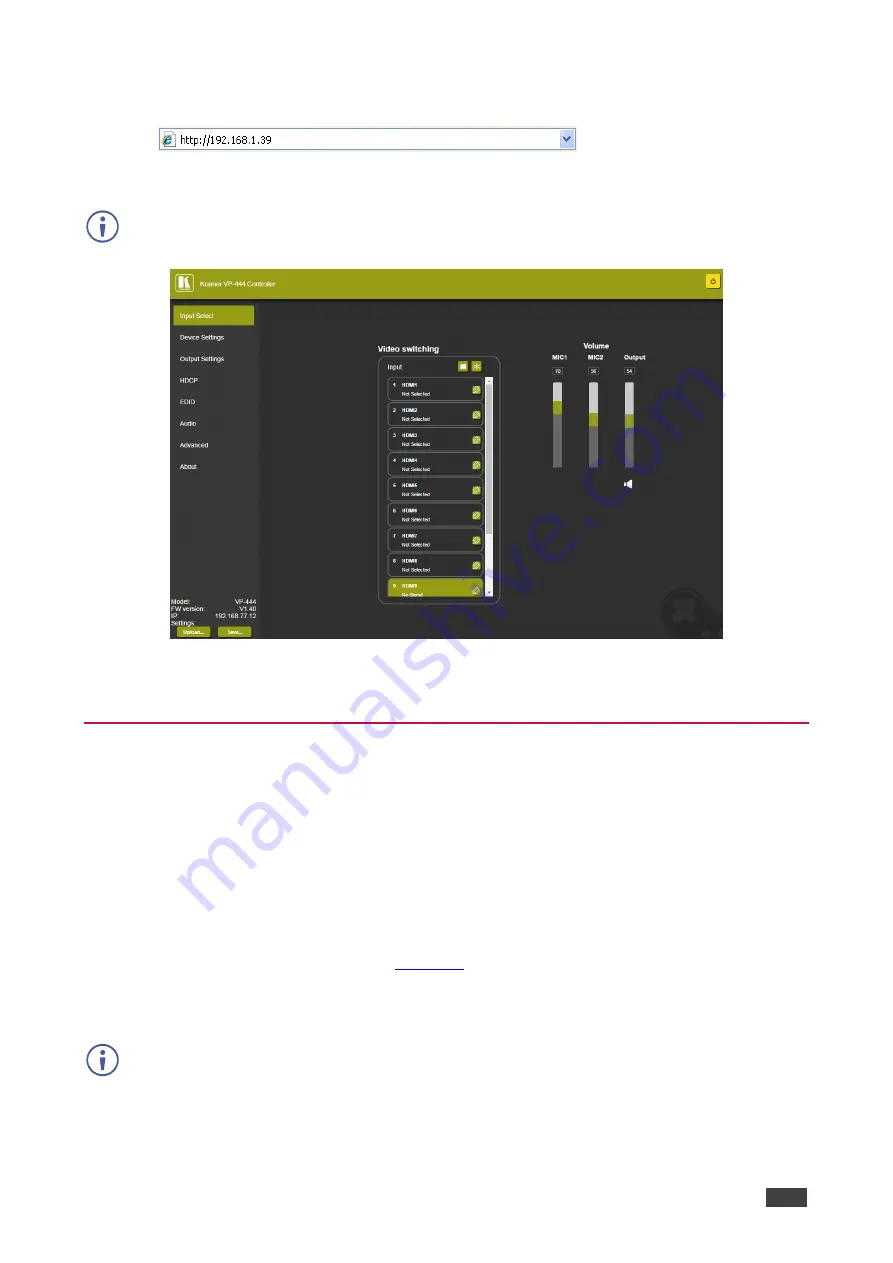
The Input Select Web page appears. 


Some features might not be supported by some mobile device operating systems. 


Figure 13: Controller Application Page with Navigation List on Left 

3.  Click the tabs on the left side of the screen to access the relevant web page. 

Loading and Saving Configurations 

VP-444 

enables you to save a configuration for easy recall in the future. 

Saving Configurations 

To save the current configuration: 

1.  Configure the device as required. 

2.  Click 

Input Select

 on the Navigation List. 

The Input Select page appears (

Figure 13

). 

3.  Click 

Save

The Save File window appears. 


When using Chrome, the file is automatically saved in the Downloads folder.  


Содержание VP-444

Страница 1: ...P N 2900 300305 Rev 9 www kramerAV com USER MANUAL MODEL VP 444 Presentation Switcher Scaler ...

Страница 2: ...g Standby Mode 20 Configuring Video Input Settings 20 Selecting Input to be Switched to Outputs 22 Freezing or Clearing Video Output 22 Adjusting Microphone and Output Volume 22 Configuring Network Settings 23 Upgrading Firmware 24 Configuring Video Output Settings 25 Configuring HDCP per Input Output 26 Managing EDID 27 Adjusting Audio Input Settings 28 Adjusting Microphone Settings 29 Configurin...

Страница 3: ...downloads VP 444 to check for up to date user manuals application programs and to check if firmware upgrades are available where appropriate Achieving the Best Performance Use only good quality connection cables we recommend Kramer high performance high resolution cables to avoid interference deterioration in signal quality due to poor matching and elevated noise levels often associated with low q...

Страница 4: ...ormance presentation scaler switcher for HDMI and computer graphics signals The unit scales the video embeds the audio and outputs the signal to two HDMI with embedded audio outputs with S PDIF and balanced stereo audio simultaneously The VP 444 features PixPerfect scaling technology Kramer s precision pixel mapping and high quality scaling technology High quality 3 2 and 2 2 pull down de interlac...

Страница 5: ...gs Control your VP 444 Directly via the front panel push buttons By RS 232 serial commands transmitted by a touch screen system PC or other serial controller Remotely from the infrared remote control transmitter with OSD on screen display Via the Ethernet with built in Web pages The VP 444 is housed in a 19 1U rack mountable enclosure with rack ears included and is fed from a 100 240 VAC universal...

Страница 6: ...ound and enabling the audio output 7 MENU Button Displays the OSD menu see Using OSD Menu on page 11 8 Navigation Buttons Press to decrease numerical values or select from several definitions When not within the OSD menu mode press to reduce the output volume Press to move up the menu list values see Using OSD Menu on page 11 Press to increase numerical values or select from several definitions Wh...

Страница 7: ... digital audio acceptor 17 Mains Socket Connect the mains power cord 18 Mains Fuse Holder Fuse for protecting the device 19 Power Switch Switch for turning the unit ON or OFF 20 HDMI OUT 1 Connector Connect to the HDMI acceptor 1 21 HDMI OUT 2 Connector Connect to the HDMI acceptor 2 22 COND DYN Switch for MIC 1 Move up to select a condenser type microphone down to select a dynamic type microphone...

Страница 8: ... before connecting any cables or power Warning Ensure that the environment e g maximum ambient temperature air flow is compatible for the device Avoid uneven mechanical loading Appropriate consideration of equipment nameplate ratings should be used for avoiding overloading of the circuits Reliable earthing of rack mounted equipment should be maintained To mount the VP 444 on a rack Attach both ear...

Страница 9: ...puts and outputs connect only those that are required To connect the VP 444 as illustrated in the example in Figure 3 do the following 1 Connect an HDMI source for example a Blu ray disk player to the HDMI VIDEO INPUT connector from 1 to 10 2 Connect a computer graphics source to the PC 1 15 pin HD VIDEO INPUT connector from 1 to 2 3 Connect the audio input signals to the AUDIO IN terminal block c...

Страница 10: ...utput The following are the pinouts for connecting the output to a balanced or unbalanced stereo audio acceptor Figure 4 Connecting the Balanced Stereo Audio Output Figure 5 Connecting an Unbalanced Stereo Audio Acceptor to the Balanced Output Microphone Pinout The microphone 6mm jack pinout for a condenser microphone Figure 6 Condenser Microphone Pinout The microphone 6mm jack pinout for a Dynami...

Страница 11: ...9 To connect to the VP 444 via RS 232 connect the RS 232 9 pin D sub rear panel port on the product unit via a 9 wire straight cable only pin 2 to pin 2 pin 3 to pin 3 and pin 5 to pin 5 need to be connected to the RS 232 9 pin D sub port on your PC ...

Страница 12: ...ns MENU ENTER and up down left and right arrow buttons RESET TO XGA 720p and PANEL LOCK buttons Auto Adjust Feature The auto adjust feature is implemented every time the input is switched to VGA or when the input resolution changes via the FINETUNE menu see MAIN MENU on page 11 Setting the Resolution to XGA 720p Press to reset the video resolution to XGA or 720p This is useful for example when the...

Страница 13: ... BEST FIT RESOLUTION Select the output resolution from the menu Output resolution Appears as Output resolution Appears as NATIVE OUT1 1680x1050 60Hz 1680x1050 60 NATIVE OUT2 1600x1200 60Hz 1600x1200 60 640x480 60Hz 640x480 60 1920x1080 60Hz 1920x1080 60 800x600 60Hz 800x600 60 1920x1200 60Hz 1920x1200 60 1024x768 60Hz 1024x768 60 480p 60Hz 720x480P 60 1280x768 60Hz 1280x768 60 720p 60Hz 1280x720P ...

Страница 14: ...ress to lessen the talkover output audio decrease level TRIGGER to determine the microphone threshold level that triggers the audio output level decrease ATTACK TIME to set the transition time of the audio level reduction after the signal rises above the threshold level HOLD TIME to define the time period talkover remains active although the signal falls below the threshold level for a short perio...

Страница 15: ...ault to have MUTE follow FREEZE Otherwise set to OFF MUTE BUTTON DEFINE Define the MUTE button to function as MUTE BLANK or BLANK AND MUTE AUTO SWITCHING MODE Set the auto switching mode to OFF AUTO SCAN default or LAST CONNECTED PRIORITY below is enabled when AUTO SCAN is selected When one of the auto switching modes is selected AUTO SCAN or LAST CONNECTED audio is enabled only when a video signa...

Страница 16: ... via a router and your IT system is based on IPv6 speak to your IT department for specific installation instructions Connecting the Ethernet Port Directly to a PC You can connect the Ethernet port of the VP 444 directly to the Ethernet port on your PC using a crossover cable with RJ 45 connectors This type of connection is recommended for identifying the VP 444 with the factory configured default ...

Страница 17: ...dow 4 Highlight either Internet Protocol Version 6 TCP IPv6 or Internet Protocol Version 4 TCP IPv4 depending on the requirements of your IT system 5 Click Properties The Internet Protocol Properties window relevant to your IT system appears Figure 9 Internet Protocol Version 4 Properties Window ...

Страница 18: ...e range 192 168 1 1 to 192 168 1 255 excluding 192 168 1 39 that is provided by your IT department Figure 11 Internet Protocol Properties Window 7 Click OK 8 Click Close Connecting the Ethernet Port via a Network Hub or Switch You can connect the Ethernet port of the VP 444 to the Ethernet port on a network hub or using a straight through cable with RJ 45 connectors Configuring the Ethernet Port Y...

Страница 19: ...he PC 1 input PC2 Select the PC 2 input XGA Reset Reset the resolution to XGA 720p Reset Reset the resolution to 720p Four navigation keys When not in the OSD the left and right arrows also control the output volume OK Press to accept changes Press also to auto adjust the picture see Auto Adjust Feature on page 10 MENU Enter the OSD menu EXIT EXIT the menu FREEZE Freeze unfreeze the output video i...

Страница 20: ...forming the following Loading and Saving Configurations on page 19 Entering Standby Mode on page 20 Configuring Video Input Settings on page 20 Selecting Input to be Switched to Outputs on page 22 Freezing or Clearing Video Output on page 22 Adjusting Microphone and Output Volume on page 22 Configuring Network Settings on page 23 Upgrading Firmware on page 24 Configuring Video Output Settings on p...

Страница 21: ...ge with Navigation List on Left 3 Click the tabs on the left side of the screen to access the relevant web page Loading and Saving Configurations VP 444 enables you to save a configuration for easy recall in the future Saving Configurations To save the current configuration 1 Configure the device as required 2 Click Input Select on the Navigation List The Input Select page appears Figure 13 3 Clic...

Страница 22: ... mode that consumes less power without having to power off Standby mode puts the device in a low power consumption mode without turning it off To toggle between standby mode and normal operation Click the power icon on the right hand side of the web pages header When in standby mode the icon displays a gray background Figure 14 The VP 444 Standby Mode Configuring Video Input Settings VP 444 enable...

Страница 23: ...at appears in the web pages 4 Click ON OFF to enable disable the HDCP decryption on the selected input If HDCP is disabled on an input an HDCP encrypted source will not pass through the unit 5 Select an Audio Source Automatic The embedded audio on the HDMI input is selected for an HDMI signal or the analog audio input is selected if the input is not HDMI for example for a DVI input signal Analog T...

Страница 24: ...learing Video Output To freeze or clear the video output do one of the following 1 Click Input Select on the Navigation List The Input Select page appears Figure 13 2 In the Video Switching area click one of the following Freezes the currently displayed video frame Clears the video output from the display the display goes blank Adjusting Microphone and Output Volume The microphones and output volu...

Страница 25: ...o configure network settings 1 Click Device Settings on the Navigation List The Device Settings page appears Figure 18 The Device Settings Page 2 Change the network settings as required and click Set changes OR Select the DHCP On check box and click Set changes A message appears asking you to confirm the setting change Figure 19 Device Settings Page Setting Change Confirmation ...

Страница 26: ...k Device Settings on the Navigation List The Device Settings page appears Figure 18 2 Under Firmware Update click Choose File A file browser appears 3 Open the required upgrade file The file name appears on the web page 4 Click Upgrade The new firmware is uploaded Figure 20 Device Settings Page Uploading the New Firmware File 5 Once the file is uploaded follow the instructions on the web page The ...

Страница 27: ...ts To configure video output settings 1 Click Output Settings on the Navigation List The Output Settings page appears Figure 23 The Output Settings Page 2 Open the Resolution drop down box and select the required output resolution or select Native OUT1 or Native OUT2 to set the output resolution to match the native resolution of the device connected to HDMI OUT1 or HDMI OUT2 The output settings in...

Страница 28: ...put is VGA in the Finetune area click Auto Adjust to automatically adjust the video output or use the slider controls to adjust the following H Position horizontal position of the video on the display screen V Position vertical position of the video on the display screen Phase Clock Configuring HDCP per Input Output VP 444 enables you to configure HDCP individually for each input output To configu...

Страница 29: ... for each of the four inputs to turn on or off the HDCP encryption for that input Managing EDID VP 444 enables you to individually configure and manage EDID settings for each of the 6 inputs To manage EDID 1 Click EDID on the Navigation List The EDID page appears Figure 25 The EDID Page 2 Under Read from click the required EDID source or click Browse to use an EDID configuration File 3 Under Copy ...

Страница 30: ...Click Close Adjusting Audio Input Settings VP 444 enables you to individually define the audio volume and source for each of the inputs To adjust audio input settings 1 Click Audio on the Navigation List The Audio page appears Figure 27 The Audio Settings Page 2 For Delay select a time value in milliseconds ...

Страница 31: ... of each of the inputs Adjusting Microphone Settings VP 444 enables you to define settings for a microphone connected to the MIC jack such as talkover mixer mode Depth and Trigger To adjust microphone settings 1 Click Audio on the Navigation List The Audio page appears see Figure 27 2 In the Mic Settings area open the drop down box and select one of the following mic modes Mixer Microphone audio p...

Страница 32: ...shuts down after about 10 seconds Slow shuts down after about 2 minutes 3 Define Auto Switching Off Disable auto switching Auto Scan Set auto scanning and select from Scan Priority below which input to begin the scanning Last connected When detecting that a source is connected to an input which previously had no signal automatically switch to that input 4 Set Scan Priority to PC or HDMI once the a...

Страница 33: ...k the PANEL LOCK button on the front panel To define the Panel Lock button 1 Click Advanced on the Navigation List The Advanced page appears 2 Define Lock Mode All Menu Only All Save Menu Only Save Viewing About Page The VP 444 About page lets you view the Web page version and Kramer Electronics Ltd details Figure 29 The About Page ...

Страница 34: ...60Hz 1080p 60Hz 576p 50Hz 720p 50Hz 1080i 50Hz 1080p 50Hz Controls HDMI 1 to HDMI 10 and PC 1 to PC 2 input selector buttons Freeze mute buttons Menu and navigation buttons Reset to XGA 720p and lock buttons RS 232 IR Ethernet OSD and Web pages USB for firmware upgrading Power Consumption 100 240V AC 22VA max Operating Temperature 0 to 40 C 32 to 104 F Storage Temperature 40 to 70 C 40 to 158 F Hu...

Страница 35: ...t to the output ports ROUTE 12 1 2 cr Input Resolutions Resolution Refresh Rate PC 1 PC 2 HDMI 1 10 640x480 60 72 75 85Hz Yes Yes 800x600 56 60 72 75 85Hz Yes Yes 1024x768 60 70 75 85Hz Yes Yes 1280x720 60Hz Yes Yes 1280x800 60Hz Yes Yes 1280x1024 60 75 85Hz Yes Yes 1366x768 60Hz Yes Yes 1400x1050 60Hz Yes Yes 1440x900 60Hz Yes Yes 1600x1200 60Hz Yes Yes 1600x900 RB 60Hz Yes Yes 1680x1050 RB 60Hz ...

Страница 36: ...ax Protocol 3000 communicates at a data rate of 9 600 baud no parity 8 data bits and 1 stop bit Host Message Format Start Address optional Body Delimiter Destination_id Message CR Simple Command Command string with only one command without addressing Start Body Delimiter Command SP Parameter_1 Parameter_2 CR Command String Formal syntax with commands concatenation and addressing Start Address Body...

Страница 37: ...and query For machine response Device address Optional for K NET K NET Device ID followed by Query sign follows some commands to define a query request Message closing character CR For host messages carriage return ASCII 13 CRLF For machine messages carriage return ASCII 13 line feed ASCII 10 Command chain separator character When a message string contains more than one command a pipe character se...

Страница 38: ...th 64 characters Kramer Protocol 3000 Command List Command Short Form Description Protocol handshaking HELP List of commands BUILD DATE Read device build date FACTORY Reset to factory default configuration MODEL Read device model PROT VER Read device protocol version RESET Reset device VERSION Read device firmware version SN Get serial number MENU CMD Switch audio and video NET MAC NTMC Get MAC ad...

Страница 39: ...IO DELAY Set the scaler audio delay SCLR AUDIO DELAY Get the scaler audio delay MIC GAIN Set the microphone gain MIC GAIN Get the microphone gain TLK Set audio talkover mode status TLK Get audio talkover mode status MIC TLK Set microphone talkover parameters MIC TLK Get microphone talkover parameters STANDBY Set Standby mode STANDBY Get Standby mode status MIC SELECT Select the microphone MIC SELE...

Страница 40: ...0 67 1080P 25Hz 16 800x600 85 51 1680x1050 RB 60 68 1080P 50Hz 19 1024x768 60 54 1920x1200 RB 60 69 1080P 60Hz 20 1024x768 70 56 1280x800 60 71 1080P 30Hz 22 1024x768 75 58 480I 72 No signal 23 1024x768 85 59 480P 255 UNSUPPORTED Output Resolutions Key Number Resolution Number Resolution 200 640x480 60Hz 212 1920x1080 60Hz 201 800x600 60Hz 213 1920x1200 60Hz 202 1024x768 60Hz 214 480p 60Hz 203 128...

Страница 41: ...aster products use this command to identify the availability of a device HELP Function Permission Transparency Set Get HELP End User Description Syntax Set Get Get command list or help for specific command 2 options 1 HELP 2 HELP command_name BUILD DATE Function Permission Transparency Set BUILD DATE End User Get Description Syntax Set Read device build date BUILD DATE Get Response nn BUILD DATE d...

Страница 42: ...user data from the device The deletion can take some time MODEL Function Permission Transparency Set Get MODEL End User Description Syntax Set Get Get device model MODEL Response nn MODEL model_name Parameters model_name String of up to 19 printable ASCII chars PROT VER Function Permission Transparency Set Get PROT VER End User Description Syntax Set Get Get protocol version PROT VER Response nn P...

Страница 43: ...nd If the port was locked disconnect and reconnect the cable to reopen the port VERSION Function Permission Transparency Set Get VERSION End User Description Syntax Set Get Get version number VERSION Response nn VERSION firmware_version Parameters firmware_version Format XX XX XXXX where the digits group are major minor build version SN Function Permission Transparency Set Get SN End User Public D...

Страница 44: ... Permission Transparency Set Get NET MAC End User Description Syntax Set Get Get MAC address NET MAC Response nn NET MAC mac_address Parameters mac_address Unique MAC address Format XX XX XX XX XX XX where X is hex digit NET IP Function Permission Transparency Set NET IP Administrator Get NET IP End User Description Syntax Set Set device IP address NET IP P1 Get Get device IP address NET IP Respon...

Страница 45: ...the device via another network and maybe over the Internet Be careful of security problems For proper settings consult your network administrator NET MASK Function Permission Transparency Set NET MASK Administrator Get NET MASK End User Description Syntax Set Set device subnet mask NET MASK net_mask Get Get device subnet mask NET MASK Response Set nn NET MASK P1 OK Get nn NET MASK net_mask Paramet...

Страница 46: ...ssigned IP by DHCP specify the device DNS name if available using the command NAME You can also get an assigned IP by direct connection to USB or RS 232 protocol port if available For proper settings consult your network administrator ROUTE Function Permission Transparency Set ROUTE End User Get ROUTE End User Description Syntax Set Set layer routing ROUTE P1 P2 P3 Get Get layer routing ROUTE P1 P...

Страница 47: ...s After execution response is sent to the com port from which the Get was received Response is sent after every change in output HPD status ON to OFF Response is sent after every change in output HPD status OFF to ON and ALL parameters new EDID etc are stable and valid LOCK FP Function Permission Transparency Set LOCK FP End User Get LOCK FP End User Description Syntax Set Lock front panel LOCK FP...

Страница 48: ...d HDCP OFF HDCP support changes following detected sink MIRROR OUTPUT VID RES Function Permission Transparency Set VID RES End User Public Get VID RES End User Public Description Syntax Set Set video resolution VID RES P1 P2 P3 P4 Get Get video resolution VID RES P1 P2 P3 Response nn VID RES P1 P2 P3 P4 Parameters P1 1 Output P2 1 Scaler P3 0 Off P4 video resolutions 200 223 see Input Resolutions ...

Страница 49: ...tus VFRZ P1 Response Set Get nn VFRZ P1 P2 Parameters P1 Scaler number 1 Scaler P2 Off On 0 Off 1 On AUD LVL Function Permission Transparency Set AUD LVL End User Public Get AUD LVL End User Public Description Syntax Set Set audio level in specific amplifier stage AUD LVL stage channel volume Get Get audio level in specific amplifier stage AUD LVL stage channel Response nn AUD LVL stage channel vo...

Страница 50: ...ress device menu and similar or genlock status was changed Notes Mutes the selected audio output AUD EMB Function Permission Transparency Set AUD EMB End User Public Get AUD EMB End User Public Description Syntax Set Set audio in video embedding status AUD EMB in out status Get Get audio in video embedding status AUD EMB in out Response Set Get nn AUD EMB in out status Parameters in audio input to...

Страница 51: ...n press device menu and similar or genlock status was changed Notes Sets the Auto Sync features for the selected Scaler IMAGE PROP Function Permission Transparency Set IMAGE PROP End User Public Get IMAGE PROP End User Public Description Syntax Set Set the image size IMAGE PROP P1 Get Get the image size IMAGE PROP P1 P6 Response Set Get nn IMAGE PROP P1 P2 Parameters P1 Scaler number 1 Scaler P2 S...

Страница 52: ... Transparency Set SCLR AUDIO DELAY End User Public Get SCLR AUDIO DELAY End User Public Description Syntax Set Set the scaler audio delay SCLR AUDIO DELAY P1 P2 Get Get the scaler audio delay SCLR AUDIO DELAY P1 Response Set Get nn SCLR AUDIO DELAY P1 P2 Parameters P1 Audio output number 1 Scaler P2 Level selection 0 Off 1 40ms 2 110ms 3 150ms Response triggers Response is sent to the com port fro...

Страница 53: ...alue decrease current value Response Triggers Response is sent to the com port from which the Set before execution Get command was received After execution response is sent to all com ports if CMD NAME was set any other external control device button press device menu and similar or genlock status was changed Notes Sets the Microphone input audio gain TLK Function Permission Transparency Set TLK E...

Страница 54: ...ue in corresponding to P1 units Depth 0 100 Trigger 0 100 60dB 40dB Attack Hold Release time 0 200 0 2 sec STANDBY Function Permission Transparency Set STANDBY End User Public Get STANDBY End User Public Description Syntax Set Set Standby mode STANDBY on_off Get Get Standby mode status STANDBY Response nn STANDBY value Parameters on_off 0 Off 1 On MIC SELECT Function Permission Transparency Set MI...

Страница 55: ...be insured during shipment with the insurance and shipping charges prepaid by you If this product is returned uninsured you assume all risks of loss or damage during shipment Kramer Electronics will not be responsible for any costs related to the removal or re installation of this product from or into any installation Kramer Electronics will not be responsible for any costs related to any setting ...

Страница 56: ...and a list of Kramer distributors visit our Web site where updates to this user manual may be found We welcome your questions comments and feedback The terms HDMI HDMI High Definition Multimedia Interface and the HDMI Logo are trademarks or registered trademarks of HDMI Licensing Administrator Inc All brand names product names and trademarks are the property of their respective owners ...

Отзывы: