background image

Your VA-2002 Multistandard Logo Generator 


5

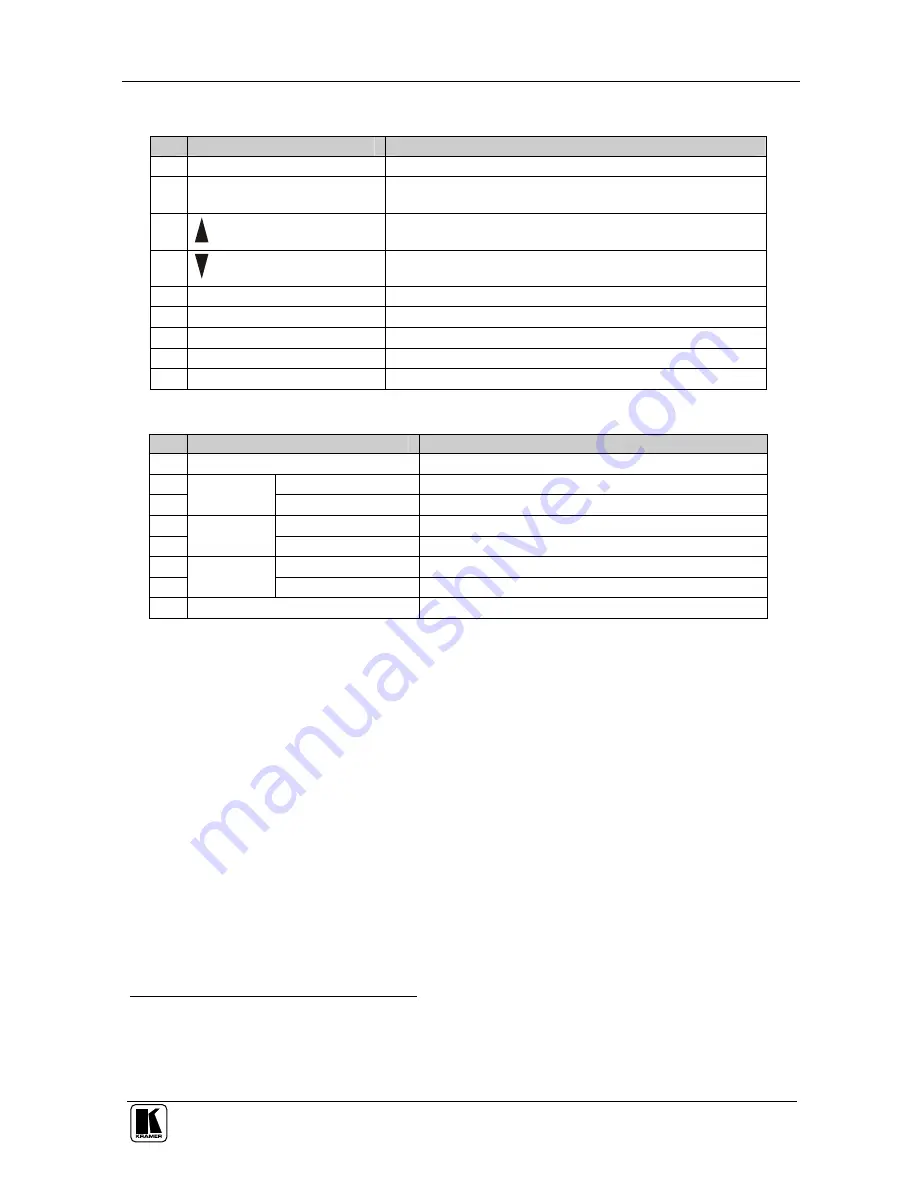
Table 1: Front Panel VA-2002 Multistandard Logo Generator Features 

Feature 

Function 

POWER 

Switch 

Illuminated switch for turning the unit ON or OFF 

LCD Display Screen 

Displays relevant data (default) or the Main Menu (when the OK 

button or the ESC button are pressed) 

Button 

Moves up one step in the LCD display screen 

Button 

Moves down one step in the LCD display screen 

OK

 Button 

Press to confirm a command 

ESC

 Button 

Press to stop the execution of a command 

INSERT

 Button 

Press to turn the logo On or Off

1


Floppy Disk Drive Green LED 

Lights when reading data from a floppy disk 

Floppy Disk Drive 

Insert a floppy disk in the floppy disk drive to transfer a logo 

Table 2: Rear Panel VA-2002 Multistandard Logo Generator Features 

Feature 

Function 

10 

RS-232

 DB 9 Connector


Connects to PC or Serial Controller 

11 

CV

 BNC Connector 

Connects to the composite video monitor

2


12 

MONITOR 

Y/C 4p

 Connector 

Connects to the s-Video monitor

2


13 

CV

 BNC Connector 

Connects to the composite video acceptor 

14 

OUTPUT 

Y/C 4p

 Connector 

Connects to the s-Video acceptor 

15 

CV

 BNC Connector 

Connects to the composite video source 

16 

INPUT 

Y/C 4p

 Connector 

Connects to the s-Video source 

17 

Power Connector with 

FUSE 

AC connector enabling power supply to the unit 


1 When displaying the logo, the INSERT button illuminates (after blinking momentarily) 
2 When previewing a logo at a local monitor (composite video and/or s-Video), the logo only appears at these MONITOR 
outputs,  and  not  at  the  OUTPUT  connectors.  You  can  set  the  MONITOR  outputs  to  function  as  an  additional  pair  of 
OUTPUT connectors (see section 9.1) 

Содержание VA-2002

Страница 1: ...Kramer Electronics Ltd USER MANUAL Model VA 2002 Multistandard Logo Generator...

Страница 2: ...mote Control Program 19 9 2 Controlling the VA 2002 from the Remote Control Program 21 9 2 1 Controlling Logos 21 9 2 2 Checking Information 21 9 3 Transferring a Logo via RS 232 21 10 Operating via t...

Страница 3: ...Set Transparency Box 18 Figure 17 Select Fade Speed Box 18 Figure 18 VA 2002 Disconnected Remote Control Window 19 Figure 19 COM Port Window 20 Figure 20 Active VA 2002 Remote Control Window 20 Figur...

Страница 4: ...02 Multistandard Logo Generator Power cord VA 2002 CD ROM that includes two Windows based programs a Logo Finalizer and Upload program and a Remote Control program as well as a copy of this user manua...

Страница 5: ...ection 8 1 Set the position for the logo on screen see section 8 1 Set transparency optional see section 8 2 Set fade speed optional see section 8 3 Save a VA 2002 Project file with the LPJ extension...

Страница 6: ...panel LCD window with push buttons for navigation and control An RS 232 port for logo selection control and transfer to the VA 2002 Your VA 2002 is computer independent you only need a computer to cre...

Страница 7: ...KRAMER SIMPLE CREATIVE TECHNOLOGY Your VA 2002 Multistandard Logo Generator 4 Figure 1 VA 2002 Multistandard Logo Generator...

Страница 8: ...Table 2 Rear Panel VA 2002 Multistandard Logo Generator Features Feature Function 10 RS 232 DB 9 Connector Connects to PC or Serial Controller 11 CV BNC Connector Connects to the composite video monit...

Страница 9: ...protection and supply wiring Refer to the appropriate nameplate ratings for information For example for fuse replacement see the value printed on the product label 5 The machine is earthed grounded in...

Страница 10: ...example a display 6 Connect the Y C 4p MONITOR connector to an s Video acceptor for example a display 7 Connect the power cord not shown in Figure 2 8 If required connect a PC2 for use with the VA 20...

Страница 11: ...KRAMER SIMPLE CREATIVE TECHNOLOGY Connecting the VA 2002 Multistandard Logo Generator 8 Display Display Figure 2 Connecting the VA 2002 Multistandard Logo Generator...

Страница 12: ...the VA 2002 software 1 Insert the VA 2002 CD ROM in the CD ROM drive The splash screen appears as follows Figure 3 VA 2002 Splash Screen 2 Click Install Remove Software The Welcome window appears Fig...

Страница 13: ...Target Directory window appears with C Program Files VA 2002 selected as the default1 Figure 5 Target Directory Window 4 Click Next The Start Menu window appears as Figure 6 illustrates Figure 6 Start...

Страница 14: ...data is copied to your system as Figure 7 illustrates and an installation complete window appears as Figure 8 illustrates Figure 7 Installation Window Figure 8 Installation Complete 6 Click Finish A...

Страница 15: ...dd transparency to a logo see section 8 3 Set the Fade Speed see section 8 4 Table 3 defines the toolbar buttons Table 3 VA 2002 Logo Finalizer and Upload Program Toolbar Buttons This button Has this...

Страница 16: ...e height should not exceed 236 pixels since 360 multiplied by 236 equals 84 960 almost the 85 000 limit A width of 291 pixels and a height of 292 pixels is also applicable because when multiplied the...

Страница 17: ...window opens displaying a background screen3 as Figure 10 illustrates Figure 10 Unnamed VA 2000 Window 2 From the Logo menu click the Load command and choose a bitmap file4 as Figure 11 illustrates 1...

Страница 18: ...reen as a VA 2002 Project file1 with the file name extension lpj optional when saving a logo to a floppy disk2 5 You can move the bitmap to a different location on the screen by dragging it with the m...

Страница 19: ...nter Right Side of the Screen 6 Add transparency to the logo if required as section 8 3 describes and select the fade speed if required as section 8 4 describes 7 From the File menu select the CreateL...

Страница 20: ...1 that describe how to load a logo 8 3 Adding Transparency to a Logo Add transparency to an inserted logo to enable the viewer to see what is being broadcast behind that logo Generating a solid logo o...

Страница 21: ...color zoom in and then choose the corresponding pixels with the mouse 8 4 Setting the Fade Speed Select the Fade Speed to set whether the logo will appear quickly or slowly To select the Fade Speed us...

Страница 22: ...tor from your PC via RS 232 do the following 1 Connect the RS 232 DB9 port on your PC to the RS 232F DB9 rear panel port2 on the VA 2002 using a flat cable3 Do not use a null modem adapter 2 Start the...

Страница 23: ...2002 Remote Control window as Figure 20 illustrates Figure 20 Active VA 2002 Remote Control Window 5 Click the Preferences tab1 to select the input source composite video or s Video and the video stan...

Страница 24: ...use the VA 2002 Remote Control program to check Information about the logo such as the size or memory by clicking the Info button on the Logo Info tab System information such as the total memory avai...

Страница 25: ...rates Figure 23 Selecting a Project File 3 Click open Progress bar messages appear simultaneously on both your PC monitor1 and on the LCD Display screen2 on the front panel3 of the VA 2002 Multistanda...

Страница 26: ...ERT button to turn the logo On or Off An ESC button to stop the execution of a command An OK button to confirm a command UP and DOWN buttons for moving up or down one step in the Main Menu 10 1 Identi...

Страница 27: ...10 2 4 10 2 1 Selecting a Logo from the Main Menu To select a logo from the Main Menu 1 Press the OK button or the ESC button The Main Menu appears as Figure 27 illustrates Figure 27 Main Menu Select...

Страница 28: ...2 2 4 10 2 2 1 Loading a Logo from the Main Menu To load a logo that is transfer a new logo from a floppy disk 1 Press the OK button or the ESC button The Main Menu appears as Figure 27 illustrates 2...

Страница 29: ...ice The Edit Delete logo screen appears 5 Press the OK button and select the logo for deletion using the UP and DOWN buttons 6 Press the OK button and confirm the deletion choosing Yes using the UP an...

Страница 30: ...pears 4 Press the UP and DOWN buttons to access the screen with the system information that you require1 The system information screens display in the following order Serial number Operating system Nu...

Страница 31: ...ess the OK button Press the DOWN button and then the OK button again choosing Yes 11 Technical Specifications Table 4 includes the technical specifications Table 4 Technical Specifications 3 of the VA...

Страница 32: ...riginal dated invoice or a copy must be presented as proof of warranty coverage and should be included in any shipment of the product Please also include in any mailing a contact name company address...

Страница 33: ...or the latest information on our products and a list of Kramer distributors visit our Web site www kramerelectronics com where updates to this user manual may be found We welcome your questions commen...

Отзывы: