


114
Reception
Do not touch the TRITON-Rack’s switches or turn off
the power while data is being received.
After a data dump is received, the TRITON-Rack will
require up to 16 seconds to process the data and write it
into memory. During this time, the display will indicate
“Now writing into internal memory.” While this dis-
play is shown, you must under no circumstances turn
off the power of the TRITON-Rack. If the power is
turned off during this time, the TRITON-Rack may fail
to operate correctly when the power is turned on again.
If this occurs, hold down the [MENU] key and the [9]
key while you turn on the power. However when this is
done, the contents of memory will be initialized.
Transmission and reception of MIDI data is also impos-
sible during this time. When receiving multiple data
dumps in succession, you must allow an interval
between the transmission of each data dump.
While the TRITON-Rack is writing the data into mem-
ory, transmission of Active Sensing (FEh) messages
from the MIDI OUT connector will stop.
Data dump reception procedure
1
Connect the TRITON-Rack and the device that will
receive the data dump.
If you are using a computer that is able to transmit MIDI
exclusive data, connect the computer’s MIDI interface
(connected to the computer) to the MIDI IN connector of
the TRITON-Rack. (
If you are using a MIDI data filer, connect the MIDI OUT
connector of the data filer to the MIDI IN connector of the
TRITON-Rack.
2
Set the MIDI channel of the MIDI device to match the
global MIDI channel “MIDI Channel” (2.1–1a) of the TRI-
TON-Rack. If data that was previously transmitted to the
MIDI device is now going to be received again by the
TRITON-Rack, set the global MIDI channel of the TRI-
TON-Rack to the same global MIDI channel setting that
was used when transmitting the data.
To set the MIDI channel of the transmitting device, refer
to the owner’s manual for that device.
3
Turn check the “Exclusive” setting (2.1–1b).
4
Transmit the data from the other device. For the proce-
dure, refer to the owner’s manual for the device you are
using.
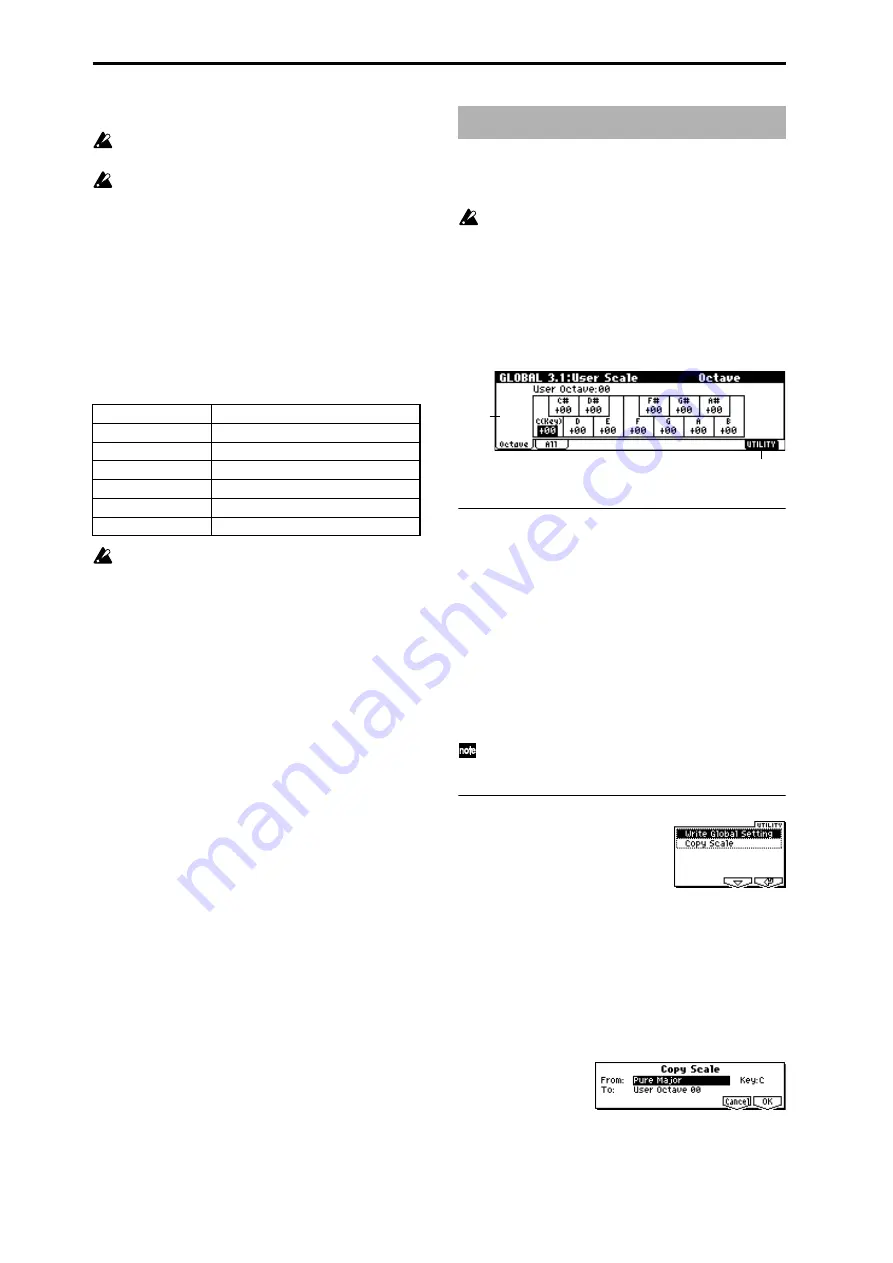
Here you can create sixteen User Octave Scales and one User
All Notes Scale. The user scales you create here can be
selected in the PROG 2.1–1, COMBI 3.2–1, MULTI 3.2–1.
If you wish to keep an edited user scale after the power
is turned off, be sure to write (save) your settings.
This data is written by the Utility “Write Global Set-
ting.” Alternatively, you can press the [WRITE] key to
access the Write Global Setting dialog box, and press
the [F8] (“OK”) key to write the edited data.
3.1–1: Octave
3.1–1a: User Octave Scale
User Octave
[User Octave 00...15]
Select the user octave scale that you wish to edit.
Tune
[–99…+99]
Specifies the scale for one octave of notes.
When you adjust the pitch of each note in the octave (C–B)
in one-cent steps, your settings will be applied to all octaves.
This adjustment is relative to equal temperament.
A setting of –99 lowers the pitch approximately a semitone
below normal pitch.
A setting of +99 raises the pitch approximately a semitone
above normal pitch.
You can select the key by holding down the [ENTER]
key and playing a note on your connected keyboard.
■
3.1–1b: UTILITY
☞
“Write Global Setting” (1.1–1d)
For details on how to select the desired utility function, refer
to “PROG 1.1–1d: UTILITY.”
Copy Scale
This command copies a preset scale or user scale to the user
scale that you wish to edit. For details on the preset scales,
refer to “Type” (PROG 2.1–1c).
1
Select “Copy Scale” to access the dialog box.
Type of data dumped
Processing time for writing into memory
One Combination Bank
Approximately 4–8 seconds
One Program Bank
Approximately 4–8 seconds
All Drum Kits
Approximately 16 seconds
All Arpeggio Patterns
Approximately 4 seconds
Global Setting
Approximately 4 seconds
Multi
Approximately 1 seconds
GLOBAL 3.1: User Scale
3.1–1a
3.1–1b


